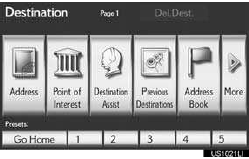
Destination search
1 Press the тАЬDESTтАЭ button.
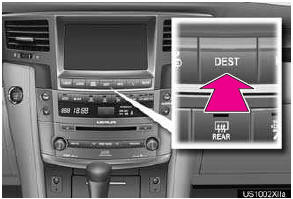
2 This screen is displayed.
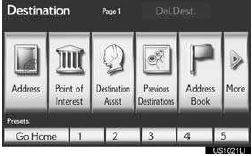
●One of 11 different methods can be used to search a destination.
INFORMATION
● When searching a destination, the response to the screen button may be slow.
SELECTING THE SEARCH AREA
The selected state (province) can be changed to set a destination from a dif- ferent state (province) by using тАЬAddressтАЭ, тАЬPoint of InterestтАЭ or тАЬIntersection & FreewayтАЭ.
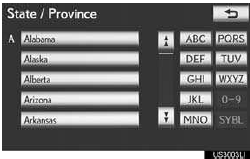
1 Touch тАЬChange State/ProvinceтАЭ to display a list of the states/provinces/ter- ritories of the United States and Cana- da.
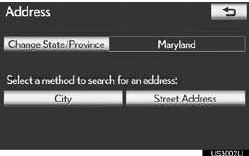
● For map database information and
updates, see тАЬMAP DATABASE VER-
SION AND COVERAGE AREAтАЭ
● If a state (province) has not been
selected yet, тАЬSelect State/ProvinceтАЭ is
displayed
2 Touch the desired state (province).
● The previous screen will be displayed.
DESTINATION SEARCH BY HOME
1 Press the тАЬDESTтАЭ button.
2 Touch тАЬGo HomeтАЭ.
● Your home address is set as the destination.
The navigation system performs a search for the route.
3 Touch тАЬOKтАЭ.
● To use this function, it is necessary to set a home address.
INFORMATION
● If a home address has not been regis-
tered, a message confirming if it is desir-
able to set a home will be displayed, and
the setting screen will appear.
● Guidance starts from the current position
to the set home address if тАЬOKтАЭ is
touched even while driving.
DESTINATION SEARCH BY PRESET DESTINATIONS
1 Press the тАЬDESTтАЭ button.
2 Touch any of the preset destination but-
tons (1-5) on the тАЬDestinationтАЭ screen.
● The selected preset destination point is set as the destination. The navigation system performs a search for the route.
3 Touch тАЬOKтАЭ.
● To use this function, it is necessary to set preset destinations to the preset screen buttons (1-5).
INFORMATION
● If a preset destination point has not been
registered, a message confirming if it is
desirable to set a preset destination will
be displayed, and the setting screen will
appear.
● Guidance starts from the current position
to the preset destination point if тАЬOKтАЭ is
touched even while driving.
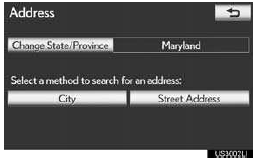
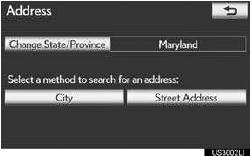
DESTINATION SEARCH BY тАЬAddressтАЭ
There are 2 methods to search a desti- nation by address:
(a) Search by city
(b) Search by street address
1 Press the тАЬDESTтАЭ button.
2 Touch тАЬAddressтАЭ on the тАЬDestinationтАЭ
screen.
3 Touch a screen button to select the de-
sired search method.
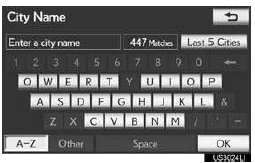
SELECTING A CITY TO SEARCH
1 Press the тАЬDESTтАЭ button.
2 Touch тАЬAddressтАЭ on the тАЬDestinationтАЭ
screen.
3 Touch тАЬCityтАЭ.
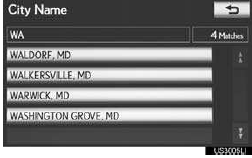
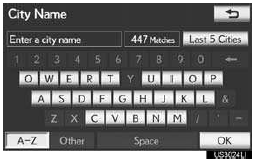
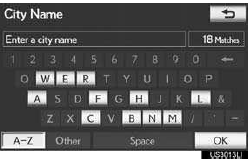
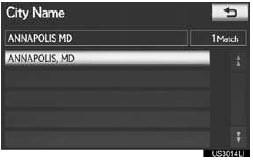
4 Input a city name.
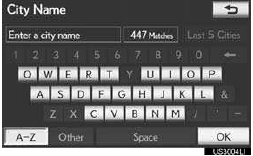
5 Touch the screen button of the desired city name from the displayed list.
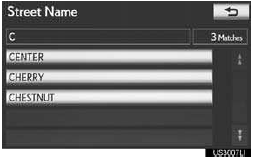
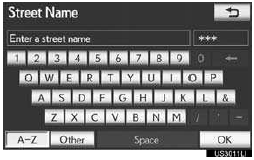
6 Input the street name and touch тАЬOKтАЭ.
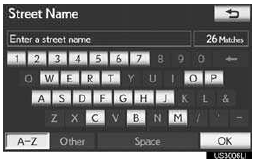
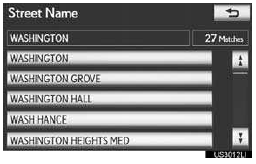
7 When the desired street name is found, touch the corresponding screen button.
тАв When the desired street name is selected, the тАЬConfirm DestinationтАЭ screen may be displayed. If тАЬGoтАЭ is touched on the тАЬCon- firm DestinationтАЭ screen, the navigation system performs a search for the route.
8 Input a house number.
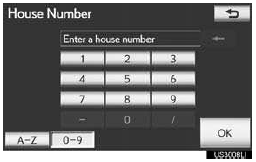
тАв If the same address exists in more than one city, the current screen changes to the address list screen.
■SEARCHING FROM THE LAST 5 CITIES
1 Touch тАЬLast 5 CitiesтАЭ.
2 Touch the screen button of the desired city name from the displayed list.
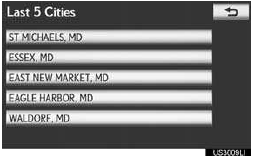
тАв The current screen changes to the screen for inputting a street name.
INFORMATION
● If the navigation system has never been used, this function will not be available.
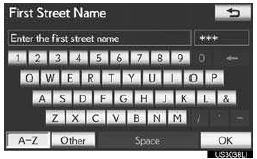
SEARCH BY STREET ADDRESS
1 Press the тАЬDESTтАЭ button.
2 Touch тАЬAddressтАЭ on the тАЬDestinationтАЭ
screen.
3 Touch тАЬStreet AddressтАЭ.
4 Touch numbers directly on the screen to input the house number.
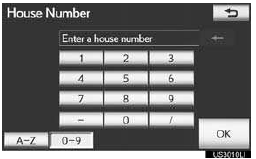
●After inputting the house number, touch тАЬOKтАЭ to display the screen for inputting the street name.
5 Input the street name and touch тАЬOKтАЭ.
6 When the desired street name is found, touch the corresponding screen button.
●When the desired street name is selected,
the тАЬConfirm DestinationтАЭ screen may be
displayed. If тАЬGoтАЭ is touched on the тАЬCon-
firm DestinationтАЭ screen, the navigation
system performs a search for the route.
● If the same address exists in more than 1
city, a screen requesting the city name to be
input or selected will be displayed.
7 Input a city name.
8 Touch the screen button of the desired city name from the displayed list.
INFORMATION
● A street name can be searched using
only the body part of its name.
● For example: S WESTERN AVE
тАв A search can be performed by inputting
тАЬS WESTERN AVEтАЭ, тАЬWESTERN AVEтАЭ
or тАЬWESTERNтАЭ.
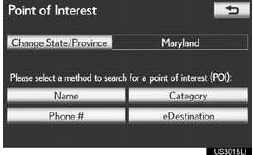
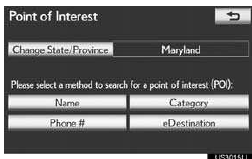
DESTINATION SEARCH BY тАЬPoint of InterestтАЭ
There are 4 methods to search a desti- nation by Points of Interest:
(a) Search by name
(b) Search by category
(c) Search by phone #
(d) Search by eDestination
1 Press the тАЬDESTтАЭ button.
2 Touch тАЬPoint of InterestтАЭ on the тАЬDesti-
nationтАЭ screen.
3 Touch a screen button to select the de-
sired search method.
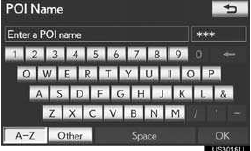
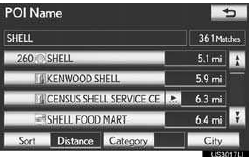
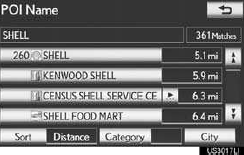
SEARCH BY тАЬNameтАЭ
1 Press the тАЬDESTтАЭ button.
2 Touch тАЬPoint of InterestтАЭ on the тАЬDesti-
nationтАЭ screen.
3 Touch тАЬNameтАЭ on the тАЬPoint of InterestтАЭ
screen.
4 Input the name of the POI.
5 Touch the screen button of the desired destination.

тАвWhen the desired destination is
selected,
the тАЬConfirm DestinationтАЭ screen may be
displayed. If тАЬGoтАЭ is touched on the тАЬCon-
firm DestinationтАЭ screen, the navigation
system performs a search for the route.
тАвWhen inputting the name of a specific Point
of Interest, and there are 2 or more sites
with the same name, the list screen is dis-
played.
6 Touch the screen button of the desired destination.
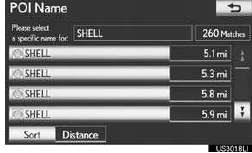
тАв If the same name exists in more than one city, a search can be performed more easily using тАЬCityтАЭ or тАЬCategoryтАЭ.
тАв The desired Point of Interest can be dis- played on the map screen.
INFORMATION
● To search for a facility name using multi- ple search words, put a space between each word.
■SELECTING A CITY TO SEARCH
1 Touch тАЬCityтАЭ.
2 Input the city name.
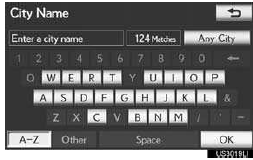
● To cancel the city setting, touch тАЬAny CityтАЭ.
3 Touch the screen button of the desired city name from the displayed list.

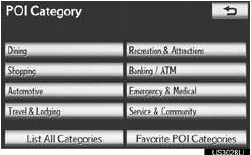
■SELECTING FROM THE CATEGORIES
1 Touch тАЬCategoryтАЭ.
2 Touch the screen button of the desired category.

● If the desired POI category is on the
screen, touch its screen button to display a
detailed list of the POI category.
● If the desired POI category is not on the
screen, touch тАЬList All CategoriesтАЭ to list
all POI categories.
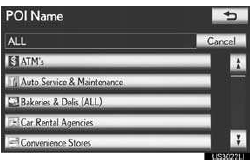
● When the desired category is touched, the POI name list screen is displayed.
SEARCH BY тАЬCategoryтАЭ
The destination can be set by touching the search point and the POI category.
1 Press the тАЬDESTтАЭ button.
2 Touch тАЬPoint of InterestтАЭ on the тАЬDesti-
nationтАЭ screen.
3 Touch тАЬCategoryтАЭ.
4 This screen is displayed.
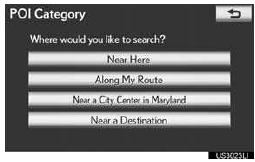
● Set the search point by one of the following
methods:
тАв Set the search point from near the current
position
тАв Set the search point from along the
selected route
тАв Set the search point from near a city cen-
ter
тАв Set the search point from near a destina-
tion
INFORMATION
● The names of POIs located within approximately 200 miles (320 km) from the selected search point can be dis- played.
■SETTING THE SEARCH POINT FROM NEAR HERE
1 Touch тАЬNear HereтАЭ.
● The search point is set at the current posi- tion, and the тАЬPOI CategoryтАЭ screen will be displayed.
■SETTING THE SEARCH POINT FROM ALONG MY ROUTE
1 Touch тАЬAlong My RouteтАЭ.
● The search point is set and the тАЬPOI Cate- goryтАЭ screen will be displayed.
■SETTING THE SEARCH POINT FROM NEAR CITY CENTER
1 Touch тАЬNear a City Center in XX*тАЭ.
2 Input the city center name.
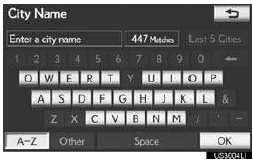
3 Touch the screen button of the desired city center name.
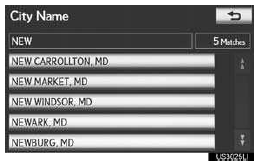
● The search point is set and the тАЬPOI Cate- goryтАЭ screen will be displayed.
■SELECTING FROM THE LAST 5 CITIES
1 Touch тАЬNear a City Center in XX*тАЭ.
2 Touch тАЬLast 5 CitiesтАЭ.
3 Touch the screen button of the desired city center name.

● The search point is set and the тАЬPOI Cate- goryтАЭ screen will be displayed.
*: XX represents the selected search area name.
■SETTING THE SEARCH POINT FROM NEAR A DESTINATION
1 Touch тАЬNear a DestinationтАЭ.
2 Touch the screen button of the desired
destination.
● The search point is set and the тАЬPOI Cate- goryтАЭ screen will be displayed.
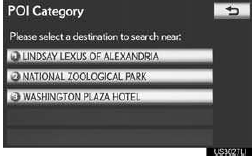
■TO SEARCH FOR POIs NEAR THE SEARCH POINT
When the search point is set, the тАЬPOI CategoryтАЭ screen will be displayed.
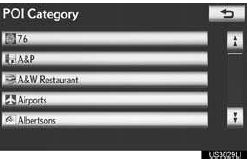
1 Touch the desired POI category.
● If the desired POI category is not on the
screen, touch тАЬList All CategoriesтАЭ to list
all POI categories.
● If тАЬFavorite POI CategoriesтАЭ is touched, a
search can be performed using the 6 POIs
that have been previously set. For more
details.
2 Touch the desired POI category from the list.
3 Touch the screen button of the desired item.

● When the desired item is selected, the тАЬConfirm DestinationтАЭ screen may be dis- played. If тАЬGoтАЭ is touched on the тАЬConfirm DestinationтАЭ screen, the navigation system performs a search for the route.
SEARCH BY тАЬPhone #тАЭ
1 Press the тАЬDESTтАЭ button.
2 Touch тАЬPoint of InterestтАЭ on the тАЬDesti-
nationтАЭ screen.
3 Touch тАЬPhone #тАЭ on the тАЬPoint of Inter-
estтАЭ screen.
4 Input a phone number.
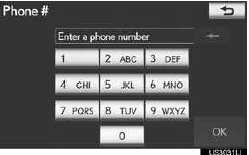
5 After inputting a phone number, touch тАЬOKтАЭ.
● When a phone number is input, the тАЬCon- firm DestinationтАЭ screen may be displayed.
If тАЬGoтАЭ is touched on the тАЬConfirm Destina-
tionтАЭ screen, the navigation system per-
forms a search for the route.
● If there is more than one site with the same
number, the following screen will be dis-
played.
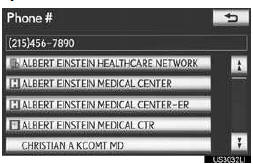
● To set an address book entry as a desti- nation using the phone number, the num- ber must already be registered with the address book entry.
INFORMATION
● If there is no match for the phone number input, a list of identical numbers with dif- ferent area codes will be displayed.
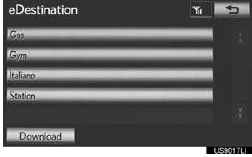
SEARCH BY тАЬeDestinationтАЭ
1 Press the тАЬDESTтАЭ button.
2 Touch тАЬPoint of InterestтАЭ on the тАЬDesti-
nationтАЭ screen.
3 Touch тАЬeDestinationтАЭ on the тАЬPoint of
InterestтАЭ screen.
● With the eDestination feature, you can go online, via the Lexus.com ownerтАЩs Web site, to select and organize destinations of your choice and then wirelessly send them to your vehicleтАЩs navigation system. You can store up to 200 locations online to access and update at any time. Your locations can be organized into up to 20 folders
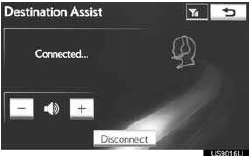
DESTINATION SEARCH BY тАЬDestination AssistтАЭ
1 Press the тАЬDESTтАЭ button.
2 Touch тАЬDestination AssistтАЭ on the
тАЬDestinationтАЭ screen.
● Destination Assist provides you with live assistance for finding destinations via the Lexus Enform with Safety Connect response center. You can request either a specific business, address, or ask for help locating your desired destination by cate- gory, such as restaurants, gas stations, shopping centers or other points of interest (POI). After you tell the agent your choice of destination, its coordinates are sent wire- lessly to your vehicleтАЩs navigation system.
1 Press the тАЬDESTтАЭ button.
2 Touch тАЬPrevious DestinationsтАЭ on the
тАЬDestinationтАЭ screen.
3 Touch the screen button of the desired
destination.

● The previous starting point and up to 100
previously set destinations are displayed on
the screen.
тАЬDeleteтАЭ: Touch to delete the previous des-
tination.
● When the desired destination is selected,
the тАЬConfirm DestinationтАЭ screen may be
displayed. If тАЬGoтАЭ is touched on the тАЬCon-
firm DestinationтАЭ screen, the navigation
system performs a search for the route.
● The list of previous destinations can also be deleted by touching тАЬDelete Previous Dest.тАЭ on the тАЬNavigation SettingsтАЭ screen when the vehicle is stopped
DESTINATION SEARCH BY тАЬAddress BookтАЭ
1 Press the тАЬDESTтАЭ button.
2 Touch тАЬAddress BookтАЭ on the тАЬDestina-
tionтАЭ screen.
3 Touch the screen button of the desired
address book entry.
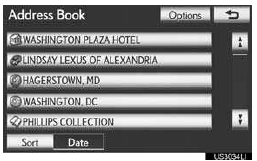
● A list of registered address book entries is displayed.
тАЬOptionsтАЭ: Touch to register or edit address book entries.
● When the desired address book entry is selected, the тАЬConfirm DestinationтАЭ screen may be displayed. If тАЬGoтАЭ is touched on the тАЬConfirm DestinationтАЭ screen, the naviga- tion system performs a search for the route.
DESTINATION SEARCH BY тАЬEmergencyтАЭ
1 Press the тАЬDESTтАЭ button.
2 Touch тАЬEmergencyтАЭ on the second
page of the тАЬDestinationтАЭ screen.
● The display changes to a screen to select police stations, dealers, hospitals or fire sta- tions.
3 Touch the desired emergency category.
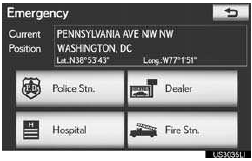
● The selected emergency category is dis- played.
4 Touch the screen button of the desired destination.
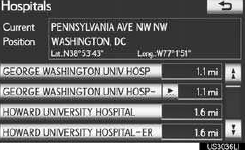
● When the desired destination entry is selected, the тАЬConfirm DestinationтАЭ screen may be displayed. If тАЬGoтАЭ is touched on the тАЬConfirm DestinationтАЭ screen, the naviga- tion system performs a search for the route.
INFORMATION
● The navigation system does not guide in areas where route guidance is unavail- able.
● The emergency function can be used even while driving.
● While driving, only the currently dis- played items and the items on the next page can be viewed.
DESTINATION SEARCH BY тАЬIntersection & FreewayтАЭ
There are 2 methods to search a desti- nation by Intersection & Freeway: (a) Search by intersection<.
(b) Search by freeway
1 Press the тАЬDESTтАЭ button.
2 Touch тАЬIntersection & FreewayтАЭ on the
second page of the тАЬDestinationтАЭ
screen.
3 Touch a screen button to select the de-
sired method.
SEARCH BY тАЬIntersectionтАЭ
1 Press the тАЬDESTтАЭ button.
2 Touch тАЬIntersection & FreewayтАЭ on the
second page of the тАЬDestinationтАЭ
screen.
3 Touch тАЬIntersectionтАЭ on the тАЬIntersec-
tion & FreewayтАЭ screen.
4 Input the name of the first intersecting
street which is located near the destina-
tion to be set, and touch тАЬOKтАЭ.
5 Touch the screen button of the desired item.
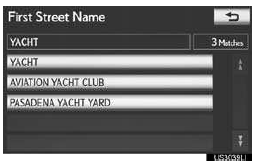
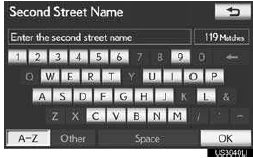
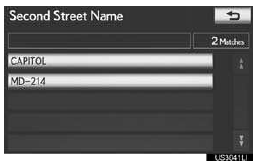
6 Input the name of the second intersect- ing street.
7 Touch the screen button of the desired item.
● When the desired item is selected, the тАЬConfirm DestinationтАЭ screen may be dis- played. If тАЬGoтАЭ is touched on the тАЬConfirm DestinationтАЭ screen, the navigation system performs a search for the route.
INFORMATION

● If the same 2 streets cross at more than 1 intersection, the screen changes and dis- plays the menu to select the city name where the streets intersect. Select the city, and the map location of the selected destination and the route preference.
SEARCH BY тАЬFreeway Entrance / ExitтАЭ
1 Press the тАЬDESTтАЭ button.
2 Touch тАЬIntersection & FreewayтАЭ on the
second page of the тАЬDestinationтАЭ
screen.
3 Touch тАЬFreeway Entrance / ExitтАЭ on
the тАЬIntersection & FreewayтАЭ screen.
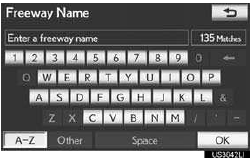
4 Input a freeway name.
5 Touch the screen button of the desired freeway.

6 Select a freeway тАЬEntranceтАЭ or тАЬExitтАЭ.
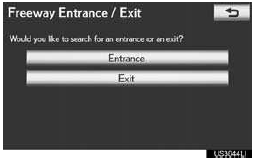
7 Input a freeway entrance or exit name, and touch тАЬOKтАЭ.
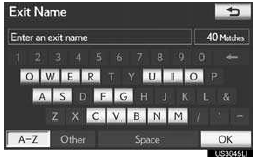
8 Touch the screen button of the desired entrance or exit name.

тАвWhen the desired entrance or exit is selected, the тАЬConfirm DestinationтАЭ screen may be displayed. If тАЬGoтАЭ is touched on the тАЬConfirm DestinationтАЭ screen, the naviga- tion system performs a search for the route.
INFORMATION
● Be sure to use the complete name of the freeway or highway, including the hyphen, when entering the destination.
Freeways and interstates use an тАЬIтАЭ (I-405). US highways use the state desig- nation before the number (CA-118).
DESTINATION SEARCH BY тАЬMapтАЭ
1 Press the тАЬDESTтАЭ button.
2 Touch тАЬMapтАЭ on the second page of the
тАЬDestinationтАЭ screen.
3 Scroll the map to the desired point.
4 Touch тАЬGo to  тАЭ.
тАЭ.
тАв The navigation system performs a search for the route.
тАв Guidance starts if тАЬOKтАЭ is touched even while driving. However, the cursor cannot be moved.
DESTINATION SEARCH BY тАЬCoordinatesтАЭ
1 Press the тАЬDESTтАЭ button.
2 Touch тАЬCoordinatesтАЭ on the second
page of the тАЬDestinationтАЭ screen.
3 Input the latitude and the longitude.
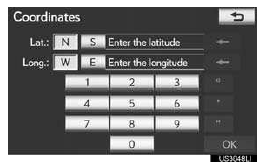
4 After inputting the latitude and longi- tude, touch тАЬOKтАЭ.
тАв When the desired screen button is selected, the тАЬConfirm DestinationтАЭ screen may be displayed. If тАЬGoтАЭ is touched on the тАЬConfirm DestinationтАЭ screen, the naviga- tion system performs a search for the route.
DELETING SET DESTINATIONS
A set destination can be deleted.
1 Press the тАЬDESTтАЭ button.
2 Touch тАЬDel.Dest.тАЭ on the тАЬDestinationтАЭ
screen.
тАв When more than 1 destination is set, a list will be displayed on the screen.
3 Touch the destination to be deleted.
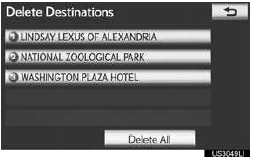
тАЬDelete AllтАЭ: Touch to delete all destina- tions on the list.
4 Touch тАЬYesтАЭ to delete the destination(s).
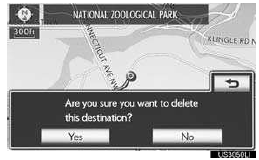
тАв A message appears to confirm the
request
to delete.
тАв If тАЬYesтАЭ is touched, the data cannot
be
recovered. If more than 1 destination has
been set, the system will recalculate the
route(s) to the set destination(s) as neces-
sary.
тАв If тАЬNoтАЭ is touched, the previous
screen will
be displayed.
тАв Set destinations can also be deleted by touching тАЬRouteтАЭ.
STARTING ROUTE GUIDANCE
When тАЬMapтАЭ is touched on the тАЬCon- firm DestinationтАЭ screen, the map screen will be displayed. The map loca- tion of the selected destination can be set as a destination.
1 Scroll the map to the desired point
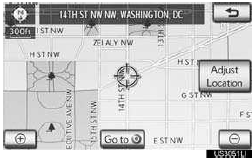
тАЬAdjust LocationтАЭ: Touch to adjust the posi- tion in smaller increment
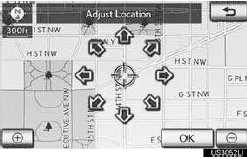
тАв When an arrow facing the desired point is touched, the map scrolls in that direction.
тАв When the screen button is released, the scrolling stops.
2 Touch тАЬGo to  тАЭ.
тАЭ.
тАв The system starts route search and displays recommended routes.
тАв If a destination has already been set,
тАЬGo
to тАЭ and тАЬAdd to RouteтАЭ will be
dis-
played.
тАЬGo to тАЭ: Touch to delete the
existing
destination(s) and set a new one.
тАЬAdd to RouteтАЭ: Touch to add a destina- tion.
тАЬInfoтАЭ: If this screen button is displayed on the top of the screen, touch it to view items such as name, address, position and phone number.
3 To start guidance, touch тАЬOKтАЭ.

тАвGuidance can be paused or resumed.
тАв If тАЬOKтАЭ is touched until a beep sounds, demo mode will start. Press the тАЬMAP/ VOICEтАЭ button to end demo mode.
CAUTION
● Be sure to obey traffic regulations and keep road conditions in mind while driv- ing. If a traffic sign on the road has been changed, the route guidance may not indicate such changed information.
INFORMATION
● The route for returning may not be the
same as that for going.
● The route guidance to the destination
may not be the shortest route nor a route
without traffic congestion.
● Route guidance may not be available if
there is no road data for the specified
location.
● When setting the destination on a map
with a scale larger than 0.5 miles (800
m), the map scale changes to 0.5 miles
(800 m) automatically. If this occurs, set
the destination again.
● If a destination that is not located on a
road is set, the vehicle will be guided to
the point on a road nearest to the destina-
tion. The road nearest to the point
selected is set as the destination.
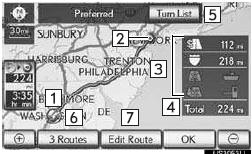
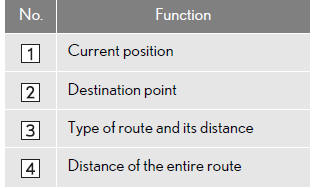
3 ROUTES SELECTION
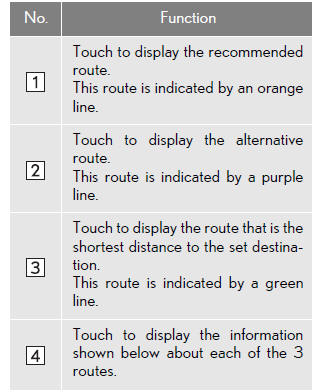
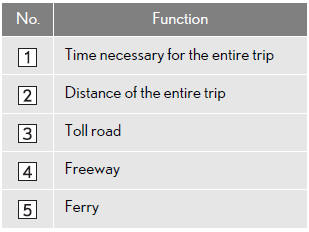
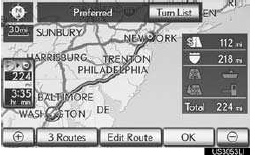
1 Touch тАЬ3 RoutesтАЭ to select the desired route from 3 routes.
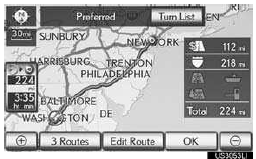
2 Touch тАЬPreferredтАЭ, тАЬAlternateтАЭ or тАЬShortтАЭ to select the desired route.

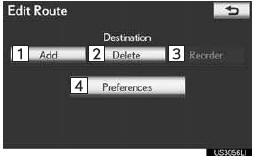
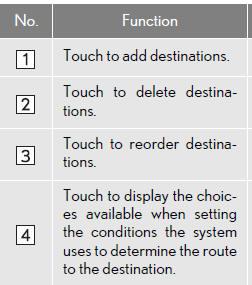
EDIT ROUTE
Conditions for the route to the destina- tion can be set again.
1 Touch тАЬEdit RouteтАЭ.
2 This screen is displayed.
INFORMATION
● Even if the тАЬFreewaysтАЭ indicator is
dimmed, the route cannot avoid including
a freeway in some cases.
● If the calculated route includes a trip by
ferry, the route guidance shows a sea
route. After you travel by ferry, the cur-
rent position may be incorrect. Upon
reception of GPS signals, it is automati-
cally corrected.
See also:
Multi-information display
Settings that can be changed using the menu switch and the тАЬENTERтАЭ switch.
- In the following situations, customize mode will automatically be
turned off.
тАв A warning message appea ...
Dealer certificate
We (the dealership) want you to know
that at the time your new Lexus vehicle
is being delivered:
1) On the basis of written notification
furnished by Lexus, we have knowledge
that the vehicle is ...
Tire inflation pressure
- Tire inflation pressure
The recommended cold tire inflation pressure and tire size is
displayed on the tire and loading information label
- Inspection and adjustment procedure
1 Tire valve
...