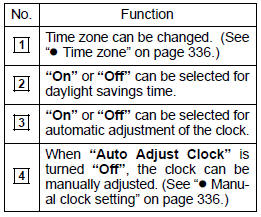
Clock settings
Used for changing time zones and the on/off settings of daylight saving time.
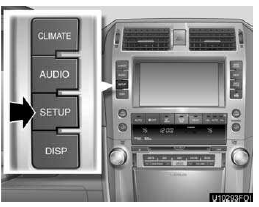
1. Push the “SETUP” button.
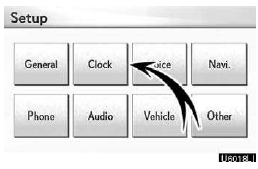
2. Touch “Clock”.
3. Touch the items to be set.
4. Touch “Save”.
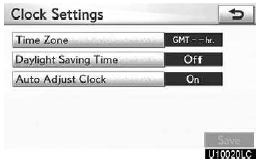
SCREEN FOR CLOCK SETTINGS
On this screen, the following functions can be performed.
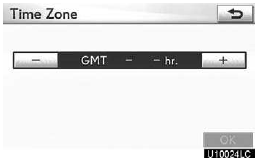
Time zone
A time zone can be selected and GMT can be set. 1. Push the “SETUP” button.
2. Touch “Clock” on the “Setup” screen.
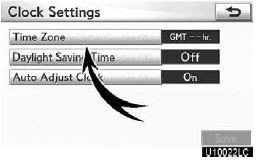
3. Touch “Time Zone”.
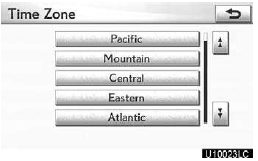
4. Touch the desired time zone.
If you touch “Other”, adjust the zone manually.
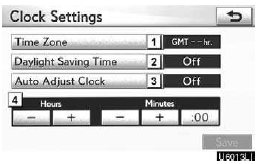
Manual clock setting
When “Auto Adjust Clock” is turned “Off”, the clock can be manually adjusted. 1. Push the “SETUP” button.
2. Touch “Clock” on the “Setup” screen.
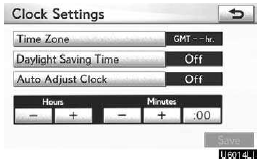
Hours “+”, “–”: Touch “+” to set the time forward one hour and “–” to set the time back one hour.
Minutes “+”, “–”: Touch “+” to set the time forward one minute and “–” to set the time back one minute.
Minutes “:00”: Rounds to the nearest hour.*
*: e.g. 1:00 to 1:29 1:00
1:30 to 1:59 2:00
3. Touch “Save”.
See also:
Expanded voice commands
Touching “On” next to “Expanded
Voice Commands” on the “Voice Set-
tings” screen enables voice command
operation of the audio/video and air
conditioning system. (See page 56.) For
mor ...
Wide View Front & Side Monitor
This system can display the wide view front monitor and the side monitor
separately or at
the same time. This system helps the driver check for front and side of the
vehicle.
ON/OFF
The displ ...
Automatic door locking and unlocking systems
The following functions can be set or canceled:
Setting and canceling the functions
To switch between setting and canceling, follow the procedure below.
Close all the doors and turn the
“ENG ...