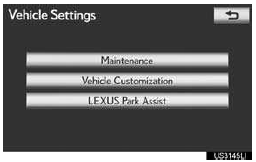
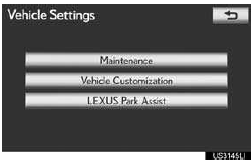
Vehicle settings
MAINTENANCE
When the navigation system is turned on, the ŌĆ£Maintenance ReminderŌĆØ screen displays when it is time to replace a part or certain components.
1 Press the ŌĆ£SETUPŌĆØ button.
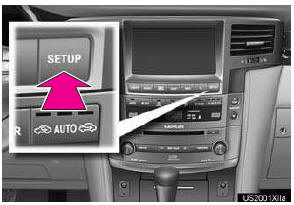
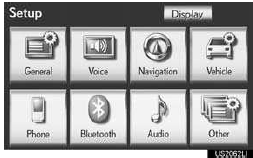
2 Touch ŌĆ£VehicleŌĆØ
3 Touch ŌĆ£MaintenanceŌĆØ.
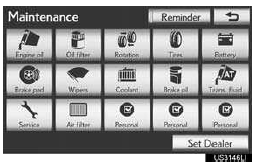
4 Touch the desired screen button.
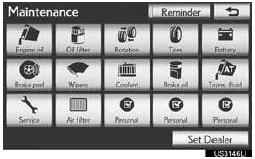
ŌĆó Setting maintenance information.
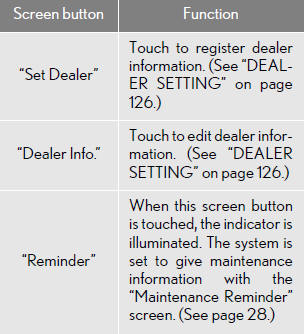
ŌĆó Setting dealer.
MAINTENANCE INFORMATION SETTING
1 Press the ŌĆ£SETUPŌĆØ button.
2 Touch ŌĆ£VehicleŌĆØ on the ŌĆ£SetupŌĆØ screen.
3 Touch ŌĆ£MaintenanceŌĆØ on the ŌĆ£Vehicle
SettingsŌĆØ screen.
4 Touch the desired screen button.
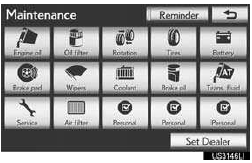
ŌĆó When the vehicle needs to be serviced, the screen button color will change to orange.
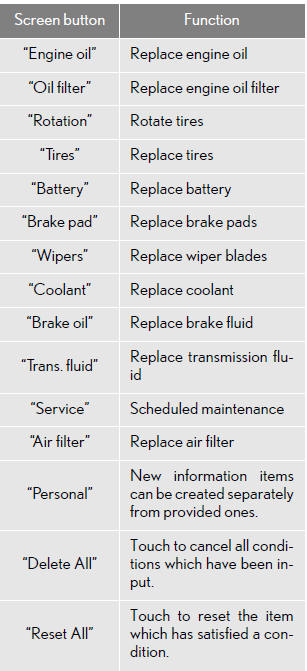
5 Input the conditions.
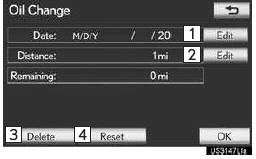
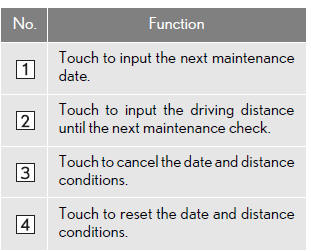
6 Touch ŌĆ£OKŌĆØ.
ŌĆó The screen then returns to the ŌĆ£MaintenanceŌĆØ screen.
INFORMATION
● For scheduled maintenance information,
refer to ŌĆ£Scheduled Maintenance GuideŌĆØ
or ŌĆ£OwnerŌĆÖs Manual SupplementŌĆØ.
● Depending on driving or road conditions,
the actual date and distance maintenance
should be performed may differ from the
stored date and distance in the system.
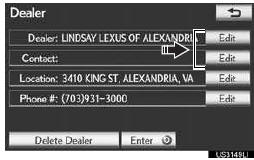
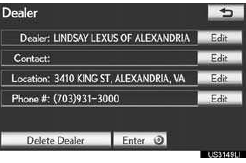
DEALER SETTING
Dealer information can be registered in the system. With dealer information registered, route guidance to the dealer is available.
1 Press the ŌĆ£SETUPŌĆØ button.
2 Touch ŌĆ£VehicleŌĆØ on the ŌĆ£SetupŌĆØ screen.
3 Touch ŌĆ£MaintenanceŌĆØ on the ŌĆ£Vehicle SettingsŌĆØ screen.
4 Touch ŌĆ£Set DealerŌĆØ.
5 If a dealer has not been registered, enter the location of a dealer in the same way as for a destination search.
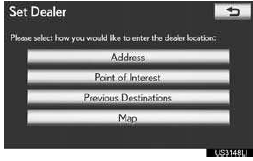
● When ŌĆ£Set DealerŌĆØ registration is finished, the ŌĆ£DealerŌĆØ screen is displayed.
6 Touch ŌĆ£EditŌĆØ next to the item to be edited.
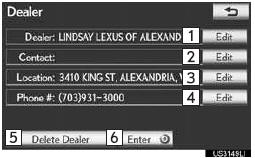
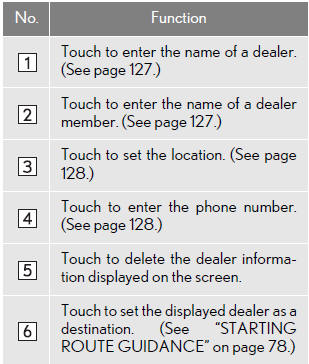
■TO EDIT ŌĆ£DealerŌĆØ OR ŌĆ£ContactŌĆØ
1 Touch ŌĆ£EditŌĆØ next to ŌĆ£DealerŌĆØ or ŌĆ£ContactŌĆØ.
2 Enter the name using the alphanumeric keys.
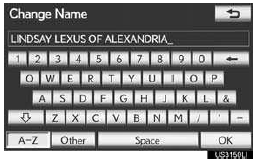
● Up to 32 characters can be entered.
3 Touch ŌĆ£OKŌĆØ.
● The previous screen will be displayed.
■TO EDIT ŌĆ£LocationŌĆØ
1 Touch ŌĆ£EditŌĆØ next to ŌĆ£LocationŌĆØ.
2 Touch one of the 8 directional screen
buttons to move the cursor  to the
desired
point on the map screen.
to the
desired
point on the map screen.
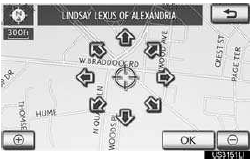
3 Touch ŌĆ£OKŌĆØ.
● The previous screen will be displayed.
■TO EDIT ŌĆ£Phone #ŌĆØ (PHONE NUMBER)
1 Touch ŌĆ£EditŌĆØ next to ŌĆ£Phone #ŌĆØ.
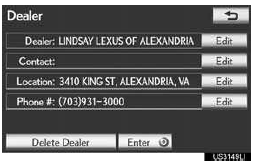
2 Enter the number using number keys.
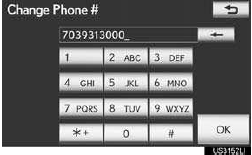
3 Touch ŌĆ£OKŌĆØ.
● The previous screen will be displayed.
VEHICLE CUSTOMIZATION
Vehicle settings can be changed.
1 Press the ŌĆ£SETUPŌĆØ button.
2 Touch ŌĆ£VehicleŌĆØ on the ŌĆ£SetupŌĆØ screen.
3 Touch ŌĆ£Vehicle CustomizationŌĆØ.
4 Touch the desired items to be set.
● For a list of the settings that can be changed, refer to ŌĆ£OwnerŌĆÖs ManualŌĆØ.
5 After changing the settings, touch ŌĆ£SaveŌĆØ. A message indicating that the settings are being saved will appear. Do not perform any other operations while this message is displayed.
CAUTION
● When performing the customization procedure, ensure that there is sufficient ventilation in the vehicle and surrounding area. If there is insufficient ventilation, exhaust gases may collect and enter the vehicle. Exhaust gases include harmful carbon monoxide (CO) and inhaling them may lead to death or a serious health hazard.
INFORMATION
● To avoid discharging the battery, perform the customization procedure with the engine running.
See also:
Customization
Your vehicle includes a variety of electronic features that can be
personalized
to your preferences.
Programming of these preferences can be performed by your Lexus
dealer.
It is also possib ...
Sun visors
►Main sun visor
1 Forward position:
Flip down.
2 Side position:
Flip down, unhook, and
swing to the side.
3 Side extender:
Place in side position, then
slide backwards.
► Su ...
Roadside Assistance
Lexus roadside assistance coverage is for 48 months from your vehicleŌĆÖs in-service
date, regardless of mileage.
Coverage is provided 24 hours a day, 365 days a year, for vehicles operated in
th ...