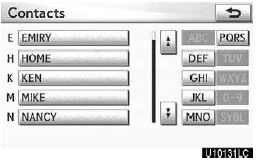
Setting the phonebook
“Setting the phonebook” is accessed from the “Contacts” screen.
1. Push the “SETUP” button.
2. Touch “Phone”.
3. Touch “Phonebook”.
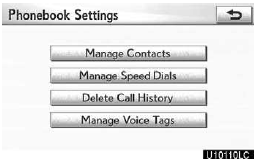
4. Touch “Manage Contacts”.
Please refer to the following pages for each setting.
You can also display the “Contacts” screen in the following way.
1. Push the “INFO/PHONE” button.
2. Touch “Phone”.
3. Touch “Contacts”.
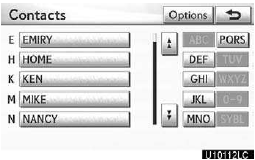
4. Touch “Options”.
5. Touch “Manage Contacts”.
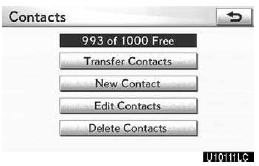
Transferring a phone number
You can transfer the phone numbers in your Bluetooth phone to the system.
The phonebook manages a maximum of 4 phonebooks in all. The data for 1000 contacts (up to 3 numbers per contact) can be registered in total of phonebooks.
Transfer it while the engine is running.
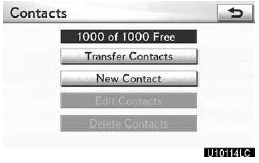
1. Touch “Transfer Contacts”.
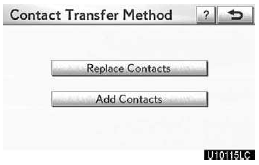
2. Touch “Replace Contacts” or “Add Contacts”.
In case that the phonebook contains phonebook data, this screen is displayed.

3. Transfer the phonebook data to the system using the Bluetooth phone. This screen appears while transferring. To cancel it, touch “Cancel”. If the transferring is interrupted on the way, the phonebook data transferred until then can be memorized in the system.
When you have touched “Replace Contacts”: If your cellular phone does not support PBAP or OPP service, you can not use this function.
If your phone supports PBAP service, you can transfer the phonebook data without operating your phone.
If your phone does not support PBAP service, you must transfer the phonebook data by operating your phone.
When you have touched “Add Contacts”:
If your cellular phone does not support OPP service, you can not use this function.
You can transfer the phonebook data only by operating your phone.
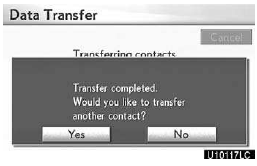
4. In case that you have touched “Add Contacts”, this screen is displayed.
If you want to transfer another phonebook, touch “Yes”.
When another Bluetooth device is connected
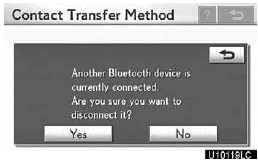
When another Bluetooth device is currently connected, this screen is displayed.
If you want to disconnect it, touch “Yes”.
INFORMATION
Bluetooth audio will disconnect during transfer on phonebook data.
In this case, it will reconnect automatically when data transfer finishes.
(It will not be reconnected depending the phone you are using.)
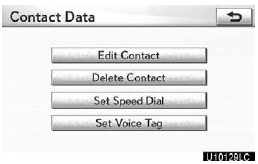
Registering the phonebook data You can register the phonebook data.
Up to 3 numbers per person can be registered.

1. Touch “New Contact”.

2. Use the software keyboard to input the name and touch “OK”.
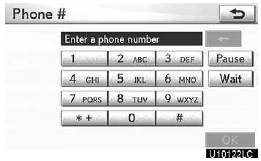
3. Input the phone number and touch “OK”.
If you want to use the tone signal after the phone number, input the tone signal too.
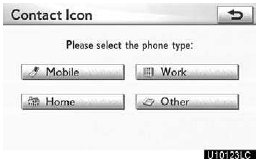
4. Select the phone type.
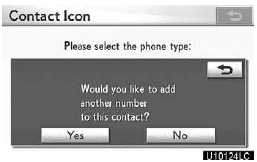
5. When two or less numbers in total are registered to this contact, this screen is displayed.
When you want to add a number to this contact, touch “Yes”.
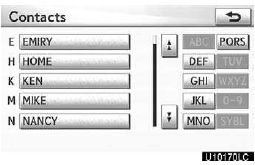
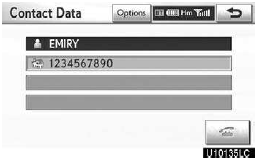
Editing the phonebook data
You can register the phone number in “Phone#1”, “Phone#2” and “Phone#3” separately.

1. Touch “Edit Contacts”.
2. Select the data you want to edit.
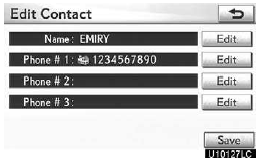
3. Touch “Edit” for the desired name or number.
4. Edit the name or the number. (See “ Registering the phonebook data” on page 363.) 5. When you complete the edit, touch “Save”.
You can also display the “Edit Contact” screen in the following ways.
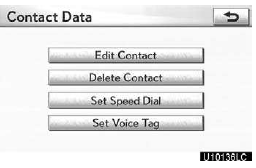
From “Contact Data” screen
1. Push the “INFO/PHONE” button.
2. Touch “Phone”.
3. Touch “Contacts”.
4. Select the desired data from the list.
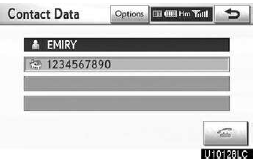
5. Touch “Options”.
6. Touch “Edit Contact”.
From “Call History” screen
1. Push the “INFO/PHONE” button.
2. Touch “Phone”.
3. Touch “Call History”.
4. Select the desired number from the list.
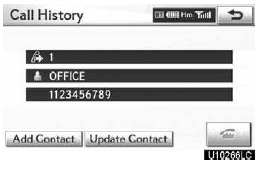
5. Touch “Add Contact” or “Update Contact”.
6. In case that you have touched “Update Contact”, this screen is displayed.
Select the desired data from the list.
Deleting the phonebook data
You can delete the data.
When you release your car, delete all your data on the system.
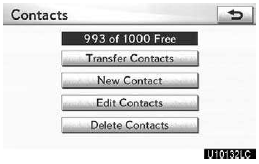
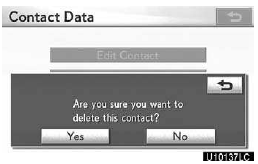
1. Touch “Delete Contacts”.

2. Select the desired data or touch “Select All”, then touch “Delete”.
You can touch multiple data and delete them at the same time.
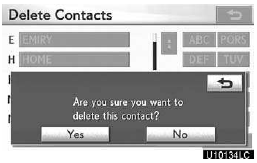
3. Touch “Yes”.
You can also delete it in the following way.
1. Push the “INFO/PHONE” button.
2. Touch “Phone”.
3. Touch “Contacts”.
4. Select the desired data from the list.
5. Touch “Options”.
6. Touch “Delete Contact”.
7. Touch “Yes”.
INFORMATION
When you delete a Bluetooth phone, the phonebook data will be deleted at the same time.
See also:
Playing a USB memory
- Connecting a USB
- Display
Select USB mode on the
source screen to display the
control screen
- Controller
1 Selecting a folder/album
2 Play/pause
3 Fast forward or rewind
4 Selecting a ...
Bottle holders/door pockets
Front
Rear
- When using the holder as a bottle holder
• When storing a bottle, close the cap.
• The bottle may not be stored depending on its size or shape.
NOTICE
- Items th ...
XM NavWeather
The subscription−based XM NavWeather service allows the navigation system to
display weather information on the map.
See page 155 for subscription information.
The following operations can b ...