Display
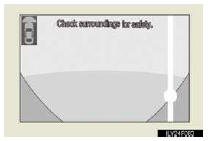
Front monitor
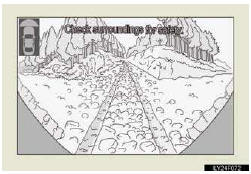
The image from the front camera is displayed. Use this monitor to help check the area in front of the vehi- cle for safety.
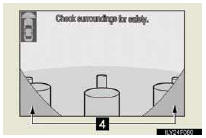
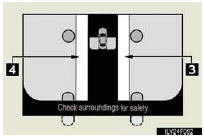
Side-front simultaneous display monitor
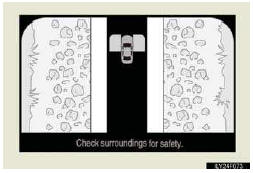
The image from both side cameras is displayed. Use this monitor to help check the area on both sides of the vehicle at the same time, and to check for objects near the tires or the sides of the vehicle.
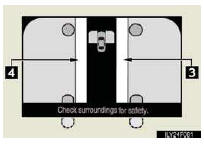
Side-rear simultaneous display monitor
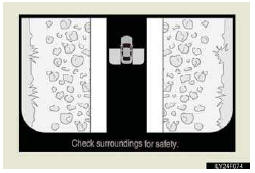
The image from both side cameras is displayed. Use this monitor to help check the area on both sides of the vehicle at the same time, and to check for objects near the tires or the sides of the vehicle.
Rear monitor
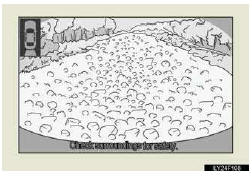
The image from the rear camera is displayed. Use this monitor to help check the area in rear of the vehi- cle for safety.
The Multi-terrain Monitor can be operated when
• Any Multi-terrain Select mode is selected.
• The door mirrors are not folded.
• The vehicle speed is less than approximately 7 mph (12 km/h).
Automatic system cancellation
In the following situations, the image is canceled automatically.
• When the vehicle speed exceeds approximately 7 mph (12 km/h).
After the vehicle speed exceeds approximately 7 mph (12 km/h), the image will continue to be displayed for a short time.
If the vehicle speed returns to below 7 mph (12 km/h) before the image extin- guishes, the image will continue to be displayed.
• The Multi-terrain Select is off.
• The door mirrors are folded.
Displayed area
The area covered by the camera is limited. Objects which are close to either corner of the bumper or under the bumper cannot be seen on the screen.
The area displayed on the screen may vary depending on vehicle orientation or road conditions.
Front camera
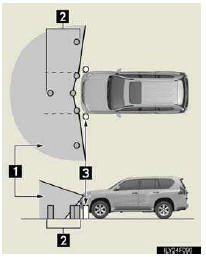
1. Camera’s field of view
2. Objects visible to the camera
3. Objects not visible to the camera
4. Parts of the vehicle (bumper, grill, etc.)
Side camera (side-front simultaneous display monitor)
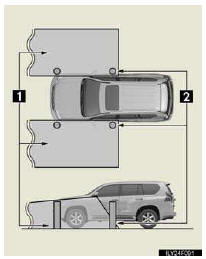
1. Camera’s field of view
2. Objects visible to the camera
3. Right side of vehicle
4.Left side of vehicle
Side camera (side-rear simultaneous display monitor)

1. Camera’s field of view
2. Objects visible to the camera
3. Right side of vehicle
4. Left side of vehicle
Rear camera
Multi-terrain Monitor cameras
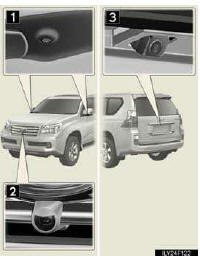
1. Side cameras
2. Front camera
3. Rear camera
In the following cases, it may be difficult to see images on the screen even when the system is functioning correctly:
• The vehicle is in a dark area, such as at night.
• The temperature near the lens is extremely high or low.
• Water droplets are on the camera lens or humidity is high, such as when it rains.
• Foreign matter, such as snow and mud, adheres to the camera lens.
• The camera has scratches or dirt on it.
• The sun or headlights are shining directly into the camera lens.
• The camera lens is damaged by flying stones.
Smear effect
If a bright light, such as sunlight reflected off the vehicle body, is picked up by the camera, a smear effect* characteristic to the camera may occur.
*: Smear effect ⎯ A phenomenon that occurs when a bright light is picked up by the camera; when transmitted by the cam- era, the light source will appear to have streaks of light emanating from it. The streaks will also appear when the light source is in the vehicle icon area.
Flicker effect
When the camera is used under fluorescent lights, sodium lights, mercury lights etc., the lights and the illuminated areas may appear to flicker.
Display settings
Vehicles without a navigation system
Vehicles with a navigation system
Refer to the “Navigation System Owner’s Manual”
CAUTION
When using the Multi-terrain Monitor system
Observe the following precautions to avoid an accident that could result in death or serious injuries:
• Never depend solely on the monitor system.
• Always check visually and with the mirrors to confirm your intended path is clear.
• Depicted distances between objects and flat surfaces differ from actual dis- tances.
• Do not use the system if the hood or doors are open.
CAUTION
Conditions which may affect the Multi-terrain Monitor system
• If the front or the rear of the vehicle or the outside rear view mirror has been hit, the camera’s position and mounting angle may have changed. Have the vehicle inspected by your Lexus dealer.
• As the camera has a water proof construction, do not detach, disassemble or modify it. This may cause incorrect operation.
• Rapid temperature changes, such as when hot water is poured on the vehicle in cold weather, may cause the system to function abnormally.
• If the camera lens is dirty, it cannot transmit a clear image. Rinse with water and wipe with a soft cloth. If the camera lens is extremely dirty, wash with a mild cleanser and rinse.
• Do not strongly rub the camera lens. If the camera lens is scratched, it cannot transmit a clear image.
• Do not allow organic solvent, car wax, window cleaner or glass coat to adhere to the camera. If this happens, wipe it off as soon as possible.
• The displayed image may be darker and moving images may be slightly distorted when the system is cold.
• Situations unsuitable for Multi-terrain Monitor • On icy or slick road surfaces, or in snow • When using tire chains • When washing the vehicle, do not apply intensive bursts of water to the camera or camera area. Doing so may result in the camera malfunctioning.
NOTICE
When using the Multi-terrain Monitor
• Even if an obstacle is no longer visible on the side monitor, do not turn the steer- ing wheel further in the direction the vehicle is turning until the vehicle has moved completely past the obstacle. If the steering wheel is turned to full lock, the vehi- cle will turn in the smallest possible turning circle, and may collide with the obsta- cle.
• It may be difficult to judge distance with the image from the front camera due to the characteristics of the lens. Drive carefully while checking the actual distance to the obstacles displayed on the screen. Also, give your full attention to sudden bumps in the road.
See also:
Driving position memory (driver’s seat)
Your preferred driving position (the position of the driver’s seat, steering
wheel and angle of the outside rear view mirrors) can be memorized and recalled
with the touch of a button. It is als ...
Selecting trailer ball
Use the correct trailer ball for your application.
1. Trailer ball load rating
Matches or exceeds the gross trailer weight rating of the trailer.
2. Ball diameter
Matches the size of the trailer ...
Connecting and disconnecting a trailer
Stop your vehicle and a trailer in line and perform the following:
• Connecting a trailer
Set the rear height control air
suspension to N mode.
Turn off the “ENGINE START STOP”
switch o ...