Floor mat
Use only floor mats designed specifically for vehicles of the same model and model year as your vehicle. Fix them securely in place onto the carpet.
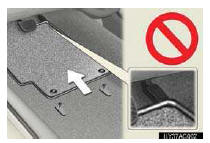
Fix the floor mat in place using the retaining hooks (clips) pro- vided.
The shape of the retaining hooks (clips) and the fixing procedure of the floor mat for your vehicle may differ from those shown in the illustration. For details, refer to the floor mat retention clip installation instructions supplied with the clips.

CAUTION
Observe the following precautions.
Failure to do so may cause the driverŌĆÖs floor mat to slip, possibly interfering with the pedals while driving. An unexpectedly high speed may result or it may become diffi- cult to stop the vehicle, leading to a serious accident.
- When installing the driverŌĆÖs floor mat
ŌĆó Do not use floor mats designed for other models or different model year vehicles, even if they are Lexus Genuine floor mats.
ŌĆó Only use floor mats designed for the driverŌĆÖs seat.
ŌĆó Always install the floor mat securely using the retaining hooks (clips) provided.
ŌĆó Do not use two or more floor mats on top of each other.
ŌĆó Do not place the floor mat bottom-side up or upside-down.
CAUTION
- Before driving
ŌĆó Check that the floor mat is securely fixed in the correct place with all the provided retaining hooks (clips). Be especially care- ful to perform this check after cleaning the floor.
ŌĆó With the engine stopped and the shift lever in P, fully depress each pedal to the floor to make sure it does not interfere with the floor mat.
See also:
Playing an audio CD/CD text
Selecting a track
Push ŌĆ£ ŌĆØ or ŌĆ£
ŌĆØ of ŌĆ£TUNEŌĆØ until the desired track
number appears on the screen.
Fast forwarding or reversing a track
Push and hold ŌĆ£ ŌĆØ or ŌĆ£
ŌĆØ of ŌĆ ...
Engine compartment cover
- Removing the engine compartment cover
- Installing the clips
NOTICE
- After installing an engine compartment cover
Make sure the cover is securely installed in its original ...
Range covered by each camera
1. Wide view front monitor
2. Side monitor
The illustration shown here is an example. As such, the actual visible area may
be different. See P. 294 for information about the visual range of each ...