Quick reference
Operations such as selecting a preset station and adjusting the sound balance are carried out on the screen. To display the audio screen, push the “AUDIO” button.
DVD changer
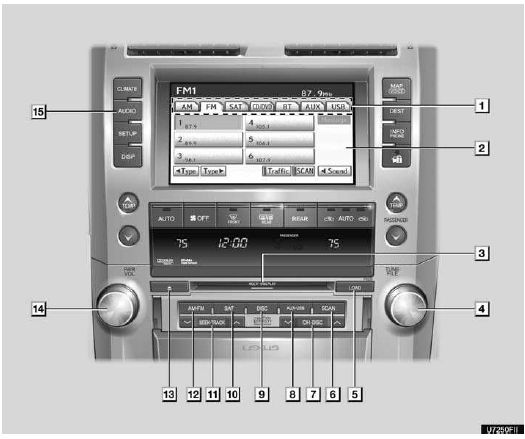
1. Function menu tab
To control the radio, DVD changer, Bluetooth audio player, AUX, USB memory or iPod, touch the screen tabs. For details, see page 190.
2. Function menu display screen
To control the radio, DVD changer, Bluetooth audio player, AUX, USB memory or iPod, touch the screen buttons. For details, see page 190.
3. Disc slot
Insert discs into the slot after pushing “LOAD” button. For details, see page 220.
4. “TUNE/FILE” knob
Turn this knob to move the station band and files up or down. For details, see pages 196, 201, 216 and 257.
5. “LOAD” button
Push this button to insert the discs.
For details, see page 220.
6. “SCAN” button
Push this button to scan radio stations or scan the files or tracks. For details, see pages 197, 203, 213, 217, 218 and 259.
7. “CH·DISC” button
Push the “ ” or “ ” button to select a preset station or a selected disc.
For details, see pages 197, 203, 223 and 225.
8. “AUX·USB” button
“AUX·USB” button Push this button to turn the Bluetooth audio player, AUX, USB memory or iPod on. For details, see pages 190, 195, 245 and 253.
9. “DISC” button
Push this button to play a DVD. For details, see pages 190 and 225.
10 . “SAT” button
Push this button to choose a SAT station.
For details, see pages 190, 196 and 200.
11. “SEEK·TRACK” button
Push the “ ” or “ ” button to seek up or down for a station, or to access a desired track, file or chapter. For details, see pages 197, 203, 212, 215, 231, 232, 242, 251 and 257.
12. “AM·FM” button
“AM·FM” button Push this button to choose a radio station. (AM, FM1, FM2) For details, see pages 190 and 196.
13. “  ” button
Push this button to eject the discs.
For details, see page 223.
14. “PWR/VOL” knob
Push this knob to turn the audio system on and off, and turn it to adjust the volume. For details, see page 189.
15. “AUDIO” button
Push this button to display the audio control screen. For details, see page 189.
CD changer
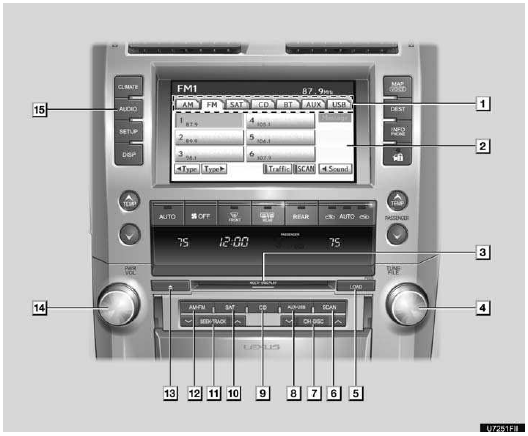
1. Function menu tab
To control the radio, CD changer, Bluetooth audio player, AUX, USB memory or iPod, touch the screen tabs. For details, see page 190.
2. Function menu display screen
To control the radio, CD changer, Bluetooth audio player, AUX, USB memory or iPod, touch the screen buttons. For details, see page 190.
3. Disc slot
Insert discs into the slot after pushing “LOAD” button. For details, see page 206.
4. “TUNE/FILE” knob
Turn this knob to move the station band and files up or down. For details, see pages 196, 201, 216 and 257.
5. “LOAD” button
Push this button to insert the discs.
For details, see page 206.
6. “SCAN” button
Push this button to scan radio stations or scan the files or tracks. For details, see pages 197, 203, 213, 217, 218 and 259.
7. “CH·DISC” button
Push the “  ” or “
 ” button to select a preset station
or a selected disc.
” button to select a preset station
or a selected disc.
For details, see pages 197, 203, 208 and 211.
8. “AUX·USB” button
Push this button to turn the Bluetooth audio player, AUX, USB memory or iPod on. For details, see pages 190, 195, 245 and 253.
9. “CD” button
Push this button to play a CD. For details, see pages 190 and 210.
10. “SAT” button
Push this button to choose a SAT station.
For details, see pages 190, 196 and 200.
11. “SEEK·TRACK” button
“SEEK·TRACK” button Push the “
” or “ ” button to seek up or down
for a station, or to access a desired track or file. For details, see pages 197,
203, 212, 215, 251 and 257.
12. “AM·FM” button
Push this button to choose a radio station. (AM, FM1, FM2) For details, see pages 190 and 196.
13. “  ” button
Push this button to eject the discs.
For details, see page 208.
14. “PWR/VOL” knob
Push this knob to turn the audio system on and off, and turn it to adjust the volume. For details, see page 189.
15. “AUDIO” button
Push this button to display the audio control screen. For details, see page 189.
See also:
Vehicle Service History
When you have your vehicle serviced
at a Lexus dealership, your service
information is recorded in the Lexus
National Service History database.
This is the first database of its kind in
the aut ...
SRS airbag instructions for Canadian owners (in French)
...
Phonebook
INFORMATION
Phonebook data is managed for every registered phone. When another phone is
connecting, you can not read the registered data.
“Phonebook” is accessed from the “Phonebook Settings ...