Using a Bluetooth® phone
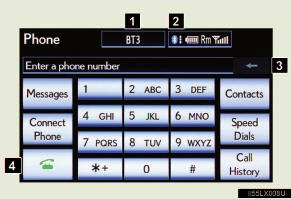
1 Device name
2 Bluetooth® connection sta-
tus
3 Character deletion
4 Make a call
To display the screen shown above, press
 or
or
 on the
steering wheel.
on the
steering wheel.
Registering a Bluetooth® phone
You can register up to 5 phones in the system.
 Display the “Phone” screen.
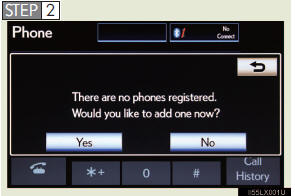
Touch “Yes”.
If 5 Bluetooth® devices have already been registered, a regis- tered device needs to be deleted.
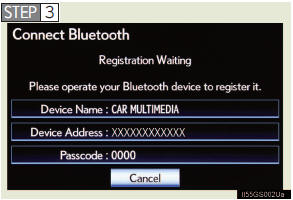
Input the passcode displayed on the screen into your phone.
For the operation of the phone, see the manual that comes with your cellular phone.
A passcode is not required for SSP (Secure Simple Pairing) compatible Bluetooth® phones.
Depending on the type of Blue- tooth® phone being connected, a message confirming registra- tion may be displayed on the Bluetooth® phone’s screen.
Respond and operate the Blue- tooth® phone according to the confirmation message.
If you want to cancel it, touch “Cancel”.
If a completion message is displayed, registration is complete.
If an error message is displayed, follow the guidance on the screen to try again.
Bluetooth® phone connection
There are two connection methods available — automatic and manual.
►Automatic
When you register your phone, auto connection will be acti- vated. Always set it to this mode and leave the Bluetooth® phone on the place where con- nection can be established.
When the “ENGINE START STOP” switch is turned to ACCESSORY or IGNITION ON mode, the system will search for a nearby cellular phone you have registered. The system will connect with the phone that was last connected, if it is nearby.
When “Display Phone Status” is set to “On”, the connection status is displayed.
►Manual
When the auto connection has failed or “Bluetooth* Power” is turned off, you must connect Bluetooth® manually.
 Display the ‚ÄúPhone‚Äù screen. (→
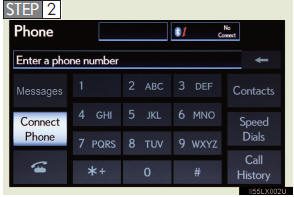
Touch “Connect Phone”.
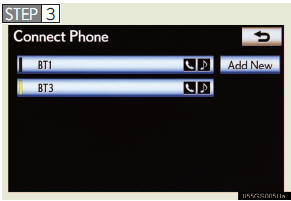
Touch the screen button corre- sponding to the desired phone connection.
When the cellular phone’s device name has not been able to be obtained, “Device 1” to “Device 5” will be displayed in the order the phones were regis- tered.
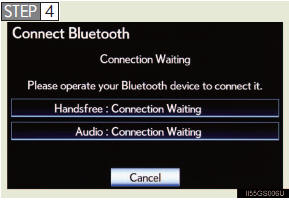
This screen is displayed.
If a completion message is dis- played, connection is complete.
*:Bluetooth is a registered trademark of Bluetooth SIG. Inc.
- Reconnecting to the Bluetooth® phone
If the system cannot connect due to poor signal strength with the “ENGINE
START STOP” switch in ACCESSORY or IGNITION ON mode, the sys-
tem will automatically attempt to reconnect.
If the phone is turned off, the system will not attempt to reconnect. In this case, it must be connected manually, or the phone must be re-selected or re- entered.
- Connecting the phone while Bluetooth® audio is playing
l Bluetooth® audio will stop temporarily.
l It may take time to connect.
- Connecting the phone while another Bluetooth® device is connected When another Bluetooth® device is currently connected, a confirmation message will be displayed. To disconnect the Bluetooth® device, touch “Yes”.
- Connecting the phone while 5 Bluetooth® devices have already been regis-
tered
When 5 Bluetooth® devices have already been registered, a registered
device needs to be deleted. Touch “Yes” to delete one or more.
Touch the device to be deleted, then touch “Remove”, and “Yes”.
- If the Bluetooth® phone has a Bluetooth® audio function
When the Bluetooth® phone to be registered has a Bluetooth® audio func-
tion, this audio function will be registered automatically at the same time
and confirmation message may be displayed. If this screen is displayed,
touch “Yes” to connect the audio function or touch “No” to cancel the con-
nection.
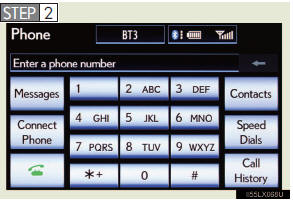
Making a call
Once the Bluetooth® phone is registered, you can make a call using the following procedure:
- Dialing
 Display the “Phone” screen.
Input the phone number.
To delete the inputted phone
number, touch  .
.
 Touch
Touch
 or press
 on the steering wheel.
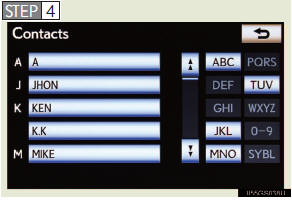
n Dialing from the phonebook You can dial a number from the phonebook data imported from your cellular phone. The system has one phonebook for each phone. Up to 1000 entries may be stored in each phonebook.
Display the “Phone” screen.
 Touch “Contacts” on the “Phone”
screen.
Touch “Contacts” on the “Phone”
screen.
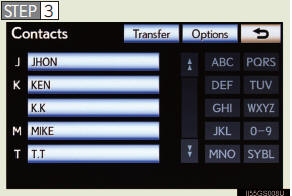
Choose the desired data to call from the list.
Choose the number and then
touch  or press
 on
the steering wheel.
on
the steering wheel.
- When the phonebook is empty
If your cellular phone is neither PBAP nor OPP compatible, the
phonebook cannot be transferred.
 Display the “Phone” screen.
 Touch “Contacts” on the “Phone”
screen.
Touch “Contacts” on the “Phone”
screen.
►PBAP compatible models
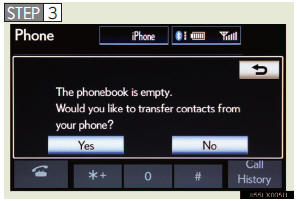
Touch “Yes”.
►PBAP incompatible but OPP compatible models
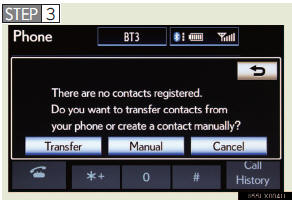
Touch “Transfer”.

Transfer the phonebook data to the system using the Blue- tooth® phone.
This screen appears while trans- ferring. To cancel this function, touch “Cancel”.
Depending on the type of cellu- lar phone, OBEX authentication may be required when transfer- ring phonebook data. Enter “1234” into the Bluetooth® phone.
When the data transfer from a PBAP incompatible but OPP compatible model is complete, “Done” will appear on the screen. Touch “Done”.
- Calling using speed dial
You can make a call using numbers registered from the phone-
book.
 Display the “Phone” screen.
 Touch “Speed Dials” on the
“Phone” screen.
Touch “Speed Dials” on the
“Phone” screen.
Touch the desired tab and choose the desired number to make a call.
- Dialing from history
You can call using the call history which has the 4 functions
below.
“All”: all the numbers below which were memorized “Missed”: calls which you missed “Incoming”: calls which you received “Outgoing”: numbers which you called You can call using the 25 most recently called numbers shown by “All” tab while driving.
 Display the “Phone” screen.
 Touch “Call History” on the
“Phone” screen.
Touch “Call History” on the
“Phone” screen.
Touch the desired tab and choose the desired data from the list.
Touch  or press
 on
the steering wheel.
on
the steering wheel.
- Calling using voice recognition
You can call by giving a voice command.
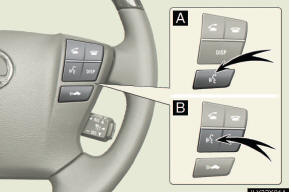
Talk switch
A Without dynamic radar cruise
control
B With dynamic radar cruise
control
The “Call <name> <type>” and “Dial <number>” operating proce- dures are explained here. Other operating procedures are also simi- lar.
l Calling by name
You can call by giving a name registered in the phonebook.
 Press
Press
 or
or
 .
.
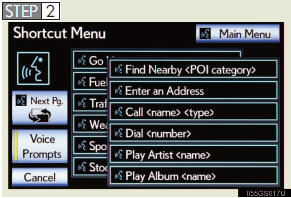
Following the system guidance, wait for the beep and then after saying “Call” say the desired name, or the name and type of phone.
 Following the system guidance,
wait for the beep and then
say “Dial”. (You can also call by pressing
Following the system guidance,
wait for the beep and then
say “Dial”. (You can also call by pressing
 on the
steering wheel.)
on the
steering wheel.)
l Calling by dial number
You can call by giving a phone number
Press
or
.
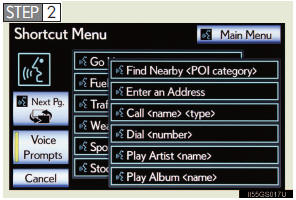
Following the system guidance, wait for the beep and then after saying “Dial” say the phone number.
Following the system guidance,
wait for the beep and then
say “Dial”. (You can also call by pressing
on the
steering wheel.)
- Calling using SMS/MMS message
You can call using the SMS (Short Message Service)/MMS
(Multimedia Messaging Service) message sender’s phone num-
ber.
Display the “Phone” screen.
Touch “Messages”.
When “Message Transfer” is set to “Off”, a confirmation screen will be displayed. Touch “Yes”.
Touch the “SMS/MMS” tab and then
touch the desired
received message from the list.
The tab display may vary depending on the type of cellular phone.
 Touch
Touch
 or press
 on the steering wheel.
- Calling using POI
You can make a call using a Point Of Interest.
- Call history list
l If you make a call to or receive a call from a number registered in the
phone book, the name is displayed in the call history.
l If you make multiple calls to the same number, only the last call made is
displayed in the call history.
l Number-withheld calls are also memorized in the system.
- When driving
The functions “Dialing”, “Dialing from the phonebook”, and “Dialing from
history” (except for call using the 25 most recently called numbers shown
by “All” tab) are unavailable.
- When calling by registered name in the phonebook
l When “Call <name> <type>” on the “Shortcut Menu” screen is dimmed,
the phonebook’s voice command recognition cannot be used. Check the
Bluetooth® connection and if the contacts have been transferred to the
system.
l Short or abbreviated names in the phonebook may not be recognized.
Change names in the phonebook to full names.
l Sometimes a voice recognition result confirmation screen will be dis-
played. After confirming the result, say “Yes” or “No”.
l When the system recognizes multiple names from the phonebook, a
name candidate list will be displayed on the screen. If the desired name
is not displayed on the top of the screen, say the number of the name
from the candidate list (number 1 and number 2) to select a name from
the candidate list.
l When a contact has multiple phone numbers registered in the phone-
book, a candidate list will be displayed. If the desired phone number is
not displayed on the top of the screen, say the number of the desired
phone number from the candidate list (number 1 and number 2) to select
a phone number from the candidate list.
- When calling by phone number
l Say the phone number one digit at a time. For example, if the phone
number is 2345678, say “two three four five six seven eight”.
l The system can recognize the following types of phone numbers:
• 3 digit numbers (911, 411, 611)
• 7 digit numbers (Local phone numbers)
• 10 digit numbers (Area code + Local phone number)
• 11 digit phone numbers (1 + Area code + Local phone number)
l As the system cannot recognize additional numbers, say the complete
number without stopping.
l When the system recognizes multiple phone numbers, a phone number
candidate list will be displayed on the screen. If the desired phone num-
ber is not displayed on the top of the screen, say the number of the
desired phone number from the candidate list (number 1 and number 2)
to select a phone number from the candidate list
- International calls
To dial a phone number that is not a 3, 7, 10 or 11 digit number, for example
an international number, use “International Call”.
 Press
Press
 or
or
 on the steering wheel to display
the “Shortcut
Menu” screen and saying “Main menu” or touch “Main Menu”.
on the steering wheel to display
the “Shortcut
Menu” screen and saying “Main menu” or touch “Main Menu”.
 Say “Use a phone”.
 Say “International call”.
Up to 24 digits can be recognized when using the international call function.
The number can also be divided into multiple groups and recognized.
You may not be able to make international calls, depending on the cellular phone in use.
- Calling by using the latest call history item
 Press
Press
 on the steering wheel to display the
“Phone” screen.
on the steering wheel to display the
“Phone” screen.
Press
 on the steering wheel to display
the “Call History”
screen.
on the steering wheel to display
the “Call History”
screen.
Press
 on the steering wheel to select the
most recent number
in the history.
on the steering wheel to select the
most recent number
in the history.
 Touch
Touch
 or press
 on the steering wheel.
- To cancel voice recognition
l Press and hold  or
or
 on the steering wheel.
l Touch “Cancel”.
- When using voice recognition
Use correct commands and speak clearly, otherwise the system may not cor-
rectly recognize the command. Wind or other noises may also cause the sys-
tem not to recognize the desired command.
Receiving a call
When a call is received, the following screen is displayed together with a sound.
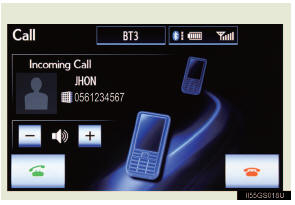
Touch  or press
 on
the steering wheel.
on
the steering wheel.
- To refuse a call
Touch  or press
 on the steering wheel.
- To adjust the incoming call volume
Touch “-” or “+”, turn the “PWR•VOL” knob, or use the volume
switch on the steering wheel.
- International calls
Received international calls may not be displayed correctly depending on
the cellular phone in use.
Speaking on the phone
The following screen is displayed when speaking on the phone.
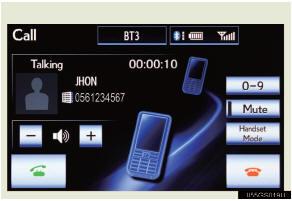
- To adjust the incoming call volume
Touch “-” or “+”, turn the “PWR•VOL” knob, or use the volume
switch on the steering wheel.
- To prevent the other party from hearing your voice
Touch “Mute”.
- Inputting tones
When using phone services such as an answering service or a
bank, you can store phone numbers and code numbers in the
phonebook.
 Touch “0-9” on the “Call” screen.
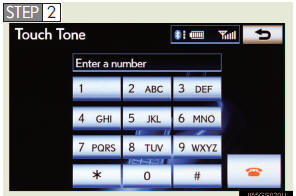
Input the number.
If repeated tone symbols* are stored in the phonebook, “Send” and “Clear” are dis- played on the right side of the screen.
*:Repeated tone symbols are symbols or numbers displayed as p or w, that come after the phone number.
(e.g. 056133w0123p#1])
 Confirm the number displayed on
the screen, and touch
“Send”.
Confirm the number displayed on
the screen, and touch
“Send”.
If you touch “Clear”, this function will end.
- To transfer a call
Touch “Handset Mode” to change from hands-free call to cellu-
lar phone call. Touch “Handsfree Mode” to change from cellular
phone call to hands-free call.
- To hang up
Touch  or press
 on the steering wheel.
- Call waiting
When a connected call is interrupted by the third party, the
incoming call message will be displayed.
l To talk with the other party: Touch
 or press
 on the
steering wheel.
on the
steering wheel.
l To refuse the call: Touch  or press
  on the steering
wheel.
on the steering
wheel.
Everytime you touch  or press
 on the steering wheel
after a call is interrupted, you will be switched to the other party.
on the steering wheel
after a call is interrupted, you will be switched to the other party.
If your cellular phone is not accepted in HFP Ver. 1.5, this func- tion cannot be used.
- Transferring calls
l It is not possible to transfer from hands-free to a cellular phone while
driving.
l If you transfer from a cellular phone to hands-free, the hands-free screen
will be displayed, and you can operate the system using the screen.
l Transfer method and operation may vary according to the cellular phone
used.
l For operation of the cellular phone in use, see the phone’s manual.
- Repeated tone symbols
When the “p” pause tone is used, after waiting 2 seconds the tone data up
until the next pause tone will be automatically sent. When the “w” pause
tone is used, the tone data up until the next pause tone will be automatically
sent after user operation.
- While driving
Key input is unavailable.
- Voice recognition during a call
“Send Tones” can be operated by voice recognition.
- Interrupt call operation
Interrupt call operation may differ from depending on your phone company
and the cellular phone.
Using a Bluetooth® phone message
Received messages can be forwarded from the connected Blue- tooth® phone, enabling checking and replying (Quick reply).
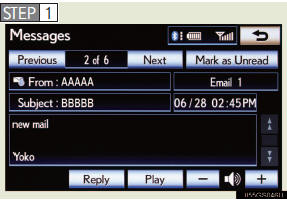
- Checking a message
 Display the “Phone” screen.
 Touch “Messages” on the “Phone”
screen.
Touch “Messages” on the “Phone”
screen.
When “Message Transfer” is set to “Off”, a confirmation screen will be displayed. Touch “Yes
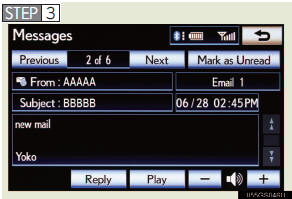
Touch the desired message to check.
The text of the message is not displayed while driving.
Touching “Previous” or “Next” displays the previous or next message.
 Touch “Play” to start reading out
of the message. Touch
“Stop” to stop the function.
Touch “Play” to start reading out
of the message. Touch
“Stop” to stop the function.
- To adjust the message reading out volume
Touch “-” or “+”, turn the “PWR•VOL” knob, or use the volume
switch on the steering wheel.
- Replying a message (Quick reply)
Touch “Reply” on the desired message screen.
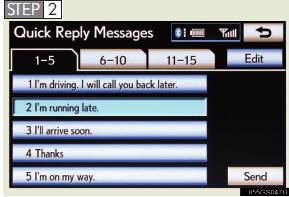
Touch the desired message.
Touch “Send”.
While the message is being sent, a sending message screen is displayed.
- To check the message
l Messages are displayed in the appropriate connected Bluetooth® phone’s
registered mail address folder. Touch the tab of the desired folder to be
displayed.
l Only received messages on the connected Bluetooth® phone can be dis-
played.
l When the received message is an e-mail and “Update Message Read Sta-
tus on Phone” is set to “On”, “Mark as Unread” or “Mark as Read” can
be selected. Touch “Mark as Unread” to mark mails that have been read
on the Bluetooth® phone as unread. Conversely, touch “Mark as Read”
to mark mails that have not been read on the Bluetooth® phone as read.
- Calling using SMS/MMS message
You can call using the SMS (Short Message Service)/MMS (Multimedia
Messaging Service) message sender’s phone number.
n If the message delivery failed If message delivery has failed, a notification will be displayed on the screen.
Touch “Retry” to attempt to send the message again or touch “Cancel” to cancel.
- Editing a quick reply message
You can edit the “Quick Reply Messages”.
- New message notification
If “New Message Pop-up” and “New Message Voice Notification” are set to
“On”, a notification appears on the screen and a voice notification will be
heard when a new message arrives, touch “Read” to check the message, also
to check the message later, touch “Ignore”. When “Automatic Message
Readout” is set to “On”, the message will be automatically read out.
You can set the hands-free system to your desired settings.
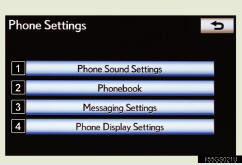
1 Phone sound settings
2 Phonebook settings
3 Message settings
4 Phone display settings
To display the screen shown above, press the “SETUP” button, and touch “Phone” on the “Setup” screen.
Phone sound settings
- Setting the volum
 Display the “Phone Settings”
screen.
Display the “Phone Settings”
screen.
 Touch “Phone Sound Settings” on
the “Phone Settings”
screen.
Touch “Phone Sound Settings” on
the “Phone Settings”
screen.

Choose the volume setting switch.
“Call Volume”:changes the speaker volume
“Ring Tone Volume”:changes the ring tone volume
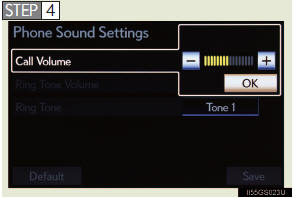
Touch “-” or “+” to lower or raise the volume, and then touch “OK”.
 When you complete all settings,
touch “Save”.
When you complete all settings,
touch “Save”.
- Setting the ring tone
 Display the “Phone Settings”
screen.
Display the “Phone Settings”
screen.
 Touch “Phone Sound Settings” on
the “Phone Settings”
screen.
Touch “Phone Sound Settings” on
the “Phone Settings”
screen.
 Touch “Ring Tone” on the “Phone
Sound Settings” screen.
Touch “Ring Tone” on the “Phone
Sound Settings” screen.
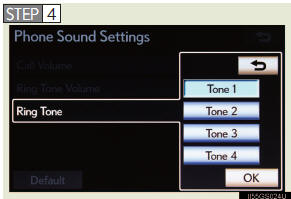
Touch the screen button corre- sponding to the desired ring tone.
Ring tones can be heard by touching the screen buttons, and then touch “OK”.
 When you complete setting, touch
“Save
When you complete setting, touch
“Save
- Adaptive volume control
When traveling at 50 mph (80 km/h) or more, the system automatically
raises the volume.
- To return to the default phone sound settings
Touch “Default”, and then touch “Yes”.
Phonebook settings
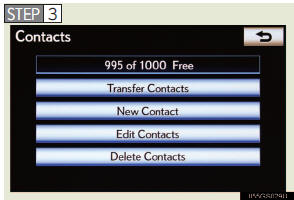
The phonebook manages a maximum of 5 phonebooks in total.
The data for 1000 contacts (up to 3 numbers per contact) can be registered in each phonebook.
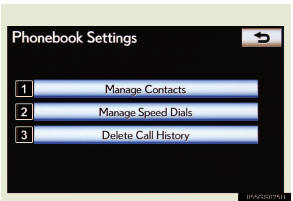
1 Setting the phonebook
2 Setting the speed dials
3 Deleting the call history
To display the screen above, follow the steps below.
Press the “SETUP” button, and
touch “Phone” on the
“Setup” screen.
Touch “Phonebook” on the “Phone
Settings” screen.
- Setting the phonebook
l Transferring a phone number
You can transfer the phone numbers in your Bluetooth® phone to
the system. Operation methods differ between PBAP compatible
and PBAP incompatible but OPP compatible Bluetooth®
phones. If your cellular phone is neither PBAP nor OPP compat-
ible, the phonebook cannot be transferred.
►For PBAP compatible Bluetooth¬Æ phones
 Display the “Phonebook Settings”
screen.
Display the “Phonebook Settings”
screen.
 Touch “Manage Contacts” on the
“Phonebook Settings”
screen.
Touch “Manage Contacts” on the
“Phonebook Settings”
screen.
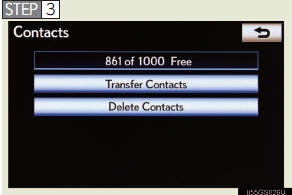
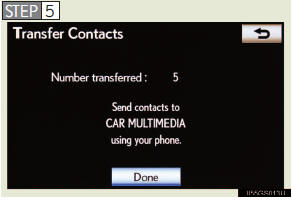
Touch “Transfer Contacts”.
Touch “Transfer Contacts”.
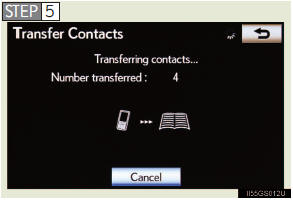
Transfer the phonebook data to the system using the Blue- tooth® phone.
This operation may be unneces- sary depending on the cellular phone model.
Depending on the type of cellu- lar phone, OBEX authentication may be required when transfer- ring phonebook data. Enter “1234” into the Bluetooth® phone.
If you wish to cancel the trans- fer before it finishes, touch “Cancel”.
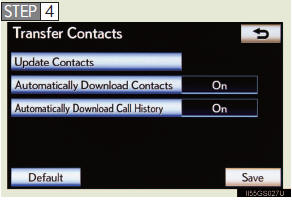
►PBAP compatible models automatic data transfer setting
 Display the “Phonebook Settings”
screen.
Display the “Phonebook Settings”
screen.
 Touch “Manage Contacts” on the
“Phonebook Settings”
screen.
Touch “Manage Contacts” on the
“Phonebook Settings”
screen.
 Touch “Transfer Contacts” on the
“Contacts” screen.
Touch “Transfer Contacts” on the
“Contacts” screen.
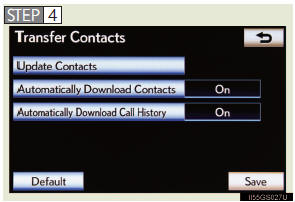
Touch the item to be set.
“Automatically Download Con- tacts”: Transfer the phonebook from a connected cellular phone.
“Automatically Download Call History”: transfer the call his- tory from a connected cellular phone.
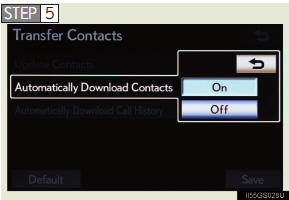
Touch “On”, and then touch “Save”.
►For PBAP incompatible but OPP compatible Bluetooth¬Æ phones
Display the “Phonebook Settings”
screen.
Display the “Phonebook Settings”
screen.
Touch “Transfer Contacts”.
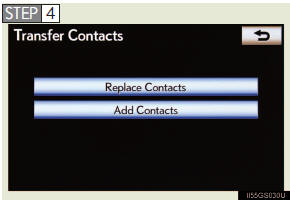
Touch “Replace Contacts” or “Add Contacts”.
In the case that the phonebook contains phonebook data, this screen is displayed.
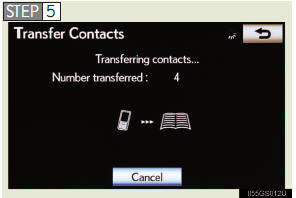
Transfer the phonebook data to the system using the Blue- tooth® phone.
Depending on the type of cellu- lar phone, OBEX authentication may be required when transfer- ring phonebook data. Enter “1234” into the Bluetooth® phone.
If you wish to cancel the trans- fer before it finishes, touch “Cancel”.
If “Add Contacts” is touched and there is an interruption dur- ing the transfer of data, the phonebook data transferred until then will be stored in the system. Please note, this is not the case when “Cancel” is touched.
 When the transfer is complete,
“Done” will appear on the
screen. Touch “Done”.
When the transfer is complete,
“Done” will appear on the
screen. Touch “Done”.
l Registering the phonebook data
You can register the phonebook data. Up to 3 numbers per per-
son can be registered. New phonebook data cannot be added for
PBAP compatible Bluetooth® phones.
 Display the “Phonebook Settings”
screen.
Display the “Phonebook Settings”
screen.
 Touch “Manage Contacts” on the
“Phonebook Settings”
screen.
Touch “Manage Contacts” on the
“Phonebook Settings”
screen.
 Touch “New Contact” on the
“Contacts” screen.
Touch “New Contact” on the
“Contacts” screen.
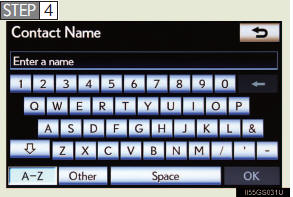
Input the name, and touch “OK”.
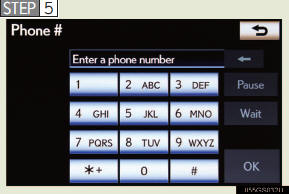
Input the phone number, and touch “OK”.
If you want to use the tone sig- nal after the phone number, input the tone signal too.
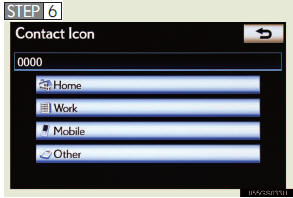
Touch the desired phone type.
 When two or less numbers in total
are registered to this con-
tact, this screen is displayed. When you want to add a num-
ber to this contact, touch “Yes”.
When two or less numbers in total
are registered to this con-
tact, this screen is displayed. When you want to add a num-
ber to this contact, touch “Yes”.
l Editing the phonebook data
You can register the phone number separately. Phonebooks can-
not be edited for PBAP compatible Bluetooth® phones.
 Display the “Phonebook Settings”
screen.
Display the “Phonebook Settings”
screen.
 Touch “Manage Contacts” on the
“Phonebook Settings”
screen.
Touch “Manage Contacts” on the
“Phonebook Settings”
screen.
 Touch “Edit Contacts” on the
“Contacts” screen.
Touch “Edit Contacts” on the
“Contacts” screen.
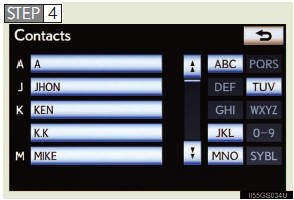
Choose the data to edit.
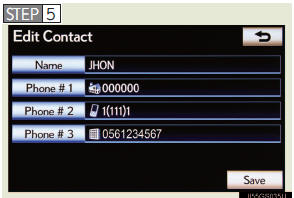
Touch the desired name or number.
 Edit the name or number. After
editing, touch “Save”.
Edit the name or number. After
editing, touch “Save”.
l Deleting the phonebook data
 Display the “Phonebook Settings”
screen.
Display the “Phonebook Settings”
screen.
 Touch “Manage Contacts” on the
“Phonebook Settings”
screen.
Touch “Manage Contacts” on the
“Phonebook Settings”
screen.
 Touch “Delete Contacts” on the
“Contacts” screen.
Touch “Delete Contacts” on the
“Contacts” screen.
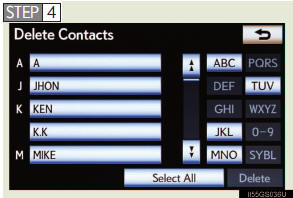
Choose the data to delete.
You can select multiple data and delete them at the same time.
To delete all data, touch “Select All”.
 Touch “Delete”. A confirmation
message will be displayed.
Touch “Delete”. A confirmation
message will be displayed.
If everything is correct, touch “Yes”.
- Phonebook data
Phonebook data is managed for every registered phone. When another
phone is connecting, you cannot read the registered data.
When selling or disposing of the vehicle, delete all your data on the system.
For PBAP compatible phones, delete the phonebook data after setting “Automatically Download Contacts” to “Off”.
- Setting the phonebook in a different way (To display the “Contacts”
screen)
 Display the “Phone” screen.
 Touch “Contacts” on the “Phone”
screen.
Touch “Contacts” on the “Phone”
screen.
 Touch “Options” on the “Contacts”
screen.
Touch “Options” on the “Contacts”
screen.
 Touch “Manage Contacts” on the
“Contacts” screen.
Touch “Manage Contacts” on the
“Contacts” screen.
- When another Bluetooth® device is connected during transferring a phone-
book
l For PBAP compatible Bluetooth® phones
If another Bluetooth® device is connected when transferring phonebook
data, depending on the phone, the connected Bluetooth® device may
need to be disconnected.
- For PBAP incompatible but OPP compatible Bluetooth® phones
When another Bluetooth® device is connected, a confirmation message will
be displayed. If you want to disconnect it, touch “Yes”.
- Transferring the phone number data in a different way
Display the “Phone” screen.
Touch “Contacts” on the “Phone”
screen.
Touch “Transfer” on the “Contacts”
screen.
The “Transfer Contacts” screen is
displayed. The following opera-
tions are performed in the same manner as when they are per-
formed from the “Setup” screen.
- Editing the phonebook data in a different way
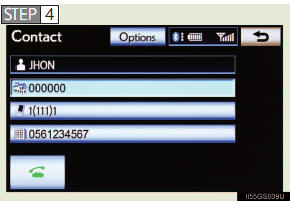
l From “Contact” screen
Display the “Phone” screen
Touch “Contacts” on the “Phone”
screen.
Choose the desired data from the
list.
Touch “Options” on the “Contact”
screen.
 Touch “Edit” on the “Contact”
screen.
Touch “Edit” on the “Contact”
screen.
 Follow the steps “Editing the
phonebook data” from “STEP5”.
Follow the steps “Editing the
phonebook data” from “STEP5”.
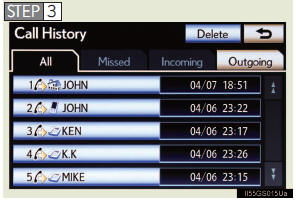
l From “Call History” screen
Display the “Phone” screen.
Touch “Call History” on the
“Phone” screen.
Choose the desired data from the
list.
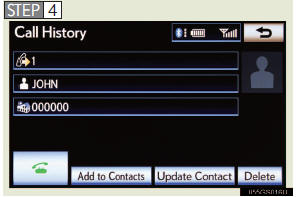
Touch “Add to Contacts” or “Update
Contact” on the “Call His-
tory” screen.
If you touch “Add to Contacts”,
follow the steps “Editing the
phonebook data” from “STEP5”.
If you touch “Update Contact”, follow the steps “Editing the phonebook data” from “STEP4”.
- Deleting the phonebook data in a different way (PBAP incompatible but OPP compatible models)
Display the “Phone” scree
Touch “Contacts” on the “Phone”
screen.
Choose the desired data from the
list.
Touch “Options” on the “Contact”
screen.
Touch “Delete” on the “Contact”
screen.
A confirmation message will be
displayed. If everything is correct,
touch “Yes”.
- When a Bluetooth® phone is deleted.
The phonebook data will be deleted at the same time.
Setting the speed dials
- Registering the speed dial
You can register the desired phone number from the phonebook.
Up to 18 numbers per phone can be registered.
Display the “Phonebook Settings”
screen.
Touch “Manage Speed Dials” on the
“Phonebook Settings”
screen.
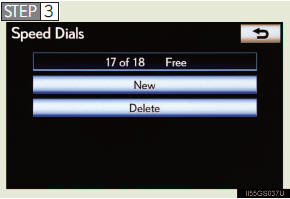
Touch “New”.
Choose the data to register.
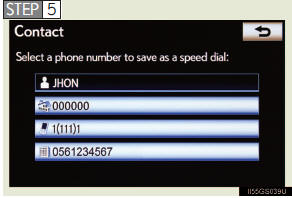
Touch the desired phone num- ber.
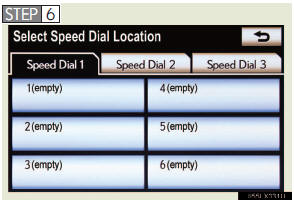
Touch the switch you want to register the number in.
 If you select a switch you
registered before, a confirmation
message will be displayed. If you want to replace it, touch
“Yes”.
If you select a switch you
registered before, a confirmation
message will be displayed. If you want to replace it, touch
“Yes”.
- Deleting the speed dial
 Display the “Phonebook Settings”
screen.
Display the “Phonebook Settings”
screen.
 Touch “Manage Speed Dials” on the
“Phonebook Settings”
screen.
Touch “Manage Speed Dials” on the
“Phonebook Settings”
screen.
 Touch “Delete” on the “Speed
Dials” screen.
Touch “Delete” on the “Speed
Dials” screen.
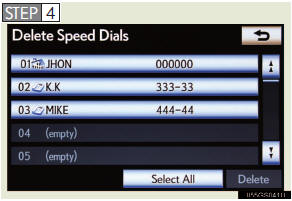
Choose the data to delete.
You can select multiple data and delete them at the same time.
To delete all data, touch “Select All”.
 Touch “Delete”. A confirmation
message will be displayed.
Touch “Delete”. A confirmation
message will be displayed.
If everything is correct, touch “Yes”.
- Setting the speed dials in a different way
l To display the “Speed Dials” screen
Display the “Phone” screen.
Touch “Speed Dials” on the
“Phone” screen.
Touch “Options” on the “Speed
Dial” screen.
l To display the “Contacts” screen
Display the “Phone” screen.
Touch “Contacts” on the “Phone”
screen
Touch “Options” on the “Contacts”
screen.
 Touch “Manage Speed Dials” on the
“Contacts” screen.
Touch “Manage Speed Dials” on the
“Contacts” screen.
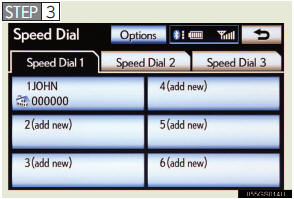
- Registering the speed dial in a different way
l From “Speed Dial” screen
Display the “Phone” screen.
Touch “Speed Dials” on the
“Phone” screen.
Touch “(add new)” on the “Speed
Dial” screen.
Touch “Yes” to set new speed
dial.
 Touch “Yes” to set new speed
dial.
Touch “Yes” to set new speed
dial.
 Touch the desired phone number.
 Follow the steps “Registering the
speed dial” from “STEP6
Follow the steps “Registering the
speed dial” from “STEP6
l From “Contact” screen
Display the “Phone” screen.
Touch “Contacts” on the “Phone”
screen.
Choose the desired data from the
list.
Touch “Options” on the “Contact”
screen.
Touch “Options” on the “Contact”
screen.
Touch the desired phone number.
Touch the desired phone number.
Deleting call history
The call history can be deleted. For PBAP compatible phones, delete the call history after setting “Automatically Download Call History” to “Off”
Display the “Phonebook Settings”
screen.
Display the “Phonebook Settings”
screen.
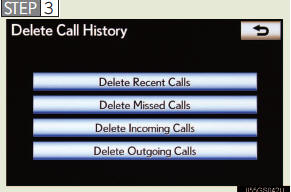
Choose the desired history to delete.
Choose the data to delete.
You can select multiple data and delete them at the same time.
To delete all data, touch “Select All”.
Touch “Delete”. A confirmation
message will be displayed.
If everything is correct, touch “Yes”.
- Deleting call history in a different way
Display the “Phone” screen.
Touch “Call History” on the
“Phone” screen.
 Touch “Delete” on the “Call
History” screen.
Touch “Delete” on the “Call
History” screen.
 Follow the steps “Deleting call
history” from “STEP4”
Follow the steps “Deleting call
history” from “STEP4”
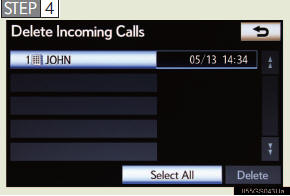
- Deleting after call history has been displayed
Display the “Phone” screen
Touch “Call History” on the
“Phone” scree
Touch the desired history to
delete.
Touch “Delete”. A confirmation
message will be displayed. If
everything is correct, touch “Yes”.
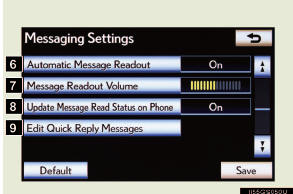
Message settings
You can change the message settings.
►Page 1
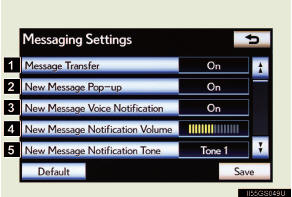
1 Message forwarding from
cellular phone on/off
2 New message notification
display on/off
3 New message voice notifica-
tion on/off
4 Changing new message noti-
fication volume
5 Changing new message voice
notification tone
6 Automatic message read out
function on/off
7 Changing a message read out
volume
8 Cellular pho
ne’s message
read and unread status update
function on/off
9 Editing “Edit Quick Reply
Messages”
►Page 2
To display the screen above, follow the steps below.
 Press the “SETUP” button, and
touch “Phone” on the
“Setup” screen.
Press the “SETUP” button, and
touch “Phone” on the
“Setup” screen.
 Touch “Messaging Settings” on the
“Phone Settings”
screen.
Touch “Messaging Settings” on the
“Phone Settings”
screen.
- Changing the new message notification volume
 Display the “Messaging Settings”
screen.
Display the “Messaging Settings”
screen.
Touch “New Message Notification
Volume” on the “Mes-
saging Settings” screen.
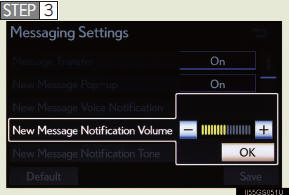
Touch “-” or “+” to lower or raise the volume, and then touch “OK”.
 When you complete setting, touch
“Save”.
When you complete setting, touch
“Save”.
- Changing the new message notification tone
Display the “Messaging Settings”
screen.
Touch “New Message Notification
Tone” on the “Messag-
ing Settings” screen.
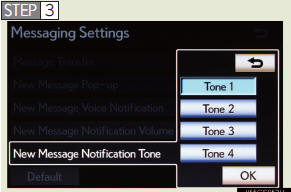
Touch the desired new mes- sage notification tone.
New message notification tones can be heard by touching the screen buttons, and then touch “OK”.
When you complete setting, touch
“Save”.
- Changing the message read out volume
Display the “Messaging Settings”
screen.
Touch “Message Readout Volume” on
the “Messaging Set-
tings” screen.
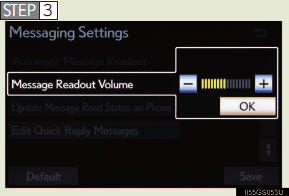
Touch “-” or “+” to lower or raise the volume, and then touch “OK”.
When you complete setting, touch
“Save”.
- Editing the quick reply messages
Quick reply messages can be edited. 15 messages have already
been stored.
Display the “Messaging Settings”
screen.
Touch “Edit Quick Reply Messages”
on the “Messaging
Settings” screen.
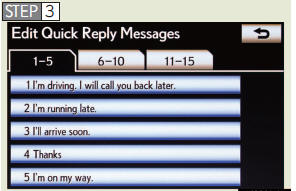
Touch the screen button corre- sponding to the desired mes- sage.
Edit the message. After editing,
touch “OK” and then touch
“Save”.
- To display the “Message settings” screen in a different way
Display the “Phone” screen.
Touch “Messages” on the “Phone”
screen.
 Touch “Options” on the “Messages”
screen.
Touch “Options” on the “Messages”
screen.
- Editing the quick reply messages in a different way
Display the desired message on
“Messages” screen.
Touch “Reply” on the desired
message screen.
 Touch “Edit” on the “Quick Reply
Messages”.
Touch “Edit” on the “Quick Reply
Messages”.
Touch the screen button
corresponding to the desired message.
 When you complete editing, touch
“OK” and then touch
When you complete editing, touch
“OK” and then touch  on
the “Edit Quick Reply Message” screen.
on
the “Edit Quick Reply Message” screen.
- Adaptive volume control
When traveling at 50 mph (80 km/h) or more, the system automatically
raises the volume.
- To return to the default message settings
Touch “Default”, and then touch “Yes”.
Phone display settings
Depending on the phone, this function may not be available even if the phone is PBAP compatible.
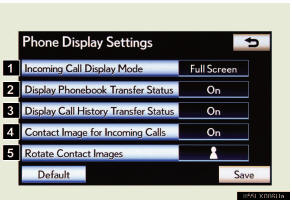
1 Changing the incoming call
display mode
2 Changing the display phone-
book transfer status on/off*
3 Changing the display call
history transfer status on/off*
4 Changing the contact image
during incoming call on/off*
5 Changing the rotate contact
image*
*: For PBAP compatible models
To display the screen above, follow the steps below.
 Press the “SETUP” button, and
touch “Phone” on the
“Setup” screen.
Press the “SETUP” button, and
touch “Phone” on the
“Setup” screen.
 Touch “Phone Display Settings” on
the “Phone Settings”
screen.
Touch “Phone Display Settings” on
the “Phone Settings”
screen.
- Changing the incoming call display mode
You can select the method of the incoming call display.
Display the “Phone Display
Settings” screen.
Touch “Incoming Call Display
Mode” on the “Phone Dis-
play Settings” screen.
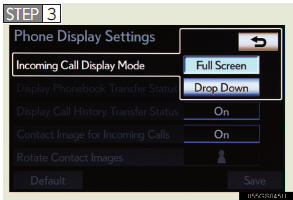
Touch “Full Screen” or “Drop Down”, and touch “Save”.
“Full Screen”: The hands-free screen is dis- played when a call is received, and you can operate the system from that screen.
“Drop Down”: A message is displayed at the top of the screen, and you can only operate the system with the steering switches.
Changing the rotating contact images
For PBAP compatible models, when “Contact Image for Incoming
Calls” is set to “On”, images stored together with phone numbers
in the cellular phone’s phonebook will be transferred and displayed
during the incoming call. The orientation of the image can be set.
Display the “Phone Display
Settings” screen.
Touch “Rotate Contact Images” on
the “Phone Display Set-
tings” screen.
 Choose the desired orientation of
the image to be displayed,
and then touch “Save”.
Choose the desired orientation of
the image to be displayed,
and then touch “Save”.
- To return to the default detailed phone settings
Touch “Default”, and then touch “Yes”.
You can confirm and change the Bluetooth® settings.
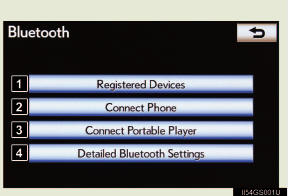
1 Registered Devices
2 Connect Phone
3 Connect Portable Player
4 Detailed Bluetooth® set-
tings
To display the screen shown above, press the “SETUP” button, touch “Bluetooth*” on the “Setup” screen.
*:Bluetooth is a registered trademark of Bluetooth SIG. Inc.
Registered devices
- Registering a Bluetooth® devices
Bluetooth® devices compatible with phones (HFP) and portable
players (AVP) can be registered simultaneously. Phones (HFP)
and portable players (AVP) (maximum of 5) can be registered.
Display the “Bluetooth*” screen.
Touch “Registered Devices” on the
“Bluetooth*” screen.
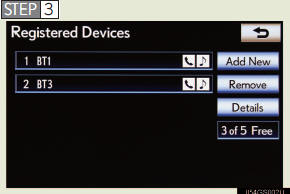
Touch “Add New” to register a Bluetooth® device to the sys- tem.
When 5 Bluetooth® devices have already been registered, a registered device needs to be deleted.
Touch “Yes” to delete one or more.
Touch the device to be deleted, then touch “Remove”, and then touch “Yes”.
*: Bluetooth is a registered trademark of Bluetooth SIG. Inc
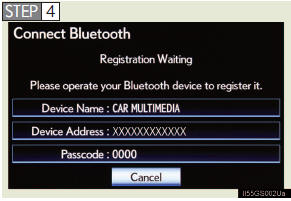
Input the passcode displayed on the screen into the Bluetooth® device.
A passcode is not required for SSP (Secure Simple Pairing) compatible Bluetooth® devices.
Depending on the type of Blue- tooth® phone being connected, a message confirming registra- tion may be displayed on the Bluetooth® phone’s screen.
Respond and operate the Blue- tooth® phone according to the confirmation message.
For the operation of the Blue- tooth® device, see the manual that comes with it.
If you want to cancel it, touch “Cancel”.
If a completion message is dis- played, registration is complete.
If an error message is displayed, follow the guidance on the screen to try again.
- Removing a Bluetooth® device
 Display the “Bluetooth*” screen.
 Touch “Registered Devices” on the
“Bluetooth*” screen.
Touch “Registered Devices” on the
“Bluetooth*” screen.
 Touch “Remove” on the “Registered
Devices” screen.
Touch “Remove” on the “Registered
Devices” screen.
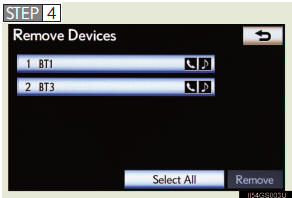
Choose the desired device.
You can select multiple device and delete them at the same time.
To remove all devices, touch “Select All”.
 Touch “Remove”. A confirmation
message will be dis-
played. If everything is correct, touch “Yes”.
Touch “Remove”. A confirmation
message will be dis-
played. If everything is correct, touch “Yes”.
*: Bluetooth is a registered trademark of Bluetooth SIG. Inc
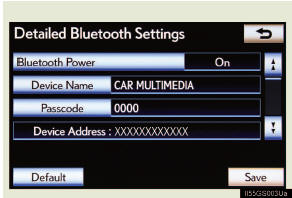
- Editing a Bluetooth® device
You can see the information of the Bluetooth® device on the sys-
tem or edit.
l Changing a device name
Display the “Bluetooth*” screen.
Touch “Registered Devices” on the
“Bluetooth*” screen.
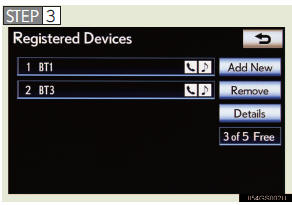
Touch “Details”.
*: Bluetooth is a registered trademark of Bluetooth SIG. Inc.

Touch the device to be edited.
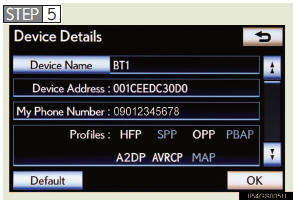
Touch “Device Name”.
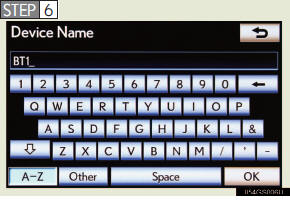
Input the device name, and touch “OK”.
 Confirm the device name and touch
“OK”.
Confirm the device name and touch
“OK”.
l Setting portable player connection method
 Display the “Bluetooth*” screen.
 Touch “Registered Devices” on the
“Bluetooth*” screen.
Touch “Registered Devices” on the
“Bluetooth*” screen.
 Touch “Details” on the
“Registered Devices” screen.
Touch “Details” on the
“Registered Devices” screen.
 Touch the device to be edited.
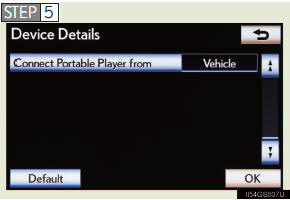
Touch “Connect Portable Player from”.
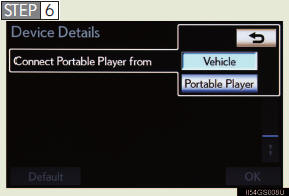
Touch the desired connection method, and touch “OK”.
“Vehicle”: Touch to connect the audio sys- tem to the portable player.
“Portable Player”: Touch to connect the portable player to the audio system.
Depending on the portable player, the “Vehicle” or “Porta- ble Player” connection method may be best. As such, refer to the manual that comes with the portable player.
*: Bluetooth is a registered trademark of Bluetooth SIG. Inc.
- Editing the “Device Name”
If you change a device name, the name registered in your cellular phone is
not changed.
- About “Device Address”
The address peculiar to the system. It cannot be changed. If you have regis-
tered two Bluetooth® phones with the same device name and you cannot
distinguish one from the other, refer to this address.
- “My Phone Number”:
The phone number of the Bluetooth® phone is displayed on the screen.
Depending on the type of phone, the phone number may not be displayed.
- “Profiles”:
The compatibil
See also:
Engine compartment
1. Engine coolant reservoir
2. Engine oil level dipstick
3. Engine oil filler cap
4. Brake fluid reservoir
5. Fuse box
6. Battery
7. Radiator
8. Condenser
9. Electric cooling fan
10. Washer ...
Child restraint systems with a top tether strap
Secure the child restraint using
a seat belt or the LATCH anchors, and do the following.
Move the head restraint in place at the upmost position.
Open the anchor bracket cover, latch the hook o ...
Quick reference (“Information” screen)
This screen can be used to display the calendar and information on operation
of the hands−free phone, etc. To display the ‚ÄúInformation‚Äù screen, push the ‚ÄúINFO/PHONE‚Äù
button.
1. ‚Ä ...