General settings
Used for language selection and the on/ off settings of operation sounds and au- tomatic screen change.
1 Press the “SETUP” button.

2 Touch “General”.
3 Touch the items to be set.
4 Touch “Save”.
SCREENS FOR GENERAL SETTINGS
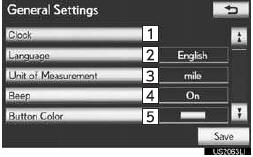

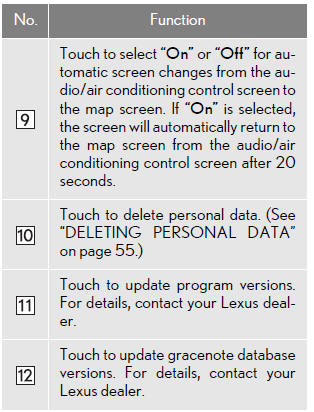
• On this screen, the following functions can be performed:

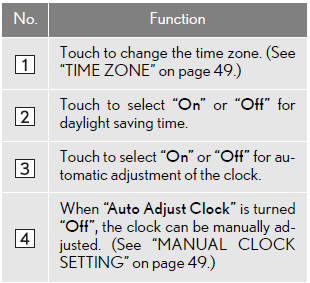
CLOCK SETTINGS
Used for changing time zones, the on/ off settings of daylight saving time and automatic adjustment of the clock.
1 Press the “SETUP” button.
2 Touch “General” on the “Setup” screen.
3 Touch “Clock”.
4 Touch the items to be set.

•On this screen, the following functions can be performed:
5 Touch “Save”.
■TIME ZONE
A time zone can be selected and GMT can be set.
1 Press the “SETUP” button.
2 Touch “General” on the “Setup” screen.
3 Touch “Clock” on the
“General Settings” screen.
4 Touch “Time Zone”.
5 Touch the desired time zone.
• If “Other” is touched, the zone can be adjusted manually. Touch “+” or “-” to adjust the time zone and then touch “OK”.

6 Touch “Save”.
■MANUAL CLOCK SETTING
When “Auto Adjust Clock” is turned “Off”, the clock can be manually adjust- ed.
1 Press the “SETUP” button.
2 Touch “General” on the “Setup” screen.
3 Touch “Clock” on the “General Set-
tings” screen.
4 Touch the items to be set.

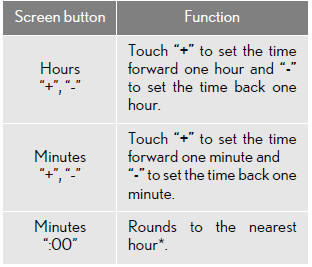
*: e.g. 1:00 to 1:29 → 1:00
1:30 to 1:59 → 2:00
5 Touch “Save”.
SELECTING A LANGUAGE
The language can be changed.
1 Press the “SETUP” button.
2 Touch “General” on the “Setup” screen.
3 Touch “Language”.
4 Touch the desired screen button.
5 Touch “Yes”.
• The previous screen will be displayed.
6 Touch “Save”.
UNIT OF MEASUREMENT
Distance unit can be changed.
1 Press the “SETUP” button.
2 Touch “General” on the “Setup” screen.
3 Touch “Unit of Measurement”.
4 Touch “km” or “mile”.
• The previous screen will be displayed.
5 Touch “Save”.
• This function is available only in English or Spanish. To change language.
SELECTING A BUTTON COLOR
The color of the screen buttons can be changed.
1 Press the “SETUP” button.
2 Touch “General” on the “Setup” screen.
3 Touch “Button Color”

4 Touch the desired screen button color.
• The previous screen will be displayed.
5 Touch “Save”.
SELECTING A KEYBOARD LAYOUT
Keyboard layout can be changed.
1 Press the “SETUP” button.
2 Touch “General” on the “Setup” screen.
3 Touch “Keyboard Layout”.

4 Touch “ABC” or “QWERTY” of “Key- board Layout” to select a keyboard lay- out.
• The previous screen will be displayed.
5 Touch “Save”.
■LAYOUT TYPE
►‚ÄúABC‚Äù type
►‚ÄúQWERTY‚Äù type
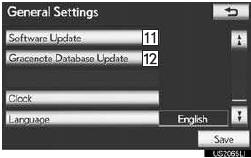
CHANGING THE STARTUP IMAGE
When the “ENGINE START STOP” switch is in ACCESSORY or IGNI- TION ON mode, the initial screen will be displayed.
An image can be copied from a USB memory and used as the startup image.
INFORMATION
●When saving the images to a USB, name
the folder that the startup image is saved
to “StartupImage” and name the folder
that the screen off image is saved to
“DisplayOffImage”. If these folder names
are not used, the navigation system can-
not download the images. (The folder
names are case sensitive.)
●The images file extension is JPG or
JPEG.
●The images file name, including the file
extension, can be up to 32 characters.
●Image files of 10 MB or less can be saved.
●Up to 3 images can be downloaded.
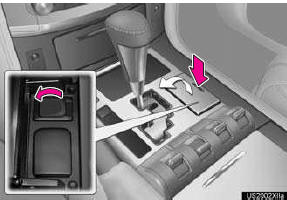
■TRANSFERRING DATA
1 Press the lid, open the cover and con- nect a USB memory.
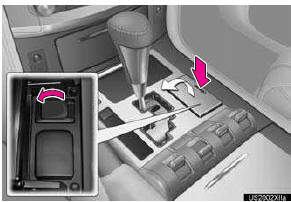
●Turn on the power of the USB memory if it is not turned on.
2 Press the “SETUP” button.
3 Touch “General” on the “Setup” screen.
4 Touch “Customize Startup Image”.
5 Touch “Transfer”.
6 Touch “Yes”.
■SETTING THE STARTUP IMAGE
1 Press the “SETUP” button.
2 Touch “General” on the “Setup” screen.
3 Touch “Customize Startup Image” on
the “General Settings” screen.
4 Touch the desired image.
5 Touch “Save”.
■DELETING TRANSFERRED IMAGES
1 Press the “SETUP” button.
2 Touch “General” on the “Setup” screen.
3 Touch “Customize Startup Image” on
the “General Settings” screen.
4 Touch “Delete All”.
5 Touch “Yes”.
CHANGING THE SCREEN OFF IMAGE
Touch “Screen Off” to turn off the screen. An image can be copied from a USB memory and can be set to display when “Screen Off” is touched.
■TRANSFERRING DATA
1 Press the lid, open the cover and con- nect a USB memory.
•Turn on the power of the USB memory if it is not turned on.
2 Press the “SETUP” button.
3 Touch “General” on the “Setup” screen.
4 Touch “Customize Screen Off Image”.
5 Touch “Transfer”.
6 Touch “Yes”.
■SETTING THE SCREEN OFF IMAGE
1 Press the “SETUP” button.
2 Touch “General” on the “Setup” screen.
3 Touch “Customize Screen Off Image”
on the “General Settings” screen.
4 Touch the desired image.
5 Touch “Save”.
■DELETING TRANSFERRED IMAGES
1 Press the “SETUP” button.
2 Touch “General” on the “Setup” screen.
3 Touch “Customize Screen Off Image”
on the “General Settings” screen.
4 Touch “Delete All”.
5 Touch “Yes”.
DELETING PERSONAL DATA
1 Press the “SETUP” button.
2 Touch “General” on the “Setup” screen.
3 Touch “Delete Personal Data”
4 Touch “Delete”.
5 Touch “Yes”.
•The following personal data can be
deleted
or returned to their default settings:
• Maintenance conditions
• Maintenance information off setting
• Address book
• Areas to avoid
• Previous points
• Route guidance
• Route trace
• Phonebook data
• Call history data
• Speed dial data
• Bluetooth® phone data
• Phone sound settings
• Phone display settings
• Message settings
• Audio setting
• Bluetooth® audio setting
• Startup image data
• Screen off image data
INFORMATION
●This function is not available while driving.
See also:
Antenna locatioand effective range
Antenna location
1 Antennas outside cabin
2 Antennas inside cabin
3 Antenna outside luggage
compartment
Effective range (areas withiwhich the electronic key is
detected)
•Whelocking or un ...
Warranty parts list
Air Conditioning System
• Compressor
• Condenser
• Evaporator
• Associated parts
Air/Fuel Metering System
• Air/fuel ratio feedback control
system
• Cold-start enrichment system
‚ ...
Operating a USB memory
Connecting a USB memory enables you to enjoy music from the vehicle speakers.
- Connecting a USB memory
Slide the auxiliary box lid.
Open the cover and connect a USB memory.
Turn on the ...