Setting up the “Address Book”
Points or areas on the map can be registered.
1. Push the “SETUP” button.
2. Touch “Navi.” on the “Setup” screen.
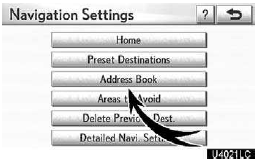
3. Touch “Address Book”.
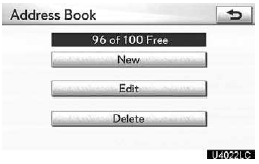
- Registering address book entries
- Editing address book entries
- Deleting address book entries
(a) Registering address book entries
1. Push the “SETUP” button.
2. Touch “Navi.” on the “Setup” screen.
3. Touch “Address Book” on the “Navigation Settings” screen.
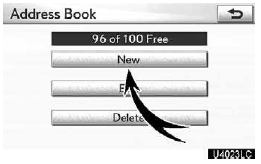
4. Touch “New”.
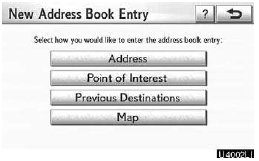
5. Enter the location in the same way as for a destination search.
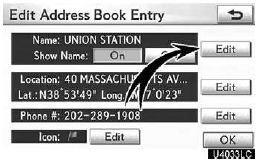
After the address book entry has been registered, the “Edit Address Book Entry” screen will be displayed.
6. Touch “OK”.
To edit registered information, see “(b) Editing address book entries” on page 118.
INFORMATION
Up to 100 address book entries can be registered.
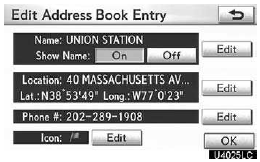
(b) Editing address book entries
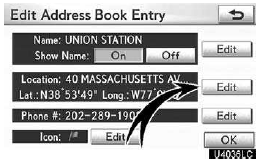
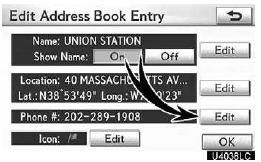
The icon, name, location and/or telephone number of a registered address book entry can be edited.
1. Push the “SETUP” button.
2. Touch “Navi.” on the “Setup” screen.
3. Touch “Address Book” on the “Navigation Settings” screen.
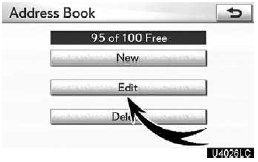
4. Touch “Edit”.
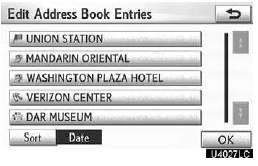
5. Touch the button of the desired address book entry.

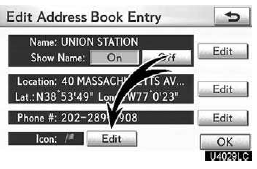
6. Touch “Edit” for the item you want to change.
“Name”: To edit address book entry names. The names can be displayed on the map.
“Location”: To edit location information.
“Phone #”: To edit telephone numbers.
“Icon”: To select icons to be displayed on the map.
7. Touch “OK”.
To change “Icon”
1. Touch “Edit” of “Icon”.
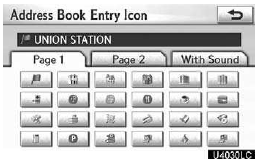
2. Touch the desired icon.
Change pages by touching “Page 1”, “Page 2” or “With Sound” tab.
SOUND ICONS
You can set a sound for some address book entries. When the vehicle approaches the location of the address book entry, the selected sound will be heard.
1. Touch “With Sound” on the “Address Book Entry Icon” screen.
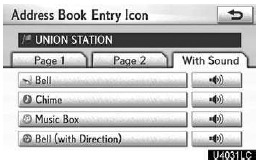
2. Touch the desired sound icon.
The next screen appears when “Bell (with Direction)” is touched.
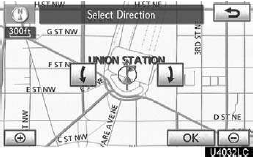
Touch either  or
or
 to adjust the direction. Touch “OK”.
The bell sounds only when the vehicle approaches this point in the direction that has been set.
To change “Name”
1. Touch “Edit” of “Name”.
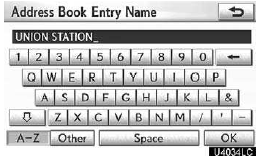
2. Enter the name using the alphanumeric keys.
Up to 32 characters can be entered.
3. Touch “OK”.
The previous screen will be displayed.
DISPLAYING MEMORY POINT NAMES
The name of an address book entry can be set to display on the map.

To show the name, touch “On” on the “Edit Address Book Entry” screen. To not show it, touch “Off”.
To change “Location”
1. Touch “Edit” of “Location”.
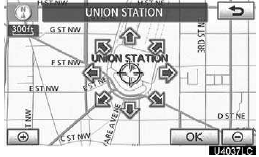
2. Touch one of the 8 directional buttons to move the cursor
 to the desired point on the map.
3. Touch “OK”.
The previous screen will be displayed.
To change “Phone #” (telephone number)
1. Touch “Edit” of “Phone #”.
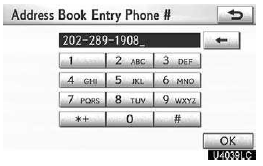
2. Enter the number using number keys.
3. Touch “OK”.
The previous screen will be displayed.
(c) Deleting address book entries
1. Push the “SETUP” button.
2. Touch “Navi.” on the “Setup” screen.
3. Touch “Address Book” on the “Navigation Settings” screen.
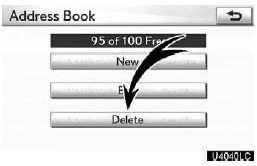
4. Touch “Delete”.
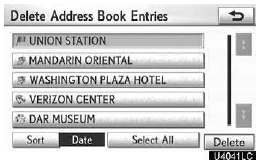
5. Touch the button to be deleted.
“Select All”: To select all addresses in the address book.
“Unselect All”: To unselect all of the selected addresses.
6. Touch “Delete”.
7. To delete the address book entry, touch “Yes”. To cancel the deletion, touch “No”.
See also:
Playing MP3/WMA discs
Selecting a file
1. Selecting a file
2. Selecting a folder
Push “ ” or “
” of “TUNE” until the desired file
number appears on the screen.
Selecting a folder
Push ‚Äú ‚Äù or ‚ ...
Command list
The system has a voice recognition command list. You can operate the voice recognition
system by saying any command from the displayed command list.
1. Push the talk switch.
2. Say “Command li ...
Selecting songs
Turn the “TUNE/SEL” knob or press “”
or “” on the “SEEK•TRACK” button to
select the desired song.
Playing and pausing songs
To play or pause a song, press the 3 (
) but ...