Quick reference
Operations such as selecting a preset station and adjusting the sound balance are carried out on the screen. To display the audio screen, push the “AUDIO” button.
DVD changer
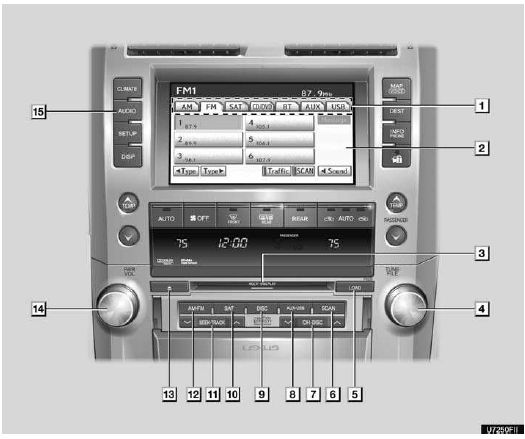
1. Function menu tab
To control the radio, DVD changer, Bluetooth audio player, AUX, USB memory or iPod, touch the screen tabs. For details, see page 190.
2. Function menu display screen
To control the radio, DVD changer, Bluetooth audio player, AUX, USB memory or iPod, touch the screen buttons. For details, see page 190.
3. Disc slot
Insert discs into the slot after pushing “LOAD” button. For details, see page 220.
4. “TUNE/FILE” knob
Turn this knob to move the station band and files up or down. For details, see pages 196, 201, 216 and 257.
5. “LOAD” button
Push this button to insert the discs.
For details, see page 220.
6. “SCAN” button
Push this button to scan radio stations or scan the files or tracks. For details, see pages 197, 203, 213, 217, 218 and 259.
7. “CH·DISC” button
Push the “ ” or “ ” button to select a preset station or a selected disc.
For details, see pages 197, 203, 223 and 225.
8. “AUX·USB” button
“AUX·USB” button Push this button to turn the Bluetooth audio player, AUX, USB memory or iPod on. For details, see pages 190, 195, 245 and 253.
9. “DISC” button
Push this button to play a DVD. For details, see pages 190 and 225.
10 . “SAT” button
Push this button to choose a SAT station.
For details, see pages 190, 196 and 200.
11. “SEEK·TRACK” button
Push the “ ” or “ ” button to seek up or down for a station, or to access a desired track, file or chapter. For details, see pages 197, 203, 212, 215, 231, 232, 242, 251 and 257.
12. “AM·FM” button
“AM·FM” button Push this button to choose a radio station. (AM, FM1, FM2) For details, see pages 190 and 196.
13. “  ” button
Push this button to eject the discs.
For details, see page 223.
14. “PWR/VOL” knob
Push this knob to turn the audio system on and off, and turn it to adjust the volume. For details, see page 189.
15. “AUDIO” button
Push this button to display the audio control screen. For details, see page 189.
CD changer
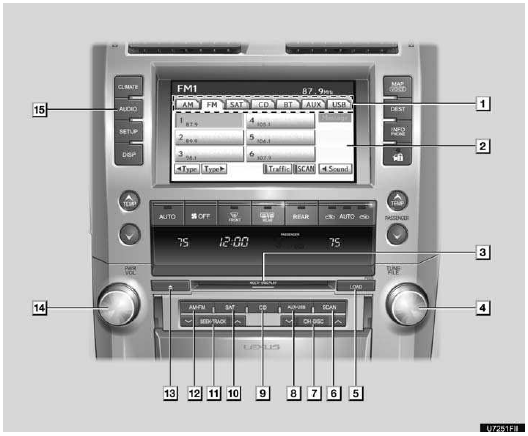
1. Function menu tab
To control the radio, CD changer, Bluetooth audio player, AUX, USB memory or iPod, touch the screen tabs. For details, see page 190.
2. Function menu display screen
To control the radio, CD changer, Bluetooth audio player, AUX, USB memory or iPod, touch the screen buttons. For details, see page 190.
3. Disc slot
Insert discs into the slot after pushing “LOAD” button. For details, see page 206.
4. “TUNE/FILE” knob
Turn this knob to move the station band and files up or down. For details, see pages 196, 201, 216 and 257.
5. “LOAD” button
Push this button to insert the discs.
For details, see page 206.
6. “SCAN” button
Push this button to scan radio stations or scan the files or tracks. For details, see pages 197, 203, 213, 217, 218 and 259.
7. “CH·DISC” button
Push the “  ” or “
 ” button to select a preset station
or a selected disc.
” button to select a preset station
or a selected disc.
For details, see pages 197, 203, 208 and 211.
8. “AUX·USB” button
Push this button to turn the Bluetooth audio player, AUX, USB memory or iPod on. For details, see pages 190, 195, 245 and 253.
9. “CD” button
Push this button to play a CD. For details, see pages 190 and 210.
10. “SAT” button
Push this button to choose a SAT station.
For details, see pages 190, 196 and 200.
11. “SEEK·TRACK” button
“SEEK·TRACK” button Push the “
” or “ ” button to seek up or down
for a station, or to access a desired track or file. For details, see pages 197,
203, 212, 215, 251 and 257.
12. “AM·FM” button
Push this button to choose a radio station. (AM, FM1, FM2) For details, see pages 190 and 196.
13. “  ” button
Push this button to eject the discs.
For details, see page 208.
14. “PWR/VOL” knob
Push this knob to turn the audio system on and off, and turn it to adjust the volume. For details, see page 189.
15. “AUDIO” button
Push this button to display the audio control screen. For details, see page 189.
See also:
Power Windows
1 Window lock switch
The window lock switch disables the operation
of all windows other than the driver’s
door window.
2 Power window switches
To open: press the switch.
To close: pull the ...
Active TRAC/VSC Off Mode
This switch turns off the active traction control system or vehicle stability
control system.
Use this switch if the wheels get stuck in snow, mud etc.
To turn off Active TRAC: Push the VSC OF ...
Switching the display
1. Menu switch
Changes modes to electronic fea- tures control mode, customization mode or back
to normal display mode.
2. “ENTER” switch
Changes trip information items.
This switch is also ...