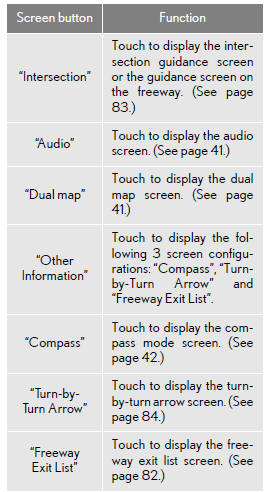
Map screen operation
CURRENT POSITION DISPLAY
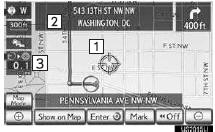
When starting the navigation system, the current position is displayed first.
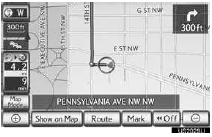
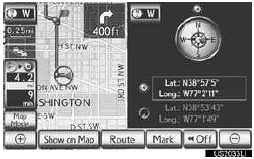
This screen displays the current position and a map of the surrounding area.

• The current position mark (1 ) appears in the center or bottom center of the map screen.
• A street name will appear on the bottom of the screen, depending on the scale of the map (2 ).
• The screen can be returned to this map screen that shows the current position at any time, from any screen by pressing the “MAP/VOICE” button.
INFORMATION
●While driving, the current position mark
is fixed on the screen and the map moves.
●The current position is automatically set
as the vehicle receives signals from the
GPS (Global Positioning System). If the
current position is not correct, it is auto-
matically corrected after the vehicle
receives signals from the GPS.
●After battery disconnection, or on a new
vehicle, the current position may not be
correct. As soon as the system receives
signals from the GPS, the correct current
position is displayed.
SCREEN SCROLL OPERATION
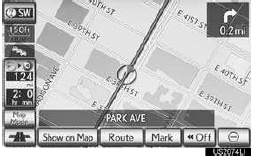
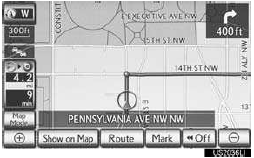
When any point on the map is touched, that point moves to the center of the screen and is shown by the cursor mark (1 ).
● Use the scroll feature to move the desired point to the center of the screen for looking at a point on the map that is different from the current position.
● If a finger touches and holds the map screen, it will continue scrolling in that direction until the finger is removed.
●A street name, city name, etc. of the
touched point will be shown, depending on
the scale of the map (2 ). Distance from
the current position to  will also
be
shown (3 ).
will also
be
shown (3 ).
●After the screen is scrolled, the map
remains centered at the selected location
until another function is activated. The
current position mark will continue to
move along your actual route and may
move off the screen. When the “MAP/
VOICE” button is pressed, the current
position mark returns to the center of the
screen and the map moves as the vehicle
proceeds along the designated route.
●When the scroll feature is used, the cur-
rent position mark may disappear from
the screen. Press the “MAP/VOICE”
button to display the current position on
the map screen.
TO SET THE CURSOR POSITION AS A DESTINATION
1 Touch “Enter  ”.
”.
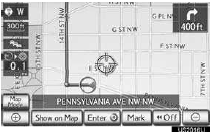
●The screen changes and displays the map location of the selected destination and the route preference.
TO REGISTER THE CURSOR POSITION AS AN ADDRESS BOOK ENTRY
Address book entry registration enables easy access to a specific point.
1 Touch “Mark”.
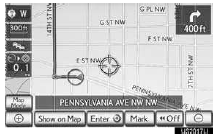
2 This screen is displayed.
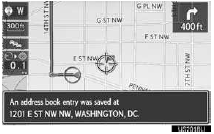
●The registered point is shown by
 on the
map.
on the
map.
INFORMATION
●Up to 100 address book entries can be registered. If there is an attempt to regis- ter more than 100 address book entries, an error message will appear.
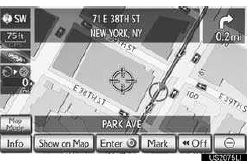
TO SEE INFORMATION ABOUT THE ICON WHERE THE CURSOR IS SET
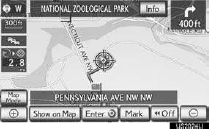
●To display information about an icon, set the cursor on it.
■POI INFORMATION
When the cursor is set on a POI icon, the name and “Info” are displayed at the top of the screen.
1 Touch “Info”.
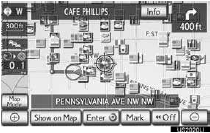
2 Information such as the name, address, position and phone number are dis- played.
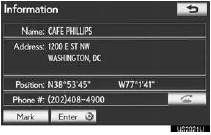
● If “Enter  ” is touched, the
cursor posi-
tion will be set as a destination.
” is touched, the
cursor posi-
tion will be set as a destination.
● If a destination has already been set,
“Enter ” and “Add to Route” will be
displayed.
” and “Add to Route” will be
displayed.
“Enter  ”: Touch to delete the
existing
destination(s) and set a new one.
”: Touch to delete the
existing
destination(s) and set a new one.
“Add to Route”: Touch to add a destina- tion.
●To register this POI as an address book entry, touch “Mark”.
● If  s touched, the registered
phone number can be called.
s touched, the registered
phone number can be called.
●The desired POI can be displayed on the map screen.
■ADDRESS BOOK ENTRY INFORMATION
When the cursor is set on an address book entry icon, the name and “Info” are displayed at the top of the screen.
1 Touch “Info”.
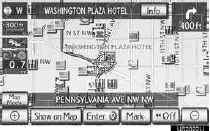
2 Information such as the name, address, position and phone number are dis- played.
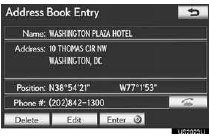
● If “Enter ” is touched, the
cursor posi-
tion will be set as a destination.
● If a destination has already been set,
“Enter ” and “Add to Route” will be
displayed.
“Enter ”: Touch to delete the
existing
destination(s) and set a new one.
“Add to Route”: Touch to add a destina-
tion.
●To edit an address book entry, touch
“Edit”.
●To delete an address book entry, touch
“Delete”.
● If is touched, the registered
phone number can be called.
■DESTINATION INFORMATION
When the cursor is set on a destination icon, the name and “Info” are displayed on the top of the screen.
1 Touch “Info”.
2 Information such as the name, address, position and phone number are dis- played.
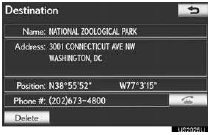
●To delete a destination, touch “Delete”.
● If s touched, the registered
phone number can be called.
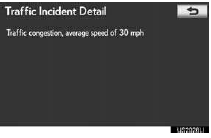
■XM NavTraffic® TEXT INFORMATION
When the XM NavTraffic® icon on the map screen is touched, the XM NavTraffic® information bar will appear on the upper part of the screen.
1 Touch “Info”.
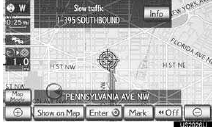
2 Traffic information will be displayed on the screen.
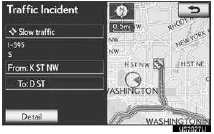
●To display detailed traffic event information, touch “Detail”.
SWITCHING THE SCREENS
Any of the screen configurations can be selected.
1 Touch “Map Mode”.
2 Touch the screen buttons to select the desired configuration.
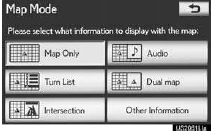
●Depending on the conditions, certain screen configuration buttons cannot be selected.
SCREEN CONFIGURATIONS
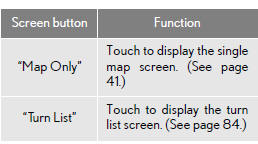
■MAP ONLY
This is a regular map screen.
• The screen shows the single map.
•While on a different screen, touching “Map Only” will display the single map screen.
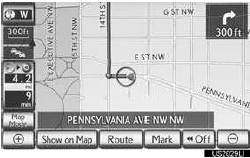
■AUDIO
The audio screen and the map screen are displayed.
•Information on the current radio station or track is displayed.
• If a different screen is displayed, touch “Audio” on the “Map Mode” screen.
•For audio system operation, refer to “Owner’s Manual”.
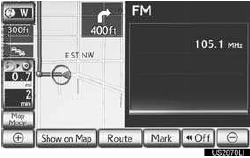
■DUAL MAP
The map screen can be split into two.
• The map screen can be split into two.
• While on a different screen, touching “Dual map” will display the dual map screen.
■EDITING RIGHT MAP
The right side map can be edited by touching any point on the right side map.
1 Touch the desired screen button.
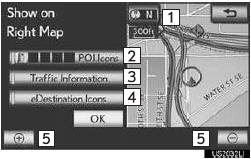
•The following procedures can be per- formed on this screen:
2 Touch “OK” when editing is completed.
• The screen returns to the dual map screen.
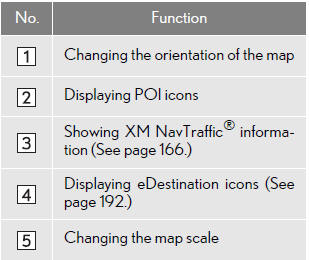
■COMPASS
The current position is indicated with a compass.
• Information about the destination, current position and a compass is displayed on the screen.
• While on a different screen, touching “Compass” will display the compass mode screen.
INFORMATION
●The destination mark is displayed in the
direction of the destination. When driv-
ing, refer to the longitude and latitude
coordinates, and the compass, to make
sure that the vehicle is headed in the
direction of the destination.
●When the vehicle travels out of the cover-
age area, the guidance screen changes to
the compass mode screen.
MAP SCALE
1 Touch  or
or
 to change the scale
of the map screen.
to change the scale
of the map screen.
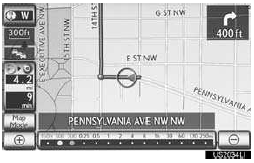
●The scale bar and indicator at the bottom of the screen indicate the map scale menu.
The scale range is from 150 ft. (50 m) to
250 miles (400 km).
●Touch and hold  or
or
 to continue
changing the scale of the map screen.
to continue
changing the scale of the map screen.
●The scale of the map screen can be
changed by touching the scale bar directly.
This function is not available while driving.
INFORMATION
●The map scale is displayed under the north-up or heading-up symbol at the top left of the screen.
●When the map scale is at the maximum
range of 250 miles (400 km), is not
shown. When the map scale  is at
the min-
imum range of 150 ft. (50 m), is
is at
the min-
imum range of 150 ft. (50 m), is  not
shown. In areas where the foot print map
is available the mapscale changes from
not
shown. In areas where the foot print map
is available the mapscale changes from
 to
to
 when at the minimum
range.
when at the minimum
range.
FOOT PRINT MAP
For the area which is covered by the foot print map (Some areas in the following cities: Detroit, Chicago, N.Y., L.A), you can switch to the foot print map on a scale of 75 ft. (25 m).
TO SWITCH TO THE FOOT PRINT MAP
changes into
when the map is
scaled down to 150 ft. (50 m).
1 To display the foot print map, touch
.
●To delete the foot print map display, touch
.
INFORMATION
●If the map or the current position is
moved to the area which is not covered
by the foot print map, the screen scale
automatically changes to 150 ft. (50 m).
●On the foot print map, a one way street is
displayed by  .
.
●It is not possible to perform scrolling on
the foot print map while driving.
Building footprints in the database were created and provided by MAPMASTER.
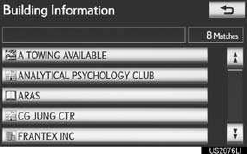
TO DISPLAY BUILDING INFORMATION
Information is available only for build- ings for which information is recorded on the map data.
1 Touch “Info” while the foot print map is displayed.
● Details of POIs in some buildings may be displayed.
●For detailed POI information, touch the building name. You can see details of the selected POIs.
ORIENTATION OF THE MAP
The orientation of the map can be changed from north-up to heading-up by touching the orientation symbol at the top left of the screen.
1 Touch  or
or
 .
.
► North-up screen

► Heading-up screen
 : North-up symbol
Regardless of the direction of vehicle travel,
north is always up.
 : Heading-up symbol
The direction of vehicle travel is always up.
●Both the north-up and heading-up sym- bols display the vehicles direction as a letter (e.g. N for north).
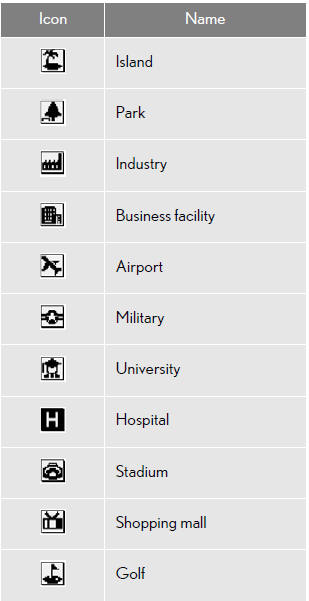
STANDARD MAP ICONS
See also:
Multi-terrain Monitor
The Multi-terrain Monitor displays the vehicle surroundings when driving at
low speeds, thus assisting off-road driving and helping the driver to check the
vehicle surroundings.
The Multi-terrain ...
Touch screen operation
This system is operated mainly by the touch screen buttons on the screen.
NOTICE
To prevent damaging the screen, lightly touch the screen buttons with your
finger.
Do not use objects other than y ...
Installing child restraints
Follow the child restraint system manufacturer’s instructions. Firmly
secure the child restraints to the outboard second seats using the
LATCH anchors or a seat belt. Attach the top tether strap w ...