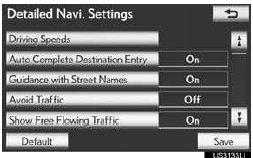
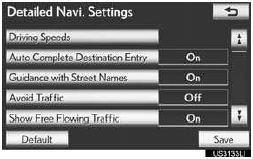
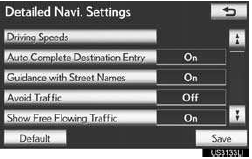
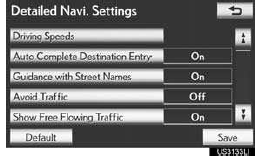
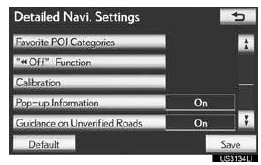
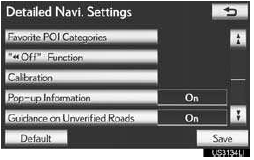
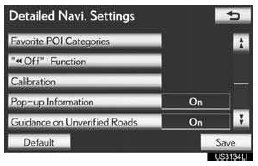
Detailed navigation settings
Settings are available for driving speeds,
favorite POI categories, automatic
screen change, ‚Äú Off‚ÄĚ function,
etc.
Off‚ÄĚ function,
etc.
1 Press the ‚ÄúSETUP‚ÄĚ button.
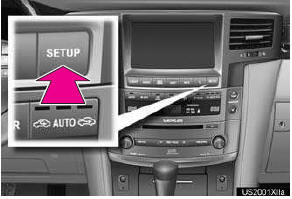
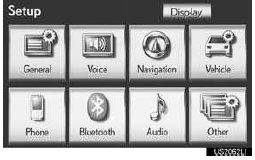
2 Touch ‚ÄúNavigation‚ÄĚ.
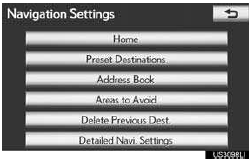
3 Touch ‚ÄúDetailed Navi. Settings‚ÄĚ.
4 Touch the items to be set.
5 Touch ‚ÄúSave‚ÄĚ.
SCREENS FOR NAVIGATION SETTINGS
‚ÄĘ On this screen, the following functions can be performed:
‚ÄĘ To reset all setup items, touch ‚Äú Default‚ÄĚ.
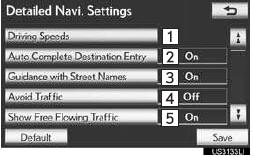
DRIVING SPEEDS
The speed that is used for the calculation of the estimated travel time and estimated arrival time can be set.
1 Press the ‚ÄúSETUP‚ÄĚ button.
2 Touch ‚ÄúNavigation‚ÄĚ on the ‚ÄúSetup‚ÄĚ screen.
3 Touch ‚ÄúDetailed Navi. Settings‚ÄĚ on the ‚ÄúNavigation Settings‚ÄĚ screen.
4 Touch ‚ÄúDriving Speeds‚ÄĚ.
5 Touch ‚Äú ‚ÄĚ or ‚Äú ‚ÄĚ to set the average vehicle speeds for ‚ÄúResidential‚ÄĚ, ‚ÄúMain Streets‚ÄĚ and ‚ÄúFreeways‚ÄĚ.
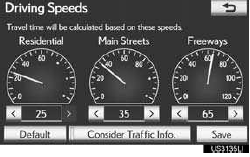
‚ÄĘ To set the default speeds, touch ‚ÄúDefault‚ÄĚ.
‚ÄĘ To use settings based on traffic information, touch ‚ÄúConsider Traffic Info.‚ÄĚ.
6 After setting of the desired speeds is completed, touch ‚ÄúSave‚ÄĚ.
INFORMATION
● The displayed time to the destination is
the approximate driving time that is calculated
based on the selected speeds
and the actual position along the guidance
route.
● The time shown on the screen may vary
greatly depending on progress along the
route, which may be affected by conditions
such as traffic jams and construction
work.
● Up to 99 hours 59 minutes can be displayed.
AUTO AVOID TRAFFIC
The guidance route automatically changes to another route to avoid heavy congestion when ‚ÄúAvoid Traffic‚ÄĚ is turned on.
1 Press the ‚ÄúSETUP‚ÄĚ button.
2 Touch ‚ÄúNavigation‚ÄĚ on the ‚ÄúSetup‚ÄĚ screen.
3 Touch ‚ÄúDetailed Navi. Settings‚ÄĚ on the ‚ÄúNavigation Settings‚ÄĚ screen.
4 Touch ‚ÄúAvoid Traffic‚ÄĚ.
5 Touch ‚ÄúOn‚ÄĚ or ‚ÄúOff‚ÄĚ.
6 Touch ‚ÄúSave‚ÄĚ.
● When congestion information about the guidance route has been received, a screen will appear to ask if it is desirable to reroute to avoid the congestion.
● Touch ‚ÄúYes‚ÄĚ to reroute. Another route to avoid the congestion will appear.
● Touch ‚ÄúNo‚ÄĚ if it is not desirable to reroute.
INFORMATION
● When the ‚ÄúTraffic Information‚ÄĚ indicator is dimmed, ‚ÄúAvoid Traffic‚ÄĚ, ‚ÄúTraffic Incident Warning‚ÄĚ and ‚ÄúShow Free Flowing Traffic‚ÄĚ will not operate.
SHOW FREE FLOWING TRAFFIC
Free flowing traffic can be shown by an arrow when ‚ÄúShow Free Flowing Traffic‚ÄĚ is turned on.
1 Press the ‚ÄúSETUP‚ÄĚ button.
2 Touch ‚ÄúNavigation‚ÄĚ on the ‚ÄúSetup‚ÄĚ screen.
3 Touch ‚ÄúDetailed Navi. Settings‚ÄĚ on the ‚ÄúNavigation Settings‚ÄĚ screen.
4 Touch ‚ÄúShow Free Flowing Traffic‚ÄĚ.
5 Touch ‚ÄúOn‚ÄĚ or ‚ÄúOff‚ÄĚ.
6 Touch ‚ÄúSave‚ÄĚ.
INFORMATION
● When the ‚ÄúTraffic Information‚ÄĚ indicator is dimmed, ‚ÄúAvoid Traffic‚ÄĚ, ‚ÄúTraffic Incident Warning‚ÄĚ and ‚ÄúShow Free Flowing Traffic‚ÄĚ will not operate.
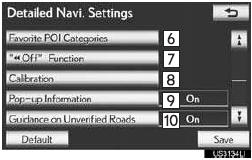
POI CATEGORY CHANGE (SELECT POI ICONS)
Select up to 6 POI icons to be displayed on the map screen.
1 Press the ‚ÄúSETUP‚ÄĚ button.
2 Touch ‚ÄúNavigation‚ÄĚ on the ‚ÄúSetup‚ÄĚ screen.
3 Touch ‚ÄúDetailed Navi. Settings‚ÄĚ on the ‚ÄúNavigation Settings‚ÄĚ screen.
4 Touch ‚ÄúFavorite POI Categories‚ÄĚ.
5 Touch the category to be changed.
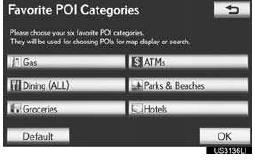
6 Touch the desired group.
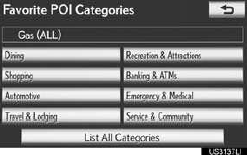
‚ÄĘ If the desired POI category is not on the screen, touch ‚ÄúList All Categories‚ÄĚ to list all POI categories.
7 Touch the desired category.
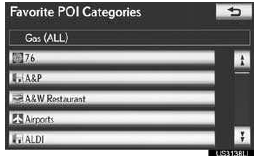
‚ÄĘ The screen returns to the first page of the ‚ÄúFavorite POI Categories‚ÄĚ screen.
8 Touch ‚ÄúOK‚ÄĚ.
SCREEN LAYOUT FUNCTION
(‚Äú Off‚ÄĚ Function)
Each screen button and current street name on the map screen can be displayed or hidden.
1 Press the ‚ÄúSETUP‚ÄĚ button.
2 Touch ‚ÄúNavigation‚ÄĚ on the ‚ÄúSetup‚ÄĚ screen.
3 Touch ‚ÄúDetailed Navi. Settings‚ÄĚ on the ‚ÄúNavigation Settings‚ÄĚ screen.
4 Touch ‚Äú‚Äú Off‚ÄĚ Function‚ÄĚ.
5 Touch the screen buttons to be turned off. The selected screen buttons will be dimmed.
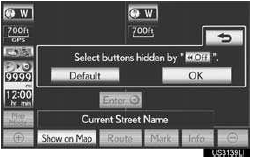
‚ÄĘ To set the setting as a default, touch ‚ÄúDefault‚ÄĚ.
6 Touch ‚ÄúOK‚ÄĚ.
‚ÄĘ The previous screen will be displayed.
7 Touch ‚ÄúSave‚ÄĚ.
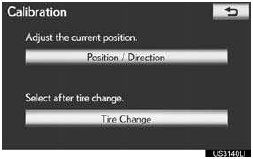
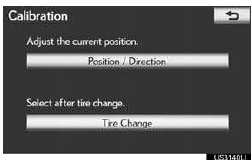
CURRENT POSITION/TIRE CHANGE CALIBRATION
The current position mark can be adjusted manually. Miscalculation of the distance caused by tire replacement can also be adjusted.
1 Press the ‚ÄúSETUP‚ÄĚ button.
2 Touch ‚ÄúNavigation‚ÄĚ on the ‚ÄúSetup‚ÄĚ screen.
3 Touch ‚ÄúDetailed Navi. Settings‚ÄĚ on the ‚ÄúNavigation Settings‚ÄĚ screen.
4 Touch ‚ÄúCalibration‚ÄĚ.
5 Touch the desired screen button.
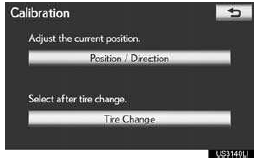
■POSITION/DIRECTION CALIBRATION
When driving, the current position mark will be automatically corrected by GPS signals. If GPS reception is poor due to location, the current position mark can be adjusted manually.
1 Touch ‚ÄúPosition / Direction‚ÄĚ.
2 Touch one of the 8 directional screen
buttons to move the cursor  to the
desired
point on the map.
to the
desired
point on the map.
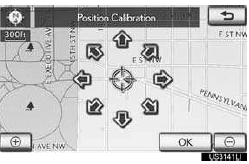
3 Touch ‚ÄúOK‚ÄĚ.
4 Touch either  or
or
 to adjust the direction
of the current position mark.
to adjust the direction
of the current position mark.
5 Touch ‚ÄúOK‚ÄĚ.
‚ÄĘ The map will be displayed.
■TIRE CHANGE CALIBRATION
The tire change calibration function will be used when replacing the tires. This function will adjust miscalculation caused by the circumference difference between the old and new tires.
1 To perform the distance calibration procedure, touch ‚ÄúTire Change‚ÄĚ.
‚ÄĘ The message appears and the quick distance calibration is automatically started. A few seconds later, a map will be displayed.
INFORMATION
● If this procedure is not performed when the tires are replaced, the current position mark may be incorrectly displayed.
POP-UP INFORMATION
When ‚ÄúPop-up information‚ÄĚ is turned on, pop-up information will be displayed.
1 Press the ‚ÄúSETUP‚ÄĚ button.
2 Touch ‚ÄúNavigation‚ÄĚ on the ‚ÄúSetup‚ÄĚ screen.
3 Touch ‚ÄúDetailed Navi. Settings‚ÄĚ on the ‚ÄúNavigation Settings‚ÄĚ screen.
4 Touch ‚ÄúPop-up Information‚ÄĚ.
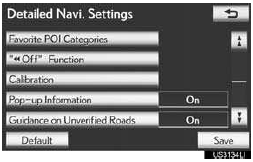
5 Touch ‚ÄúOn‚ÄĚ or ‚ÄúOff‚ÄĚ.
6 Touch ‚ÄúSave‚ÄĚ.
‚ÄĘ When ‚ÄúPop-up Information‚ÄĚ is turned off, the following messages will not be displayed.
►This message appears when the map is displayed POI icons and the map scale is over 0.5 miles (800 m).

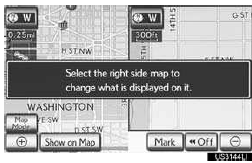
►This message appears when the map is switched to dual map screen mode.
See also:
Driving the vehicle
The following procedures should be observed to ensure safe driving:
Starting the engine
Driving
With the brake pedal depressed,
shift the shift lever to D.
Release the parking brake.
Graduall ...
Maintenance
You are responsible for performance
of the required maintenance indicated
in the Owner’s Manual and this guide.
Lexus will not deny a warranty claim
solely because you do not have
records to ...
Child restraint systems
A child restraint system for a small child or baby must itself be prop-
erly restrained on the seat with the lap portion of the lap/shoulder belt.
The laws of all 50 states of the U.S.A. and Canad ...