Detailed navigation settings
Average cruising speed, displayed screen contents, and POI icon categories can be set.

1. Push the “SETUP” button.
2. Touch “Navi.”.
3. Touch “Detailed Navi. Settings”.
4. Touch the items to be set.
5. Touch “Save”.
SCREENS FOR NAVIGATION SETTINGS

On this screen, the following functions can be performed.
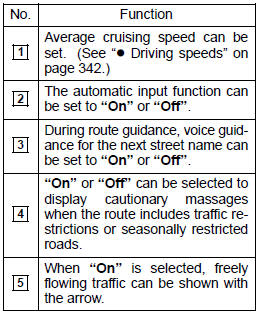
Driving speeds
The speed that is used for the calculation of the estimated travel time and the estimated arrival time can be set.
1. Push the “SETUP” button.
2. Touch “Navi.” on the “Setup” screen.
3. Touch “Detailed Navi. Settings” on the “Navigation Settings” screen.
4. Touch “Driving Speeds”.

5. Touch  or
or
 to set the average vehicle speeds
for “Residential”, “Main Streets”, and “Freeways”.
to set the average vehicle speeds
for “Residential”, “Main Streets”, and “Freeways”.
To set the default speeds, touch “Default”.
6. After setting of the desired speeds is completed, touch “Save”.
INFORMATION
The displayed time to the destination is the approximate driving time that is calculated based on the selected speeds and the actual position along the guidance route.
The time shown on the screen may vary greatly depending on progress along the route, which may be affected by conditions such as traffic jams and construction work.
It is possible to display up to 99 hours 59 minutes.
Auto avoid traffic
The guidance route automatically changes to another route to avoid heavy congestion.
To turn the “Auto Avoid Traffic” on:
1. Push the “SETUP” button.
2. Touch “Navi.” on the “Setup” screen.
3. Touch “Detailed Navi. Settings” on the “Navigation Settings” screen.
4. Touch “On” of the “Auto Avoid Traffic”.
5. Touch “Save”.
When congestion information about the guidance route has been received, a screen will appear to ask you whether to reroute to avoid the congestion.
If you wish to reroute, touch “Yes”. Another route to allow you to avoid the congestion will appear.
If you do not wish to reroute, touch “No”.
INFORMATION
When the “Traffic Information” indicator is dimmed, “Auto Avoid Traffic”, “Traffic Voice Guidance” and “Show Free Flowing Traffic” will not operate.
Show free flowing traffic
Freely flowing traffic is shown with the arrow.
To turn the “Show Free Flowing Traffic” on:
1. Push the “SETUP” button.
2. Touch “Navi.” on the “Setup” screen.
3. Touch “Detailed Navi. Settings” on the “Navigation Settings” screen.
4. Touch “On” of the “Show Free Flowing Traffic”.
5. Touch “Save”.
INFORMATION
When the “Traffic Information” indicator is dimmed, “Auto Avoid Traffic”, “Traffic Voice Guidance” and “Show Free Flowing Traffic” will not operate.
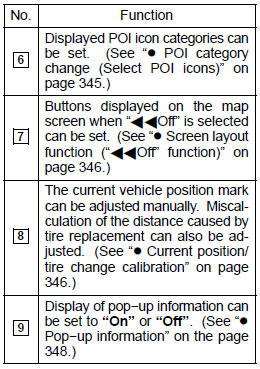
POI category change (Select POI icons)
Select from among the 6 icons displayed on the “Customize POI Icons” screen, so that setting of the icons to be displayed on the map screen can be done easily.
1. Push the “SETUP” button.
2. Touch “Navi.” on the “Setup” screen.
3. Touch “Detailed Navi. Settings” on the “Navigation Settings” screen.
4. Touch “Customize POI Icons”.

5. Touch the category button to be changed.
6. Touch the desired group.
If the desired POI category is not on the screen, touch “List All Categories” to list all POI categories.
7. Touch the desired category.
8. Touch “OK”.
Screen layout function (“ Off” function)
Each screen buttons and current street name on the map screen can be displayed or hidden.
1. Push the “SETUP” button.
2. Touch “Navi.” on the “Setup” screen.
3. Touch “Detailed Navi. Settings” on the “Navigation Settings” screen.
4. Touch ““ Off” Function”.
5. Touch the button to be turned off.
The button becomes dimmed. To set the default, touch “Default”.
6. Touch “Save”.
Current position/tire change calibration
The current vehicle position mark can be adjusted manually. Miscalculation of the distance caused by tire replacement can also be adjusted.
1. Push the “SETUP” button.
2. Touch “Navi.” on the “Setup” screen.
3. Touch “Detailed Navi. Settings” on the “Navigation Settings” screen.
4. Touch “Calibration”.
5. Touch the desired button.
INFORMATION
For additional information on the accuracy of a current vehicle position, see “Limitations of the navigation system” on page 406.
POSITION/DIRECTION CALIBRATION
When driving, the current vehicle position mark will be automatically corrected by GPS signals. If GPS reception is poor due to location, you can manually adjust the current vehicle position mark.
1. Touch “Position / Direction”.
2. Touch the 8 directional button to move the cursor
 to the desired point on the map.
3. Touch “OK”.
4. Touch either the  or
or
 to adjust the direction of the current
vehicle position mark.
to adjust the direction of the current
vehicle position mark.
5. Touch “OK”.
The map will be displayed.
TIRE CHANGE CALIBRATION
The tire change calibration function will be used when replacing the tires. This function will adjust the miscalculation caused by the circumference difference between the old and new tires. If this procedure is not performed when the tires are replaced, the current vehicle position mark may be incorrectly displayed.
To perform a distance calibration procedure, touch “Tire Change” on the “Calibration” screen.
The message appears and the quick distance calibration is automatically started.
A few seconds later, a map will be displayed.
Pop−up information
When the ‚ÄúPop−up information‚Äù is turned on, the pop−up information will be displayed.
1. Push the “SETUP” button.
2. Touch “Navi.” on the “Setup” screen.
3. Touch “Detailed Navi. Settings” on the “Navigation Settings” screen.
4. Touch ‚ÄúPop−up Information‚Äù.
5. Touch “On” or “Off”.
6. Touch “Save”.
When the ‚ÄúPop−up Information‚Äù is turned off, the following messages will not be displayed.
This message appears when the system is in the POI mode and the map scale is over 0.5 miles (800 m).
The message appears when the map is switched to the dual map screen mode.
See also:
Adjusting the position and opening and closing the air outlets
Roof side outlets
1. Direct air flow to the left or right, up or down.
2. Turn the knob fully to the back of the vehicle to close the vent.
- Air conditioning system settings
When the “E ...
Past record
Fuel consumption information from recent resets will be displayed.
1. Push the “INFO/PHONE” button.
2. Touch “Fuel Consumption
If the “Past Record” screen does not appear, touch “Pa ...
Power steering fluid
- Fluid level
The fluid level should be within the appropriate range.
1. Full (when cold)
2. Add fluid (when cold)
3. Full (when hot)
4. Add fluid (when hot)
Hot: The vehicles has been d ...