Floor mat
Use only floor mats designed specifically for vehicles of the same model and model year as your vehicle. Fix them securely in place onto the carpet.
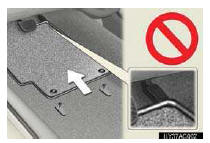
Fix the floor mat in place using the retaining hooks (clips) pro- vided.
The shape of the retaining hooks (clips) and the fixing procedure of the floor mat for your vehicle may differ from those shown in the illustration. For details, refer to the floor mat retention clip installation instructions supplied with the clips.

CAUTION
Observe the following precautions.
Failure to do so may cause the driverŌĆÖs floor mat to slip, possibly interfering with the pedals while driving. An unexpectedly high speed may result or it may become diffi- cult to stop the vehicle, leading to a serious accident.
- When installing the driverŌĆÖs floor mat
ŌĆó Do not use floor mats designed for other models or different model year vehicles, even if they are Lexus Genuine floor mats.
ŌĆó Only use floor mats designed for the driverŌĆÖs seat.
ŌĆó Always install the floor mat securely using the retaining hooks (clips) provided.
ŌĆó Do not use two or more floor mats on top of each other.
ŌĆó Do not place the floor mat bottom-side up or upside-down.
CAUTION
- Before driving
ŌĆó Check that the floor mat is securely fixed in the correct place with all the provided retaining hooks (clips). Be especially care- ful to perform this check after cleaning the floor.
ŌĆó With the engine stopped and the shift lever in P, fully depress each pedal to the floor to make sure it does not interfere with the floor mat.
See also:
Tires and wheels
...
Intuitive parking assist
The distance from your vehicle to nearby obstacles when parallel
parking or maneuvering into a garage is measured by the sensors and
communicated via the multi-information display, touch screen and ...
Other messages
If the following message is displayed, take appropriate action and confirm that
the message has disappeared.
- Warning light display in radar cruise mode (if equipped)
In the following cas ...