Lexus parking assist monitor
The parking assist monitor assists the driver by displaying an image of the view behind the vehicle while backing up, for example while park- ing.
The parking assist monitor assists with the following 2 backing-
up operations:
• Perpendicular parking (parking in a garage, etc.)
• Parallel parking (parking at the side of the road, etc.)
The screen illustrations used in this text are intended as examples,
and may differ from the image that is actually displayed on the
screen.
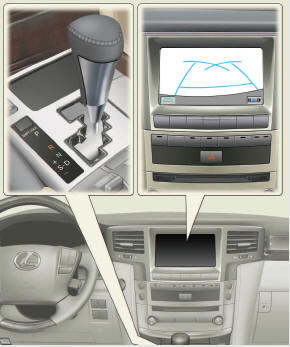
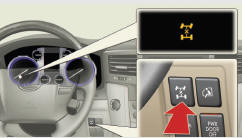
Parking assist monitor will activate when the shift lever is in “R”.
If you move the lever out of “R”, the parking assist moni- tor will be deactivated.
When the shift lever is shifted to the “R” position and any mode button (such as “MAP/VOICE”) is pressed, the parking assist monitor is cancelled, and the screen is switched to the mode of the button that was pressed.
Using the Lexus parking assist monitor
- Screen display
The parking assist monitor screen will be displayed if the shift
lever is shifted to the “R” position while the “ENGINE START
STOP” switch is in IGNITION ON mode.
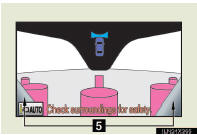
The parking assist monitor displays the last-used parking mode first.
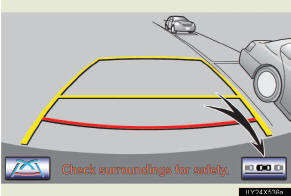
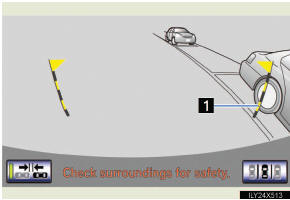
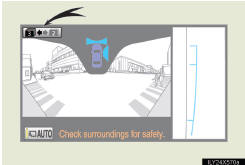
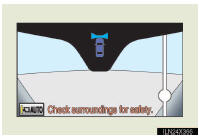
►Perpendicular parking
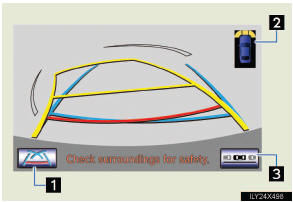
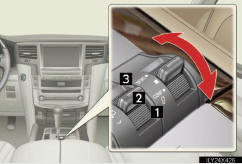
1 Display mode switch screen
button
Switches the display mode.
2 Intuitive parking assist dis-
play
If an obstacle is detected while
the intuitive parking assist is on,
a display is shown in the top
right corner of the screen.
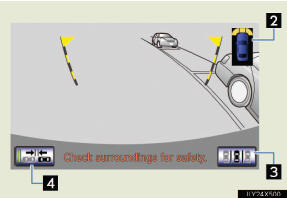
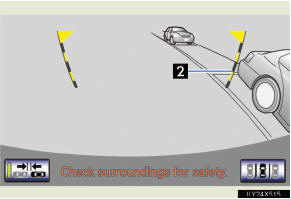
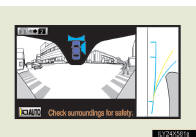
►Parallel parking
3 Parking mode switch screen
button
Switches the parking mode
(between perpendicular parking
and parallel parking assist
screens)
4 Narrow mode screen on-off
button
Switch the narrow mode on and
off.
- Using the system when perpendicular parking
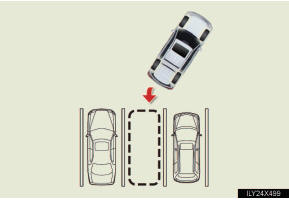
Use any of the following modes when perpendicular parking (for example, when parking in a garage).
Each time you touch the display mode switch screen button, the display mode switches in the following order:
Estimated course line display mode → Parking assist guide line display mode → Course line deletion mode → Estimated course line display mode
►Estimated course line display mode

Estimated course lines are dis- played which move in accor- dance with the operation of the steering wheel.
►Parking assist guide line display mode
The steering wheel return points (parking assist guide lines) are displayed.
►Course line deletion mode

Distance guide lines only are displayed.
- Using the system when parallel parking
Screen display and beep sounds provide an estimation of the point at which you should turn the steering wheel when paral- lel parking. If the position the vehicle is to be parked in is nar- rower than usual, narrow mode can be used.
Each time you touch the narrow mode screen on-off button, the narrow mode and the normal mode are switched.
- Switching the parking mode screen
Each time you touch the parking mode switch screen button, the perpendicular parking mode and parallel parking mode are switched.
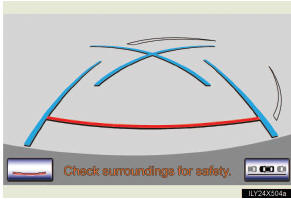
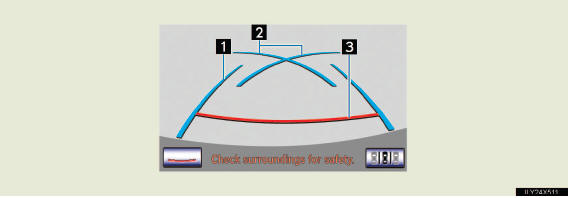
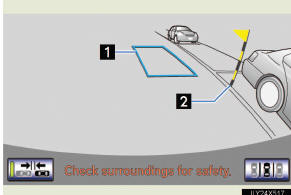
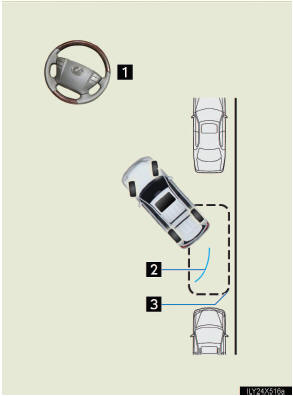
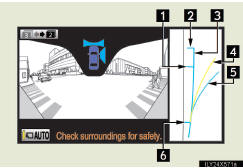
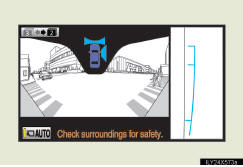
Perpendicular parking (estimated course line display mode)
- Screen description
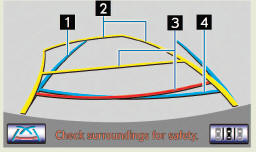
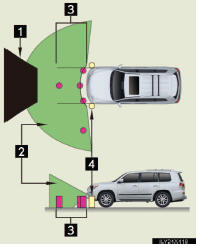
1 Vehicle width extension guide line
The line indicates a guide path when the vehicle is being backed
straight up.
The displayed width is wider than the actual vehicle width.
The line aligns with the estimated course lines when the steering wheel is straight.
2 Estimated course lines
The lines show an estimated course when the steering wheel is turned.
3 Distance guide line
The line moves, together with the estimated course lines, in sync with
the steering wheel. The line shows points approximately 1.5 ft. (0.5 m)
(red) and approximately 3 ft. (1 m) (yellow) from the center of the
edge of the bumper.
4 Distance guide line
The line shows distance behind the vehicle, a point approximately 1.5
ft. (0.5 m) (blue) from the edge of the bumper.
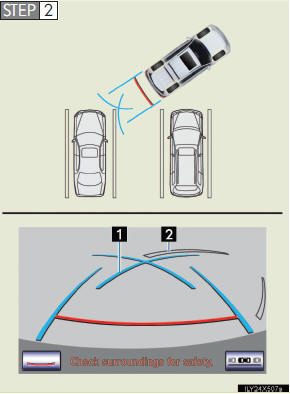
- Parking operation
When parking in a space which is in the reverse direction to the
space described in the procedure below, the steering directions
will be reversed.
 Shift the shift lever to the “R”
position.
Shift the shift lever to the “R”
position.
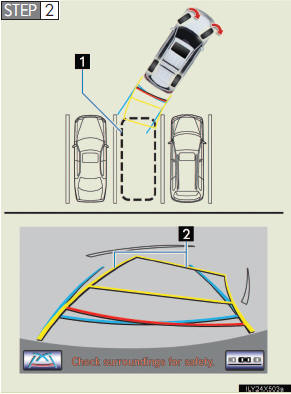 Turn the steering wheel so that
the estimated course lines are
within the parking space, and
back up slowly.
Turn the steering wheel so that
the estimated course lines are
within the parking space, and
back up slowly.
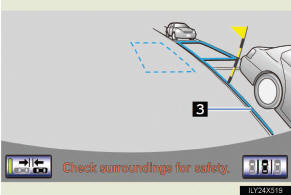
1 Parking space
2 Estimated course lines
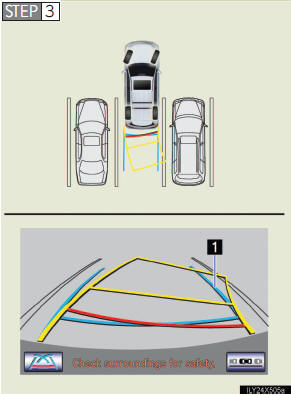
When the rear position of the vehicle has entered the parking space, turn the steering wheel so that the vehicle width exten- sion guide lines are within the left and right dividing lines of the parking space.
1 Vehicle width extension guide line
 Once the vehicle width extension
guide lines and the park-
ing space lines are parallel, straighten the steering wheel
and back up slowly until the vehicle has completely entered
the parking space
Once the vehicle width extension
guide lines and the park-
ing space lines are parallel, straighten the steering wheel
and back up slowly until the vehicle has completely entered
the parking space
 Stop the vehicle in an
appropriate place, and finish parking.
Stop the vehicle in an
appropriate place, and finish parking.
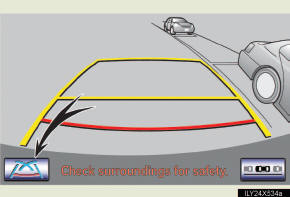
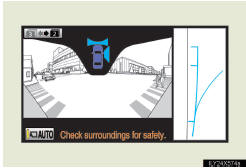
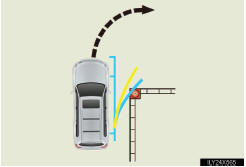
Perpendicular parking (parking assist guide line display mode)
- Screen description
1 Vehicle width extension guide lines
These lines indicate a guide path when the vehicle is being
backed straight up. The displayed width is wider than the actual
vehicle width.
2 Parking assist guide lines
These lines indicate the path of the smallest turn possible behind
the vehicle.
These lines also indicate the approximate position of the steering wheel when parking.
3 Distance guide line
This line indicates points approximately 1.5 ft. (0.5 m) (red)
behind the rear bumper of your vehicle.
- Parking operation
When parking in a space which is in the reverse direction to the
space described in the procedure below, the steering directions
will be reversed.
 Shift the shift lever to the “R”
position.
Shift the shift lever to the “R”
position.
Back up until the parking assist guide line meets the edge of the left-hand dividing line of the parking space.
1 Parking assist guide line
2 Parking space dividing line
 Turn the steering wheel all the
way to the right, and back up
slowly.
Turn the steering wheel all the
way to the right, and back up
slowly.
 Once the vehicle is parallel with
the parking space,
straighten the steering wheel and back up slowly until the
vehicle has completely entered the parking space.
Once the vehicle is parallel with
the parking space,
straighten the steering wheel and back up slowly until the
vehicle has completely entered the parking space.
 Stop the vehicle in an
appropriate place, and finish parking.
Stop the vehicle in an
appropriate place, and finish parking.
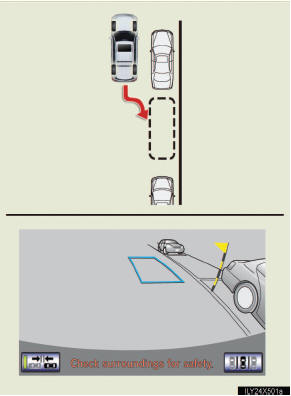
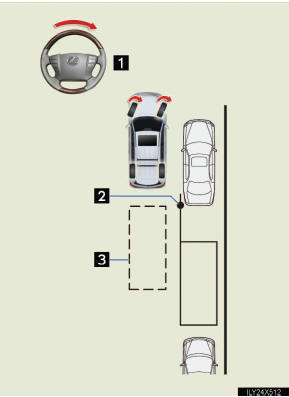
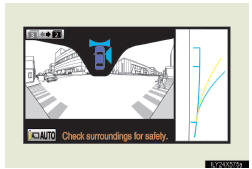
Parallel parking
- Vehicle movement procedure
1 Approx. 3 ft. (1 m)
2 Keeping parallel with the road, stop the vehicle leaving a gap of
approximately 3 ft. (1 m) between your vehicle and the parked
vehicle. ( in “Parking
operation”).
3 Back up until the black and yellow vertical pole just overlaps the
rear end of the parked vehicle. Then stop the vehicle. ( in
“Parking operation”)
in
“Parking operation”)
Leaving the vehicle stopped, move the steering wheel until the blue
outline meets the desired parking space, and back up while keeping
the steering wheel in that position.  in “Parking operation”)
4 A curved blue line is displayed. Keep the steering wheel in the
same position and back up until the curved blue line meets the
right corner of the parking space. ( in “Parking opera-
tion”)
in “Parking opera-
tion”)
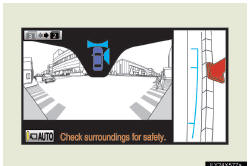
5 When it meets the right corner of the parking space, turn the
steering wheel in the opposite direction as far as it will go.
( in “Parking operation”)
6 Keeping the steering wheel in that position, check your sur-
roundings visually and using mirrors, and back up using the dis-
tance guide lines etc. as a reference. ( in “Parking
operation”)
in “Parking
operation”)
7 When the vehicle is approximately in the desired parking loca-
tion, parallel parking assist is complete. ( in “Parking
operation”)
in “Parking
operation”)
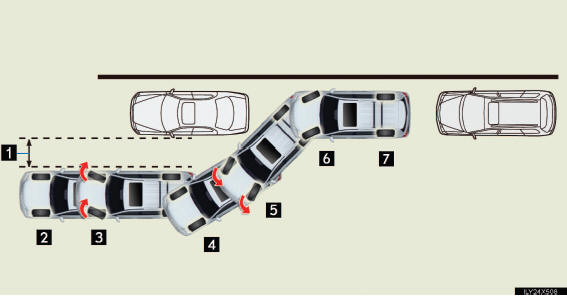
- Parking operation
The following example describes the procedure for pulling into
a parking space on the right. For pulling into a parking space on
the left, substitute left for right and vice versa in all steps.
 Stop the vehicle in the position
as described below, and
straighten the steering wheel.
Stop the vehicle in the position
as described below, and
straighten the steering wheel.
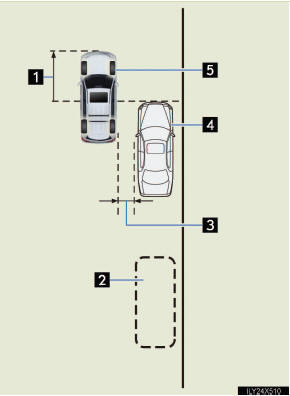
1 Roughly half a vehicle’s
length
2 Desired parking space
3 Approx. 3 ft. (1 m)
4 Parked vehicle
5 Your vehicle
A position in which you are par- allel with the road (or the side of the road), and in which there is approximately 3 ft. (1 m) of space between your vehicle and the parked vehicle A position in which you are half a vehicle’s length ahead of the parked vehicle
 Shift the shift lever to the “R”
position.
Shift the shift lever to the “R”
position.
 Make sure the monitor displays
the part behind the rear tires
of the parked vehicle, and select
Make sure the monitor displays
the part behind the rear tires
of the parked vehicle, and select  .
.
If the area is not displayed, move the vehicle to forward.
 With the steering wheel straight,
back up slowly to a posi-
tion at which the black and yellow vertical pole just over-
laps the rear end of the parked vehicle. Then stop the
vehicle.
With the steering wheel straight,
back up slowly to a posi-
tion at which the black and yellow vertical pole just over-
laps the rear end of the parked vehicle. Then stop the
vehicle.
1 Black and yellow vertical
pole
2 Back the vehicle up to here
 Turn the steering wheel with the
vehicle stopped until the
blue outline meets the desired parking space.
Turn the steering wheel with the
vehicle stopped until the
blue outline meets the desired parking space.
1 Blue outline
2 Black and yellow vertical
pole
3 Extended line
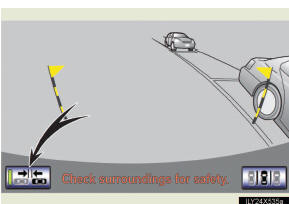
If the extended line from the blue outline is displayed, the parallel parking assist is opera- tional.
1 Turn the steering wheel right
2 Black and yellow vertical
pole
3 Blue outline
Keep the steering wheel in its current position and backing up.
The parallel parking assist will be cancelled if the steering wheel is moved while backing up. Shift the shift lever out of the “R” position, and restart from the procedure “1”.
When backing up, be careful not to hit any obstacles with the right front corner of your vehi- cle. Back the vehicle up slowly.
 A curved blue line will appear on
the screen. Keep the
steering wheel in its current position and back up slowly.
A curved blue line will appear on
the screen. Keep the
steering wheel in its current position and back up slowly.
Stop when the curved blue line meets the corner of the desired parking space.
1 Curved blue line
1 Back up keeping the steering
wheel in its current position
2 Curved blue line
3 Curved blue line meets the
corner here
If you back up too quickly, you may lose synchronization with the parallel parking assist.
 Leaving the vehicle stopped, turn
the steering wheel all the
way to the left.
Leaving the vehicle stopped, turn
the steering wheel all the
way to the left.
Be sure to turn the steering wheel only when the vehicle is stopped.
 When the screen changes, keep the
steering wheel in its
current position and back up.
When the screen changes, keep the
steering wheel in its
current position and back up.
When backing up, be careful not to hit any obstacles with the right front corner of your vehicle. Back the vehicle up slowly.
 When the vehicle is parallel with
the road or the shoulder,
straighten the steering wheel.
When the vehicle is parallel with
the road or the shoulder,
straighten the steering wheel.
Check your surroundings visually and with the mirrors, then back up using the distance guide lines as a reference, and stop.
When the vehicle is approximately in the desired parking loca- tion, the parallel parking assist is complete.
l Parallel parking assist mode information
• There is a possibility that parallel parking guidance may not
be given when backing up at a very slow speed.
• If the back door is opened, the parallel parking assist will be
interrupted by a message being displayed on the screen. Stop
the vehicle, shift the shift lever out of the “R” position, and
restart the operation from the procedure “1”.
l Canceling parallel parking assist
Select  .
.
l Vehicles equipped with intuitive parking assist
If intuitive parking assist detects an object while you attempt to
park in a parking space on the left, the black and yellow vertical
pole could be obscured by intuitive parking assist display. In this
event, turn intuitive parking assist switch off (→P. 245), and
operate the vehicle while checking the safety of the surrounding
area direct visually and with mirror. After the operation, turn the
switch on.
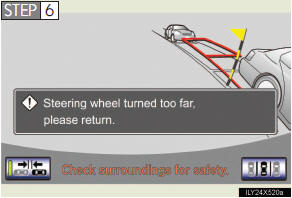
l If the message “Steering wheel turned too far, please return.” is
displayed
The steering wheel has been turned too far, and the system can-
not function. Return the steering wheel to its original position.
If the message is displayed before the outline is positioned over the desired parking space, it is likely that the vehicle is too far away from the shoulder. Check that there is a gap of approxi- mately 3 ft. (1 m) between your vehicle and the parked vehicle.
- Narrow mode
If the position the vehicle is to be parked in is narrower than
usual, narrow mode can be used.
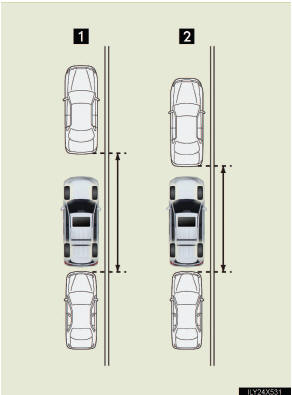
1 Normal mode
2 Narrow mode
The “ENGINE START STOP” switch is turned off when the parking assist monitor is can- celed with narrow mode, the caution screen is displayed first when the parallel parking assist is selected next time.
l Operating narrow mode
 Touch
Touch
 while in parallel parking assist
mode.
while in parallel parking assist
mode.
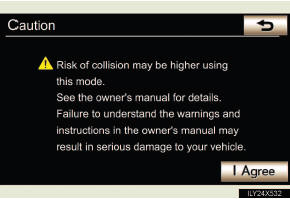
 Confirm the warning on the caution
screen. If you agree,
touch “I Agree”. To cancel narrow mode, touch
Confirm the warning on the caution
screen. If you agree,
touch “I Agree”. To cancel narrow mode, touch
 .
.
 When the system is switched to
narrow mode, the indicator
on will be turned on.
When the system is switched to
narrow mode, the indicator
on will be turned on.

Touch again to switch
the system to the normal mode.
Lexus parking assist monitor precautions
- Area displayed on screen
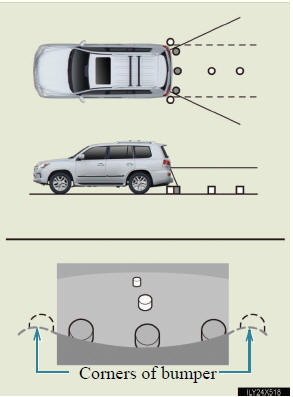
The parking assist monitor dis- plays an image of the view from the bumper of the rear area of the vehicle.
To adjust the image on the parking assist monitor screen.
• The area displayed on the
screen may vary accord-
ing to vehicle orientation
conditions.
• Objects which are close to
either corner of the bumper
or under the bumper can-
not be seen on the screen.
• The camera uses a special
lens. The distance of the
image that appears on the
screen differs from the
actual distance.
• Items which are located
higher than the camera
may not be displayed by
the monitor.
- Lexus parking assist monitor camera
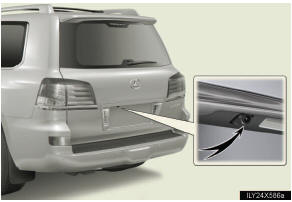
The camera for the parking assist monitor is located above the license plate.
l Using the camera
If the camera lens becomes dirty, it cannot transmit a clear image. If water droplets, snow or mud adhere to the lens, rinse with water and wipe with a soft cloth. If the lens is extremely dirty, wash it with a mild cleanser and rinse.
- Differences between the screen and the actual road
The distance guide lines and the vehicle width extension guide
lines may not actually be parallel with the dividing lines of the
parking space, even when they appear to be so. Be sure to check
visually.
The distances between the vehicle width extension guide lines and the left and right dividing lines of the parking space may not be equal, even when they appear to be so. Be sure to check visu- ally.
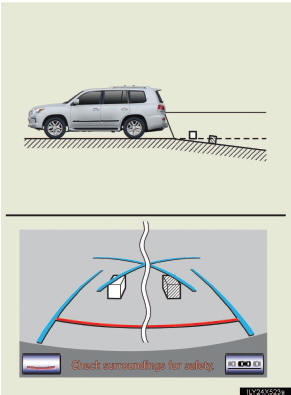
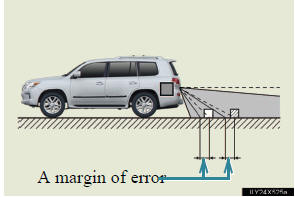
The distance guide lines give a distance guide for flat road sur- faces. In any of the following situations, there is a margin of error between the guide lines on the screen and the actual dis- tance /course on the road.
l When the ground behind the vehicle slopes up sharply

The distance guide lines will appear to be closer to the vehi- cle than the actual distance.
Because of this, objects will appear to be farther away than they actually are. In the same way, there will be a margin of error between the guidelines and the actual distance/course on the road.
l When the ground behind the vehicle slopes down sharply
The distance guide lines will appear to be further from the vehicle than the actual distance.
Because of this, objects will appear to be closer than they actually are. In the same way, there will be a margin of error between the guidelines and the actual distance/course on the road.
l When any part of the vehicle sags
When any part of the vehicle sags due to the number of pas- sengers or the distribution of the load, there is a margin of error between the guide lines on the screen and the actual dis- tance/course on the road.
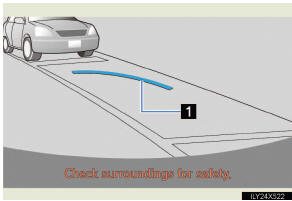
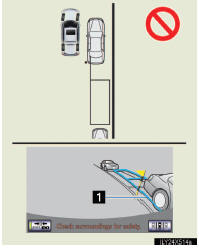
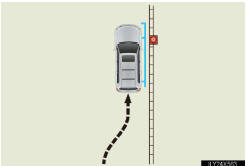
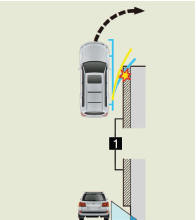
- When approaching three-dimensional objects
The estimated course lines target a flat surfaced objects (such as
the road). It is not possible to determine the position of three-
dimensional objects (such as vehicles) using the estimated
course lines and distance guide lines. When approaching a three-
dimensional object that extends outward (such as the flatbed of a
truck), be careful of the following.
l Estimated course lines
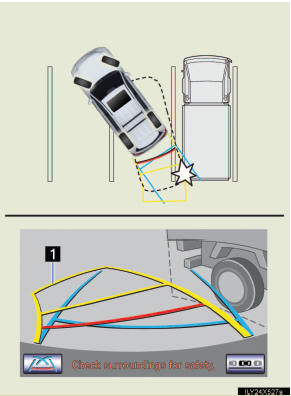
Visually check the surround- ings and the area behind the vehicle. In the case shown in the illustration, the truck appears to be outside of the estimated course lines and the vehicle does not look as if it hits the truck. However, the rear body of the truck may actually cross over the estimated course lines. In reality if you back up as guided by the estimated course lines, the vehicle may hit the truck.
1 Estimated course lines
l Distance guidelines
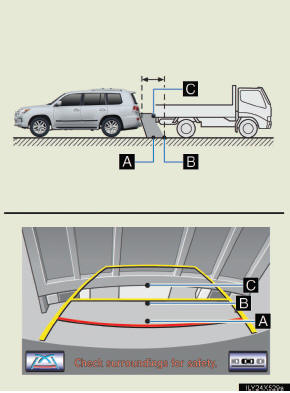
Visually check the surround- ings and the area behind the vehicle. On the screen, it appears that a truck is parking at point B. However, in reality if you back up to point A, you will hit the truck. On the screen, it appears that A is closest and C is furthest away. However, in reality, the distance to A and C is the same, and B is farther than A and C.
Things you should know
- If you think something is wrong
If you notice any of the following symptoms, refer to the likely
cause and the solution, and re-check.
If the symptom is not resolved by the solution, have the vehicle inspected by your Lexus dealer.
- When using the Lexus parking assist monitor system
When backing up, be sure to check visually behind and all around the vehi-
cle before proceeding.
Observe the following precautions to avoid an accident that could result in death or serious injuries.
l The parking assist monitor is a supplemental device intended to assist the driver when backing up. Never depend on the parking assist monitor entirely when backing up. Always make sure your intended path is clear.
Use caution, just as you would when backing up any vehicle.
l Never back up while looking only at the screen.
The image shown on the screen may differ from the actual state, and you could collide with another vehicle or obstacles if backing up looking only at the screen, possibly causing an accident. When backing up, be sure to check in front of and behind the vehicle, both directly and with mirrors.
l Be sure to back up slowly, depressing the brake pedal to control vehicle speed.
l If you seem likely to hit nearby vehicles, obstacles, people or mount the
shoulder, depress the brake pedal to stop the vehicle, then disable the
assist system by touch  on the
screen to cancel the system.
on the
screen to cancel the system.
l The instructions given are only guidelines.
When and how much to turn the steering wheel will vary according to traffic conditions, road surface conditions, vehicle condition, etc. when parking. It is necessary to be fully aware of this before using the parking assist system.
l When parking, be sure to check that the parking space will accommodate your vehicle before maneuvering into it.
l Do not use system in the following cases:
• On icy or slick road surfaces, or in snow
• When using tire chains
• When the back door is not closed completely
• On roads that are not flat or straight, such as curves or slopes.
l In low temperatures, the screen may darken or the image may become faint. The image could distort when the vehicle is moving, or you may become unable to see the image on the screen. Be sure to check direct visually and with mirror all around the vehicle before proceeding.
CAUTION
l If the tire sizes are changed, the position of the guide lines displayed on the screen may change.
l The camera uses a special lens. The distances between objects and pedes-
trians that appear in the image displayed on the screen will differ from the
actual distances. (→P. 286)
- When using the perpendicular parking assist screen
l The position of the guide lines displayed on the screen may change in
accordance with the number of passengers, the amount of cargo etc. Be
sure to check behind and all around the vehicle direct visually and with
mirror before proceeding.
l Estimated course line display mode: If the steering wheel is straight and the vehicle width extension guide lines and the estimated course lines are not in alignment, have the vehicle inspected by your Lexus dealer.
l The vehicle width extension guide lines are wider than the actual width of the vehicle. When backing up, be sure to check behind and all around the vehicle direct visually and with mirror before proceeding.
n When using the parallel parking assist screen l Do not use the system if the display is incorrect due to an uneven (curvy/ hilly) road or a non-straight road.
l Make sure to operate the steering wheel only when the vehicle is stopped.
l Be sure to check that there are no obstacles inside the blue outline.
If there are any obstacles inside the blue outline, do not use the parallel parking assist.
l When positioning the blue outline over the parking space, be sure to posi- tion it so that the extended blue line may not cross the tire of the vehicle parked in front of the empty space.
l If the extended line of the blue outline may be crossing the parked vehicle, your vehicle is too close. Check that there is a gap of approximately 3 ft.
(1 m) between your vehicle and the parked vehicle.
CAUTION
1 Extended line overlapping wheel
NOTICE
- How to use the camera
l The parking assist monitor may not operate properly in the following
cases, or if the precautions described below are not followed.
• If the back of the vehicle is hit, the position and mounting angle of the
camera may change.
• As the camera has a water proof construction, do not detach, disassem-
ble or modify it. This may cause incorrect operation.
• Do not strongly rub the camera lens. If the camera lens is scratched, it
cannot transmit a clear image.
• Do not allow organic solvent, car wax, window cleaner or glass coat to
adhere to the camera. If this happens, wipe it off as soon as possible.
• If the temperature changes rapidly, such as when hot water is poured
on the vehicle in cold weather, the system may not operate normally.
• When washing the vehicle, do not apply intensive bursts of water to
the camera or camera area. Doing so may result in the camera mal-
functioning.
l Do not expose the camera to strong impact as this could cause a malfunc- tion. If this happens, have the vehicle inspected by your Lexus dealer as soon as possible.
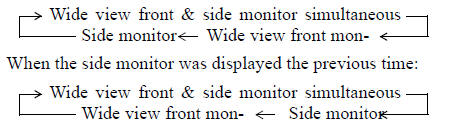
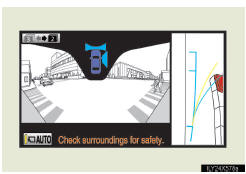
This system can display the wide view front monitor and the side monitor separately or at the same time.
The wide view front monitor uses a super-wide angle lens to display on screen the areas to the left and right of the vehicle and the blind spots to the front of the vehicle. This system helps the driver check for approaching cars, bicycles and pedestrians when at intersections with poor visibility.
The side monitor uses a camera installed in the passenger’s side out- side rear view mirror to display on screen the area to the front-right of the vehicle, helping the driver check this area.
On/off
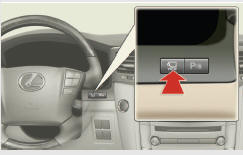
The simultaneous display screen is displayed when the VIEW switch is pressed.
Display
- Wide view front & side monitor simultaneous display
Both the wide view front monitor and the side monitor are dis-
played on one screen. When switching to the wide view front &
side monitors this screen is displayed first, regardless of the
screen mode.

1 Wide view front monitor
2 Side monitor
- Wide view front monitor
The image from the front camera is displayed. Use this monitor
to help check the area in front of the vehicle for safety, for exam-
ple in intersections with poor visibility.
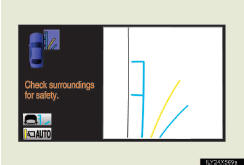
- Side monitor
The image from the side camera is displayed. Use this monitor
to help check the area to the right of the vehicle, for example
when taking off and stopping, when turning right, etc. If dis-
played, the course line can be used as rough guide for steering
wheel operation when turning right.
- Changing the screen mode
This system has a 2 screen mode and a 3 screen mode.
2 screen mode: Only the wide view front & side monitor simulta- neous display can be used.
3 screen mode: The wide view front & side monitor simultaneous display or the individual display can be used. The display can be switched between the simultaneous display and the individual dis- play by operating the VIEW switch.
The screen mode is changed
from the wide view front & side
monitor simultaneous display
screen. The screen mode will
change as the  or
or
 buttons are touched.
If the screen is changed to the wide view front & side monitor simultaneous display screen while the Lexus parking assist monitor is displayed, it is not possible to switch to the 3 screen mode. (The switch is not displayed.)
- Changing the display in 3 screen mode
When in 3 screen mode, you can change the display from the
simultaneous display to each individual display.
The screen changes as follows with each press of the VIEW switch.
When the wide view front monitor was displayed the previous time:
The wide view front monitor and side monitor individual displays are not accessible when the shift lever is in “R”.
- Automatic display mode
You can set the automatic display mode, which automatically
changes the display.
Touch “AUTO”.
When automatic display mode is on, you can have the system display automatically in the following situations: l When the shift lever is in “N”, “D” or “S”.
l When the shift lever is in a position other than “R”, and the vehicle speed is approximately 6 mph (10 km/h) or less.
“AUTO” will not be displayed when the shift lever is in “R”.
Using the side monitor
►Simultaneous display
►Individual display
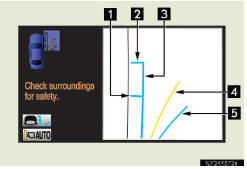
1 Front wheel contact point
Shows the position of the vehi-
cle’s front tire.
2 Vehicle front edge line
Shows the position of the vehi-
cle’s leading edge.
3 Vehicle width line (blue)
Indicates the width of the vehi-
cle including the outside rear
view mirror.
4 Projected course line (yel-
low)
Displays a rough guide of the
vehicle path that moves accord-
ing to the steering wheel posi-
tion. Displayed along with the
minimum projected turning cir-
cle.
5 Minimum projected turning
circle (blue)
Displays the smallest turning
circle projected by the system if
the steering wheel is turned to
full lock. Displayed when the
steering wheel is turned to the
right (further than 90° from
straight ahead).
6 Rear wheel contact point
Shows the position of the vehi-
cle’s rear tire.
When in individual display mode, the right front view will be expanded and displayed.
- Changing the course line display mode
►No course lines mode
Vehicle width line is displayed.
►Minimum projected turning circle display mode
The minimum projected turning circle line is added to the no course lines mode.
►Turning course line display mode
The projected course line is added to the minimum pro- jected turning circle mode.
 Change to the side monitor
individual display.
Change to the side monitor
individual display.

Touch  .
.
The course line display mode will change as follows each time the switch is touched.

The selected mode will also be displayed on the wide view front & side monitor simultaneous display screen.
- Using the vehicle width line & course line
►Vehicle width line
Use the vehicle width line to check the vehicle’s distance from objects such as curbstones etc. As shown in the illustra- tion, be sure that the vehicle width line does not overlap the object. If you also move the vehicle so that the vehicle width line and the object are parallel, you can park parallel to the object
►Minimum projected turning circle & projected course line
Use the minimum projected turning circle & projected course line (when displayed) to check the vehicle’s path with relation to obstacles. If the min- imum projected turning circle line (blue) is over the obstacle as shown in the illustration, or the obstacle falls within the minimum projected turning cir- cle, if you turn with the mini- mum possible turning circle, the vehicle may collide with the object. When the projected course line (yellow) is dis- played, be sure to operate the steering wheel so that the obsta- cle stays outside the projected course line until the vehicle has passed the object.
If the battery is disconnected
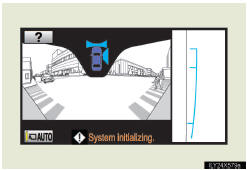
If the battery is disconnected and connected again, the mes- sage “System initializing” will be displayed on the screen. The help screen appears when “?” is touched. Make a correction using the following method in accordance with the display.
Carry out one of the following.
• When the vehicle is stopped,
turn the steering wheel all the
way to the left, then all the
way to the right.
• Drive for at least 5 minutes
on a road with as few turns
and curves and as little heavy
traffic as possible.
When the screen returns to the original display, correction is complete.
If the above screen remains, have the vehicle inspected at your Lexus dealer.
- The wide view front & side monitor can be operated when
l The “ENGINE START STOP” switch is in IGNITION ON mode.
l The vehicle speed is less than approximately 6 mph (10 km/h).
- Automatic system cancelation
In the following situations, the system is canceled automatically.
l When the vehicle speed exceeds approximately 7 mph (12 km/h).
l When the shift lever is in “R”.
- When the outside rear view mirrors have been folded
The side monitor screen can be displayed even if the outside rear view mir-
rors have been folded. In this case, there will be a slight difference between
the image displayed when the outside rear view mirrors are extended and
when the outside rear view mirrors have been folded.
If the side monitor is displayed while the outside rear view mirrors are folded, you cannot check the area near the front edge of the vehicle as the base of the outside rear view mirrors will be in the way.
n When switched to from the Lexus parking assist monitor

If the wide view front & side monitor is switched to from the Lexus parking assist monitor, the icon display area will flash to inform the driver that the currently dis- played area is the front or side. The icon display area will continue to flash until the screen is turned off.
- Displayed area
►Front camera
1 Masking
This section is masked to prevent the
driver from moving the vehicle while
watching only the wide view front
monitor screen. The driver must visu-
ally confirm this area directly.
2 Camera’s field of view
3 Objects visible to the camera
4 Objects not visible to the camera
5 Parts of the vehicle (bumper, grill,
etc.)
►Side camera
1 Camera’s field of view
2 Objects visible to the camera
3 Right side of vehicle
The area covered by the camera is limited. Objects which are close to either corner of the bumper or under the bumper cannot be seen on the screen.
The area displayed on the screen may vary according to vehicle orientation or road conditions.
- Wide view front & side monitor cameras
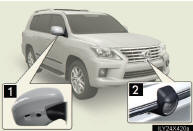
1 Side camera
2 Front camera
In the following cases, it may be difficult to see the images on the screen, even when the system is functioning correctly.
• In the dark (e.g. at night).
• If the temperature near the lens is extremely high or low.
• If water droplets get on the camera, or when humidity is high (e.g. when
it rains).
• If foreign matter (e.g. snow or mud) get on the camera lens.
• If the sun or headlights are shining directly into the camera lens.
• If the camera lens is damaged by flying stones.
- Smear effect
If a bright light (for example, sunlight reflected off the vehicle body) is picked up by the camera, a smear effect* pecu- liar to the camera may occur.
*: Smear effect – A phenomenon that occurs when a bright light (for exam- ple, sunlight reflected off the vehicle body) is picked up by the camera; when transmitted by the camera, the light source appears to have a vertical streak above and below it. The vertical streak also appears in the masked
- Flicker effect
When the camera is used under fluorescent lights, sodium lights, or mercury
lights etc., the lights and the illuminated areas may appear to flicker.
CAUTION
- When using the wide view front & side monitor system
Observe the following precautions to avoid an accident that could result in
death or serious injuries.
l Never depend solely on the monitor system.
l Always check visually to confirm your intended path is clear.
l Depicted distances between objects and flat surfaces differ from actual
distances.
l Do not use the system if the hood or the front passenger’s door is not com-
pletely closed.
CAUTION
- Conditions which may affect the wide view front & side monitor system
l If the front of the vehicle or the passenger side outside rear view mirror is
hit, the camera’s position and mounting angle may change. Contact your
Lexus dealer.
l Rapid temperature changes, such as when hot water is poured on the vehi-
cle in cold weather, may cause the system to function abnormally.
l If the camera lens is dirty, it cannot transmit a clear image. Rinse with
water and wipe with a soft cloth. If extremely dirty, wash with a mild
cleanser and rinse.
l The displayed image may be darker and moving images may be slightly
distorted when the system is cold.
l Situations unsuitable for wide view front & side monitor
• On icy or slick road surfaces, or in snow.
• When using tire chains or emergency tires.
• On roads that are not flat or straight, such as curves or slopes.
l If the tires are changed, the position of the guide lines displayed on the screen may be incorrect. When changing the tires, consult your Lexus dealer.
l Depending on th
e circumstances of the vehicle (number of passengers,
amount of luggage, etc.), the position of the guide lines displayed on the
screen may change. Be sure to check visually behind and all around the
vehicle before proceeding.
l When washing the vehicle, do not apply intensive bursts of water to the
camera or camera area. Doing so may result in the camera malfunctioning.
NOTICE
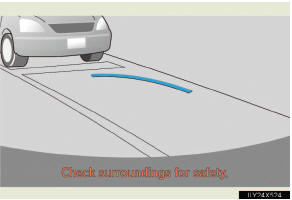
- When a solid object is close by
The screen’s guide lines are designed for level surfaces (road surface etc.) or flat walls etc. When driving near the obstacle, the obstacle may be displayed as outside the projected course line, and it may seem that there is no danger of a colli- sion, however any sections protruding from the wall may project over the course line and the vehicle may actually collide with the obstacle.
In cases such as this were the projected course line passes close to obstacles, always visually check the surroundings for safety.
1 Protruding section of wall
2 Wall displayed on screen
- When using the wide view front & side monitor
Even if an obstacle is no longer visible on the side monitor, do not turn the
steering wheel further in the direction the vehicle is turning until the vehicle
has moved completely past the obstacle. If the steering wheel is turned to
full lock, the vehicle will turn in the smallest possible turning circle, and
may collide with the obstacle.
The 4-Wheel AHC adjusts the vehicle height in accordance with driv- ing conditions. There are 3 selectable modes, “HI” (high), “N” (nor- mal), and “LO” (low).
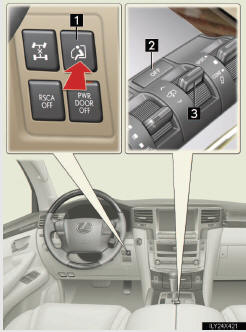
1 Easy access mode switch
2 Height control OFF switch
3 Height select switch
Selecting vehicle height
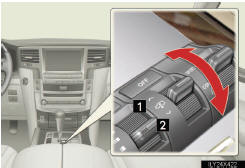
1 Higher
2 Lower
Display
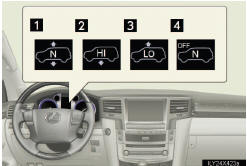
1 Current mode
The vehicle is in the “N” (nor-
mal) height mode in the illustra-
tion.  and
and
 show
directions in which it is possible
to adjust the vehicle height.
show
directions in which it is possible
to adjust the vehicle height.
2 Height up
3 Height down
4 Height control “OFF” indica-
tor
When the height control “OFF” indicator is displayed, the vehi- cle height will not change even if the height select switch is operated.
Vehicle height modes
Push the height select switch to ‚Äú∧‚Äù to step up one height mode,
and pull to ‚Äú∨‚Äù to step down one height mode. (Ex. When in the
low height mode, push to ‚Äú∧‚Äù once to switch to the normal height
mode, and twice to switch to the high height mode.)
- “HI” (high) height mode
Vehicle height is about 2.0 in. (50 mm) higher at the front, and
about 2.4 in. (60 mm) higher at the rear than the normal mode
height.
This mode is suitable when driving on bumpy roads or through water.
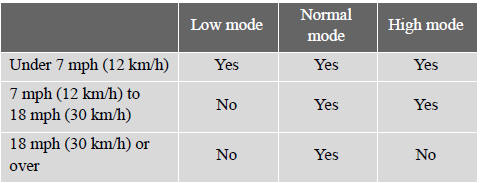
High height mode is only available when the vehicle speed is under 18 mph (30 km/h).
- “N” (normal) height mode
The standard vehicle height. This mode is suitable for ordinary
driving.
When driving at high speeds, the vehicle height is automatically lowered by 0.8 in. (20 mm) in the front and 0.6 in. (15 mm) in the rear, to ensure excellent aerodynamic characteristics and sta- bility.
If the vehicle speed drops, normal height mode is automatically resumed.
- “LO” (low) height mode
Vehicle height is about 2.4 in. (60 mm) lower at the front, and
about 1.6 in. (40 mm) lower at the rear than the normal mode
height.
This mode allows easy access to the vehicle.
Low height mode is only available when the vehicle is travelling at 7 mph (12 km/h) or less. When the vehicle speed exceeds 7 mph (12 km/h), normal height mode is automatically selected.
Conditions for changing the vehicle height mode
Some modes may not be selectable depending on the vehicle speed when the four-wheel drive control switch is in the “H4” position.
Refer to the following table.
Easy access mode
You can select this mode for easy access and easy loading of the vehicle.
If the “ENGINE START STOP” switch is turned to OFF within 30 sec- onds after the vehicle stops while this mode is on, the vehicle height is lowered automatically.
When the vehicle begins to lower a beep will sound twice, and while the vehicle is lowering the indicator light will flash to alert the driver and surrounding people that the vehicle is lowering.
The indicator light stops blinking, and comes on continuously to indicate that the shift is completed.
Easy access mode is available if the following conditions have been met:
l The vehicle height mode is in normal mode.
l The vehicle is stopped on a flat surface.
l The shift lever is in “P”.
l The side door and the back door are not opened from the vehicle
stopped to the “ENGINE START STOP” switch is turned to off.
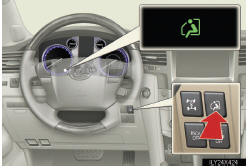
The following method will cancel the vehicle lowering operation and raise the vehicle again: l Press the height control OFF switch.
l Push the height select switch to ‚Äú∧‚Äù.
Disabling the height control
When the height control OFF switch is pressed with the vehi- cle stopped.
The “OFF” indicator will appear on the multi-informa- tion display, and the vehicle height will be fixed in the cur- rent mode. Push the switch again to turn the system back on.
n Operating conditions
l The engine must be running.
l Vehicle height control must be turned off.
l All side doors and the back door must be closed.
- Switching vehicle height mode while the engine is stopped
l If the engine is stopped while the vehicle height is being lowered, lower-
ing will continue.
l If any luggage is removed from the vehicle or if any occupants leave the
vehicle within approximately 30 seconds of the “ENGINE START
STOP” switch being turned OFF, the vehicle height may be lowered by
the auto leveling function.
l Operating the height select switch will have no effect while the engine is
stopped.
- Automatic change in vehicle height when the four-wheel drive control
switch is in the “L4” position
If the vehicle speed exceeds 2 mph (3 km/h) while driving on an uneven
road with the four-wheel drive control switch in the “L4” position, high
mode is automatically selected. (On even roads, the height mode will not
change.)
- Automatic change in vehicle height when in the high mode
l If the vehicle speed exceeds 18 mph (30 km/h) with the four-wheel drive
control switch in the “H4” position, normal mode is automatically
selected.
l If the vehicle speed exceeds 25 mph (40 km/h) with the four-wheel drive
control switch in the “L4” position, the vehicle height is lowered to 1.0
in. (25 mm) higher than the normal mode height. If the vehicle speed
drops to 12 mph (20 km/h) or less, high mode is automatically resumed.
- Extra high mode
If the vehicle becomes stuck or the Crawl Control system requests the vehi-
cle height be raised, extra high mode may be automatically selected when
the vehicle height is in high mode with the four-wheel drive control switch
in the “L4” position.
The vehicle height is raised to 0.8 in. (20 mm) higher than the high mode height, or slightly higher.
l Extra high mode will change back to high mode when:
• The vehicle speed exceeds 6 mph (10 km/h)
• The four-wheel drive control switch is shifted to “H4”.
l If you pull the height select switch to ‚Äú∨‚Äù when in extra high mode, nor-
mal mode is selected.
l Extra high mode cannot be manually selected.
- Turning off the height control
l The system will remain off until the height control OFF switch is pushed
again, even if the “ENGINE START STOP” switch is turned off.
l Even if the system is turned off, the system automatically modulated if
the vehicle speed exceeds following.
• 18 mph (30 km/h) with high or low mode
• 50 mph (80 km/h) with normal mode
- Automatic leveling function
The vehicle is adjusted to a fixed height for each mode, regardless of the
number of occupants and the luggage load.
l However the vehicle cannot be raised if the vehicle load exceeds the fol-
lowing limits:
• Up to 4 occupants* plus approximately 661 lb. (300 kg) in the normal
mode
• Up to 4 occupants* plus approximately 441 lb. (200 kg) in the high
mode
*: average weight 150 lb. (68 kg) per person
l If the vehicle height cannot be raised when in the normal mode, and
“LO” appears on the display, the vehicle is loaded too heavily. Take extra
care when driving in this condition.
If the vehicle height cannot be raised even after unloading the vehicle, pull the height select switch to ‚Äú∨‚Äù then push to ‚Äú∧‚Äù. If the vehicle height still cannot be raised, turn the ignition off then on again, then try once more.
- When the vehicle is stopped during driving
The activation of the automatic leveling function may cause the vehicle
height to change. This is not a malfunction.
- If the vehicle height does not change
If the vehicle is loaded too heavily, or the undercarriage has come into con-
tact with the road surface, the vehicle height cannot be raised/lowered.
- In the following cases the 4-Wheel AHC will not operate
l The brake pedal has been depressed for a few seconds or longer while
the vehicle is stopped.
l Vehicle height control has not been frequently used.
l The suspension fluid temperature is lower than -22°F (-30°C).
l There is ice on the suspension.
l Driving on bumpy roads which may cause the suspension to fully elon-
gate.
l If the steering wheel is abruptly turned more than 3/4 of a revolution
with the center differential lock system activated.
- Cold weather operation
It may take longer for the vehicle height to change if the suspension fluid
temperature drops below 5°F (-15°C).
The 4-Wheel AHC does not operate when the suspension fluid temperature drops below -22°F (-30°C).
l In this case, even if the height select switch is pressed, the vehicle height
will not change. Once the vehicle has been driven for a short time and
the suspension fluid has been warmed to within normal operating limits,
the 4-Wheel AHC will begin operating and the vehicle height will auto-
matically change to the selected mode.
l When the suspension fluid is around -22°F (-30°C), the vehicle height
may not be able to be raised, even if the 4-Wheel AHC is operating. In
this case, pull the height select switch to ‚Äú∨‚Äù then push to ‚Äú∧‚Äù after driv-
ing for a short time longer to select the desired vehicle height.
- Parking and stopping tips
l If you immediately stop the engine after off-road driving, the vehicle
height may gradually lower. When parking, make sure there is nothing
under the vehicle that may come in contact with the underbody. The
vehicle will return to the set height when the engine is started.
l The vehicle height may change as the temperature changes when the
engine is stopped. The vehicle will return to the set height when the
engine is started.
- Propeller shaft noise
If the vehicle height is adjusted on a slope, or with the shift lever in a posi-
tion other than “P” or “N” while the vehicle is stopped, you may hear a
sound caused by the expansion and contraction of the propeller shaft. This
does not indicate a malfunction.
- 4-Wheel AHC failure warning
If a malfunction occurs in the 4-Wheel AHC, normal mode is automatically
selected. However, the system may not switch to normal mode depending
on the location of the malfunction.
The warning message is displayed on the multi-information display, and the 4-Wheel AHC cannot be activated until the malfunction is corrected.
Stop the engine and start it again. If the warning message turns off, the sys- tem is operating correctly. If the warning message continues to be displayed, have the vehicle checked at your Lexus dealer as soon as possible.
CAUTION
- When switching the vehicle height mode
Before lowering the vehicle height, check that there are no people under or
around the vehicle, and check for obstacles.
If you do not do this, body parts may be caught in the vehicle, possibly lead- ing to an accident.
- Using the high mode
The high mode should only be used when driving on rough roads, for exam-
ple when driving off-road. Because the vehicle’s center of gravity will
become higher when in the mode, the vehicle may become unstable when
turning abruptly, resulting in an accident.
- When jacking up the vehicle or installing tire chains
Turn off the height control and stop the engine, otherwise the vehicle height
may change due to the automatic leveling function and you may catch part
of your body in the vehicle, resulting in an accident.
- When crossing rivers
Select the high mode and turn off the height control. Drive at 18 mph (30
km/h) or lower. Otherwise the vehicle height may change due to the auto-
matic leveling function, resulting in an accident.
- If your vehicle must be towed
Put the vehicle height in the normal mode and turn off the height control,
otherwise the vehicle height may change due to the automatic leveling func-
tion and you may catch part of your body in the vehicle, resulting in an acci-
dent.
- If your vehicle becomes stuck in a ditch
Turn off the height control, otherwise the vehicle height may change due to
the automatic leveling function, resulting in an accident.
- When loading cargo on the roof luggage carrier
Do not switch to high mode. Sudden steering could cause the vehicle to lose
stability due to the vehicle’s higher center of gravity, possibly leading to an
accident.
NOTICE
- When parking in areas with limited overhead height
After leaving the vehicle or unloading the luggage, the vehicle height may
be slightly higher than normal. Take care when overhead height is limited.
- To avoid damage to the vehicle
l Normal mode will be switched to automatically even if the vehicle is
started off in low mode. Take care when overhead height is limited.
l Do not select the low mode when driving on bumpy roads, as the under-
body of the vehicle may contact the road surface.
l When traveling on bumpy roads or through water, or when towing, turn
off easy access mode.
- Avoid rapid changes to the vehicle height
As the pump may overheat. Leave at a few seconds between selections
when changing the vehicle height mode.
AVS controls the suspension according to the road and driving condi- tions. Selecting an optimum driving mode assists good riding comfort and stability.
1 For driving on a bumpy
road
2 For ordinary driving such
as in the city traffic
3 For sporty type driving
such as on winding moun-
tain roads and high speed
driving
- Driving mode
l Mode 2 is suitable for ordinary driving.
l Mode 3 is suitable for heavy load or driving on a unpaved road.
l With the four-wheel drive control switch at “L4”, the damping effect
suitable for off-road driving will be provided.
Use the four-wheel drive control switch and center differential lock/ unlock switch to select the following transfer and center differential modes.
- Four-wheel drive control switch
1 “H4” (high speed position)
Normal driving on all types
of roads.
2 “L4” (low speed position)
Driving requiring maximum
power and traction such as
climbing or descending steep
hills, off-road driving, and
hard pulling in sand or mud,
etc.
- Center differential lock/unlock switch
Lock the center differential when your vehicle’s wheels get stuck in a ditch or when driving on a slippery or bumpy surface.
Shifting between “H4” and “L4”
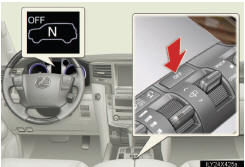
- Shifting from “H4” to “L4”
 Stop the vehicle completely.
 Shift the shift lever to “N”.
 Push and shift the four-wheel drive
control switch to “L4”.
Push and shift the four-wheel drive
control switch to “L4”.
Maintain this condition until the low speed four-wheel drive indicator light turns on.
- Shifting from “L4” to “H4”
Stop the vehicle completely.
 Shift the shift lever to “N”.
 Shift the four-wheel drive control
switch to “H4”.
Shift the four-wheel drive control
switch to “H4”.
Maintain this condition until the low speed four-wheel drive indicator light turns off.
- The four-wheel drive control switch can be operated when
l The “ENGINE START STOP” switch is in IGNITION ON mode.
l The shift lever is in the “N” position.
l The vehicle is stopped completely.
- The low speed four-wheel drive indicator light
The indicator light blinks while shifting between “H4” and “L4”.
- Advice for driving on slippery roads
l If you shift the four-wheel drive control switch to “L4” and the shift
lever to the “2” range of “S” while driving in steep off-road areas, the
output of the brake can be controlled effectively by the Active TRAC,
which assists the driver to control the driving power of 4 wheels.
l Use the “1” range of “S” of the shift lever for maximum power and trac-
tion when your wheels get stuck or when driving down a steep incline.
- The center differential lock indicator light
The indicator light blinks while locking/unlocking the center differential.
- The center differential lock/unlock button can be operated when
l The “ENGINE START STOP” switch is in IGNITION
See also:
Checking and replacing fuses
If any of the electrical components do not operate, a fuse may have
blown. If this happens, check and replace the fuses as necessary.
Turn the “ENGINE START STOP”
switch OFF.
The fuses are lo ...
Four-wheel Drive System
Use these switches to select following transfer and center differential
modes.
►Four-wheel drive control switch
To select “L4” mode, push down and shift the
switch backward. To select ...
Automatic Transmission
■Shift positions
P Park*
R Reverse
N Neutral (drive not engaged)
D Drive
S “S” mode
*: The engine can only be started in “P”.
The vehicle can only be shifted
out of “P”
...